
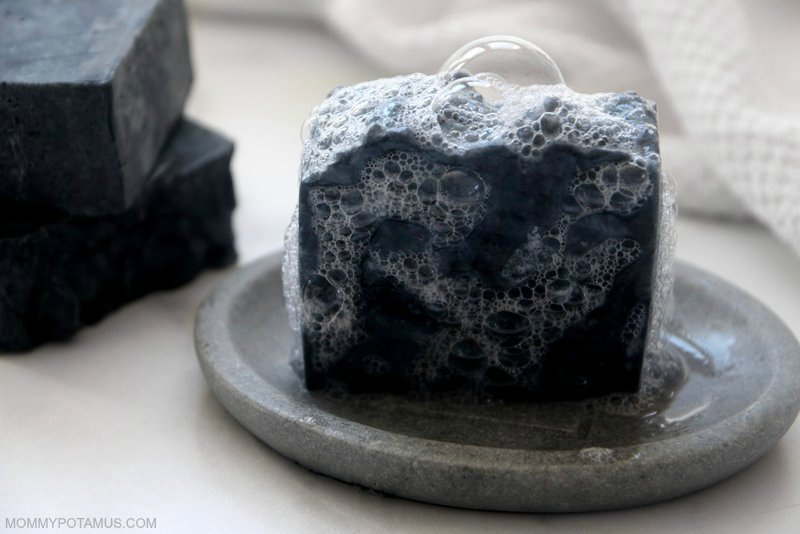
Activated charcoal is well-known for its ability to draw out impurities and support detox, which is why I incorporate it into face masks and lots of other ways, too. I’ve got to admit, though, that when I first picked up a bar of Toups & Co. Activated Charcoal Soap I wondered how much benefit activated charcoal could really have in a wash-off product.
When I realized I was clinging to the last little nub of soap instead of replacing it with a fresh, plain bar, I knew I had my answer.
Activated charcoal soap is a favorite with people who want clear, fresh looking skin. Many users also report that as it draws excess oil and grime from pores it also reduces the appearance of pore size.
It doesn’t actually shrink pores, but by drawing out dirt and gunk it makes them less pronounced. (Occasional exfoliation helps, too.)
The Toups & Co. bar is made with coconut oil and tallow, making it deeply cleansing and nourishing. I love it and treat myself to it when I’m placing an order for something else (I love their makeup), but I’m mostly a DIY girl so I decided to figure out how to make my own.
Infused with nourishing oils like olive and castor, this bar creates a big, bubbly, creamy lather that balances and moisturizes without leaving skin oily.
Before we dive into the step-by-step photo tutorial, let’s take a look at the ingredients and why each one was chosen for this recipe:
Coconut Oil ^
With deeply cleansing properties and the ability to create a big, bubbly lather, coconut oil is a foundational ingredient in most handmade soap recipes. Because it’s such a powerful cleanser, it can be drying if it makes up a large percentage of the soap.
There are ways around it and pure coconut oil soap is actually my most popular soap recipe on the site, but because some people with acne-prone skin react to soaps with large amounts of coconut oil, I kept it low in this recipe and incorporated other skin calming, balancing, and nourishing oils.
Olive Oil ^
Gentle and nourishing, this is a great oil for all skin types that adds creaminess to the lather. On its own it tends to make a soft soap unless you cure it for very long time, so it’s best when paired with harder oils and fats. Which leads me to . . .
Tallow ^
If you’ve seen my tallow skin balm recipe, you know I’m a huge fan of what it does for skin. It’s fatty acid composition is uniquely compatible with our skin’s biology, and in soap it has some additional benefits as well:
- It makes a long-lasting, bubbly bar
- It’s a good alternative to palm oil, which is used in many charcoal soap recipes
Although I do use sustainably harvested palm oil in my kitchen, I use it sparingly due to sustainability concerns. If there is a good substitute for palm oil in a recipe I will use it, which is what I’ve done here. Shea butter or cocoa butter can also be used, but they’re more expensive so I use tallow most of the time.
One note: Soap made with tallow does often have mild fatty scent, which doesn’t bother most people. However, it is possible to render and filter tallow so that it is virtually odorless.
Castor Oil ^
Often used in bubble baths to create big bubbles, castor oil is a moisturizing oil that absorbs quickly and is great for sensitive skin, acne-prone skin, and mature skin. It’s often one of the main oils using in oil cleansing for clear skin.
Activated Charcoal ^
Charcoal is “activated” through a high temperature steam process that increases its surface area, which increases its ability to absorb and filter. It’s kind of like magnet that binds strongly to the surface of certain substances, grabbing onto them so they can’t get away.
Many people who use it in skincare report clear skin and a reduction in pore size appearance.
Salt ^
Pure salt without any other ingredients (including other minerals) helps to harden the soap, which would otherwise be on the softer side because of the activated charcoal.
Tea Tree Essential Oil (Optional) ^
Although it’s totally optional, I like to add tea tree oil for its astringent properties and also because it makes the tallow scent less noticeable. (I don’t usually filter my tallow to make it mostly odorless, although as I mentioned above it’s certainly possible.)
Lye ^
“Can I make this soap without lye?” is one of the most common questions I receive about my soap recipes. I cover this more in my article on soapmaking myths, but the short answer is no.
ALL bar soap is made with lye, because it’s what converts fats and oils into soap. Some soap kits come with melt-and-pour soap that has already undergone the saponification process and is ready to be customized with essential oils, clays, or exfoliating ingredients like shredded loofah, coffee grounds, or even broccoli seeds.
They’re fine to use, but it would be inaccurate to say those soaps were made without lye. The lye was just added before the kit was sold.
Water ^
Minerals (which are usually good) and contaminants (which are usually not) that are found in undistilled water can cause unwanted reactions in soap, so I always use and recommend distilled water in my recipes.
As an example, water rich in calcium and magnesium will make the soap less bubbly in terms of lather, and others can cause oxidation or excess soap scum.
A Note On Safety ^
As you’ll see in the instructions below, I am a huge proponent of taking appropriate safety precautions like wearing protective clothing, using appropriate containers when working with lye, and keeping kids and pets away from my lye water and soap as it cooks. In all my years of making soap I have never experienced a lye burn, and I think that’s probably because I strictly follow safety recommendations.
That said, you are the only one who has the ability to ensure safety in your kitchen, so if you’re new to making soap here’s a guide that covers the basics of lye safety.
DIY Activated Charcoal Soap Recipe ^
Ingredients
- 10 oz. coconut oil (33%)
- 10.5 oz. olive oil (35%)
- 8 oz. tallow (27%)
- 1.5 oz. castor oil (5%)
- 1 tsp pure salt with no additive (even other minerals)
- 11.4 oz. distilled Water (15% water discount)
- 4.36 oz. lye
- 0.9 oz. tea tree essential oil
- 2 tbsp activated charcoal
Equipment:
- 8 quart slow cooker
- stick blender
- digital scale
- thermometer
- bowls for measuring your oils
- measuring spoons
- rubber or stainless steel spoon with long handle
- silicone spatula (0ptional)
- protective equipment: long-sleeved shirt, plastic/rubber gloves that go up the forearm, safety glasses or protective eye gear
- soap mold – I used this one. A standard sized bread pan will also work for this batch. If you use a bread pan instead of a flexible mold that easily pops out the soap, just make sure to line it with parchment paper so you can easily lift the soap out.
- medium-size heat resistant glass or ceramic bowl
- sink filled with hot soapy water and some for cleaning anything that comes in contact with lye (Wait until you’re ready to clean to fill the sink. Details below)
Step 1: Measure Your Ingredients
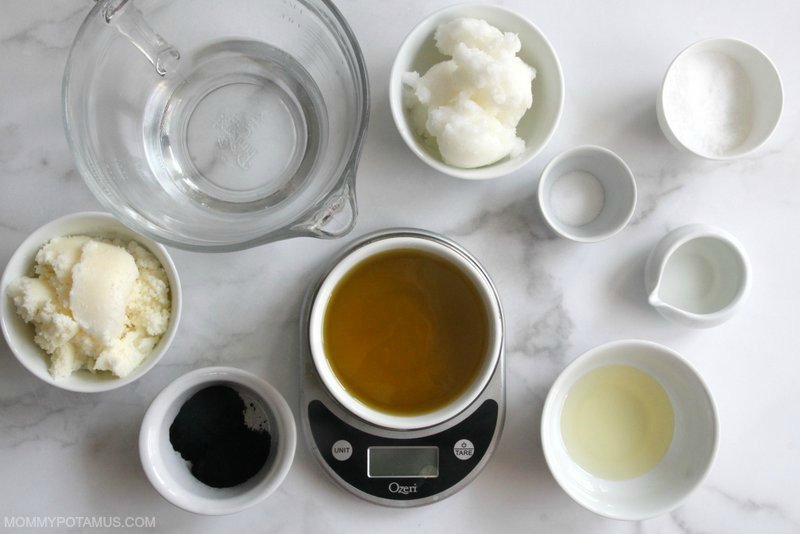
Weigh all your ingredients: coconut oil, olive oil, tallow, castor oil, distilled water, lye and optional essential oils if using. Next, place salt in a small bowl and activated charcoal in a separate small bowl.
Step 2: Melt The Oils
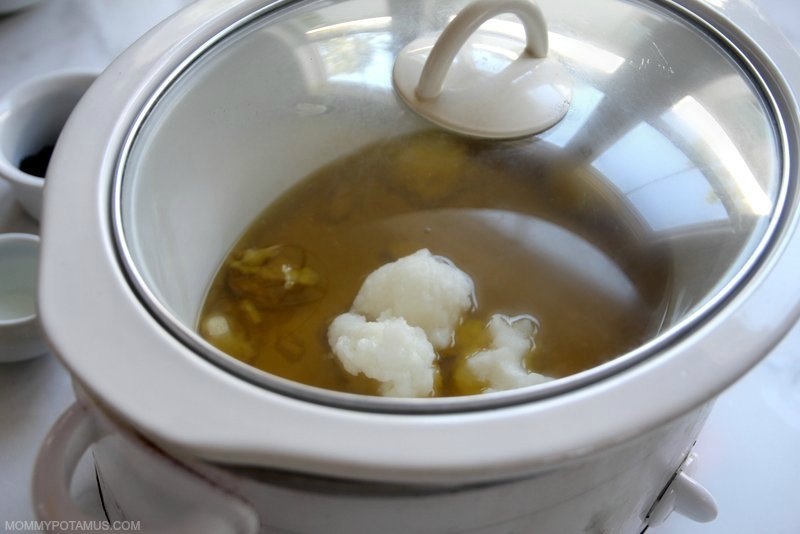
Add coconut oil, olive oil, tallow and castor oil to the slow cooker. When they are almost fully melted move on to step 3.
Step 3: Mix The Lye Water
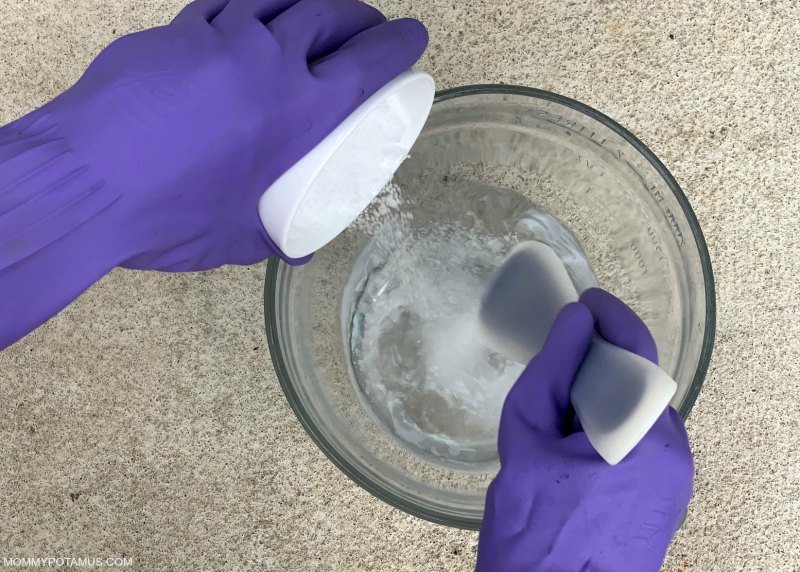
Make sure that kids and pets do not have access to the lye water you are about to make, then put on your protective gear and add your water to a medium-sized heat-resistant glass or ceramic bowl.
Choose a well-ventilated area to mix in the lye. I prefer to mix outside, but some soapers like to mix in their kitchen sink with several open windows and a fan or air purifier running. If you’re new to working with lye, see the FAQ section for safety information.
Make sure you have a long-handled spoon or spatula ready. I use a this silicone spatula/scraper.
While wearing your protective gear and taking care not to breathe the vapors, slowly add the lye to the water while mixing gently. Order is important here, so make sure it is the lye you’re pouring into the water.
Keep stirring until the lye seems mostly dissolved. The mixture will be cloudy at first, but will turn clear in 5-10 minutes.
When it’s clear, add the salt and stir again until the salt is fully dissolved, then proceed to step 4.
Step 4: Add Lye Water To Slow Cooker

Add the lye water to the slow cooker (being careful not to splash) and stir a few times with your spatula or long-handled spoon.
Step 5: Blend Mixture To Trace
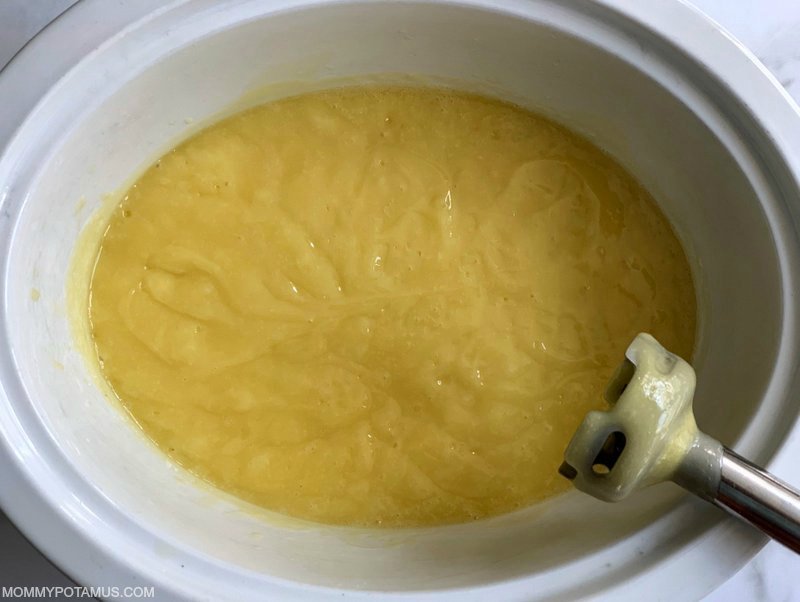
Using the stick blender begin mixing toward “trace.” I’ve found that if I mix while holding the immersion blender straight down instead of at an angle it doesn’t splatter outside of the container, which keeps my protective equipment clean and reduces cleanup.
You’ll know trace is achieved when the mixture has the texture and thickness of a light pudding.
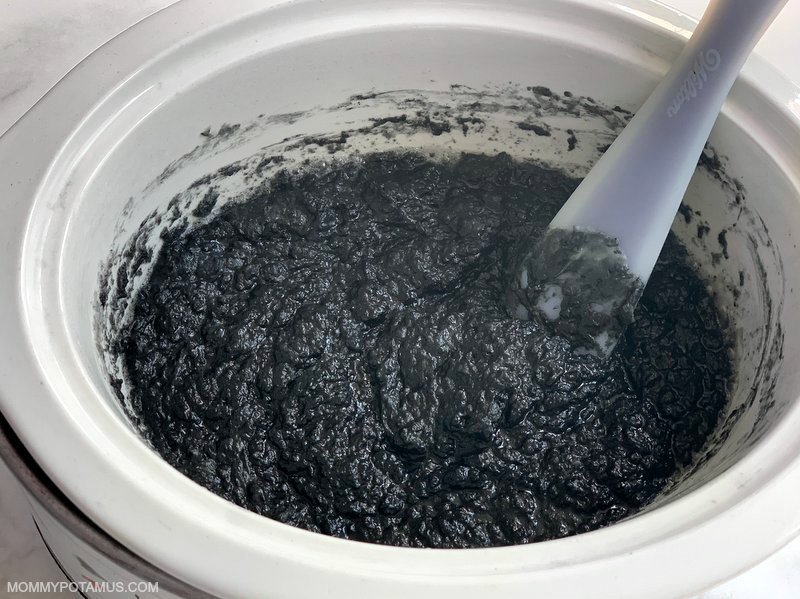
Step 6: Stir In Activated Charcoal
Add the activated charcoal and mix gently with a long-handled spoon or silicone spatula.
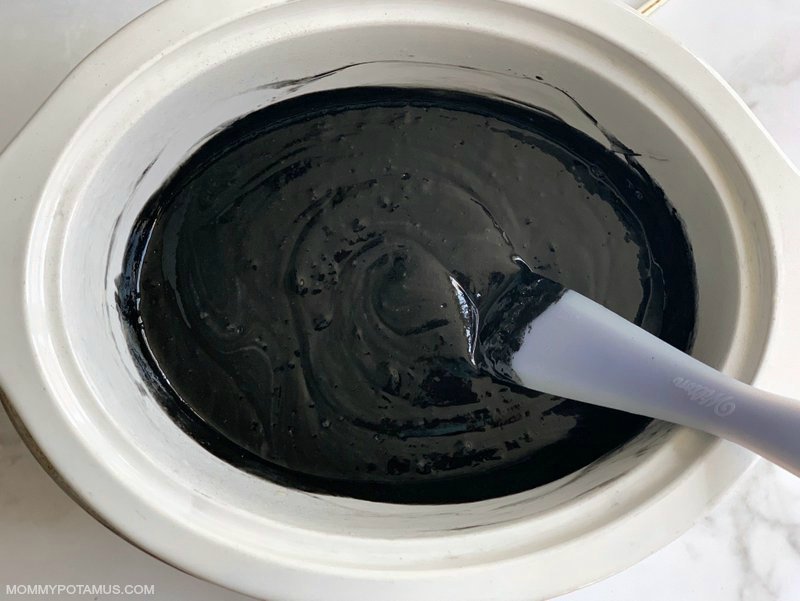
I’ve found that activated charcoal seems to accelerate the saponification process (conversion of fats into soap), so at this point I set a timer for 10 minutes to remind me to check on the soap.
Step 7: Check And Stir
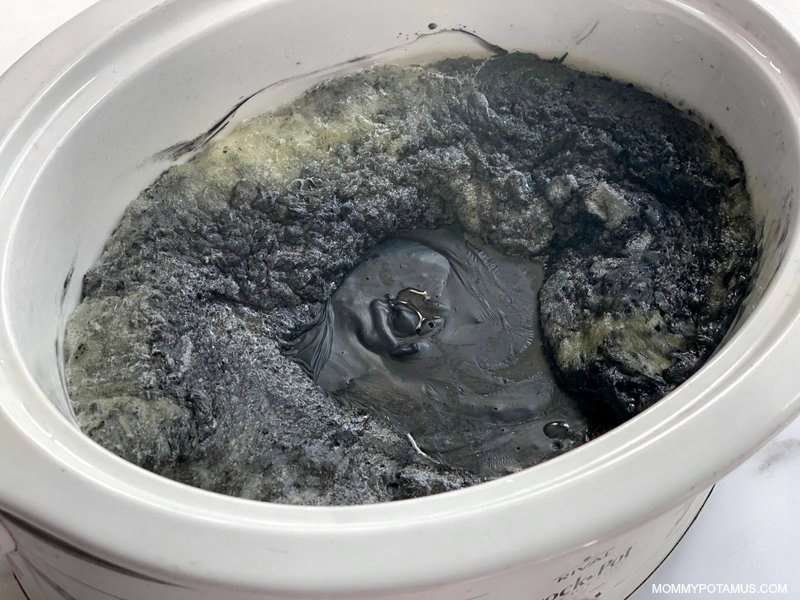
After the soap has been cooking for about 10 minutes, I check on it and give it a stir. During the cooking process the oils should rise up the sides like a wave and then fold back into the mixture, but sometimes if they’re not stirred often enough they can overflow out of the slow cooker. After the first 10 minute check, I stir the soap every 15 minutes until a total of 55 minutes has passed.
Step 8: Check for Doneness
When the soap is ready, it should look like soft, fluid mashed potatoes. Here’s how to test your soap for readiness according to Dr. Kevin Dunn, author of ‘Scientific Soapmaking.”
“1) Take a gloved finger and wet it.
2) Rub the wet finger over the surface of your soap to gather up a coating of diluted soap/lather (does not have to be frothing).
3 Very carefully touch the lather on your finger to only the very tip of your tongue – i.e., behave as if your finger might be covered with something gross or dangerous, instead of covered with something delicious like chocolate. Don’t go licking the bar of soap itself, and don’t go rubbing your lathered finger all over your tongue. Just a quick touch or 2 of your lathered finger to the very tip of your tongue is all it takes to be able to detect excess alkali/unreacted lye in your soap, which will make itself known by a zapping or stinging sensation on the tip of your tongue.
4) Repeat the above on each side of your soap.
5) Rinse your mouth out with water (or lemon juice if you desire) and spit.”
If there’s no zapping or stinging sensation, it’s ready. If you don’t want to do this test, the only other reliable testing method I know of is to purchase a waterproof pH tester kit and make sure the soap ph is between 8-10.
Note: It’s really important to make sure the soap is finished cooking and therefore all the lye is converted – otherwise it can burn skin.
Step 9: Add Essential Oils (Optional)
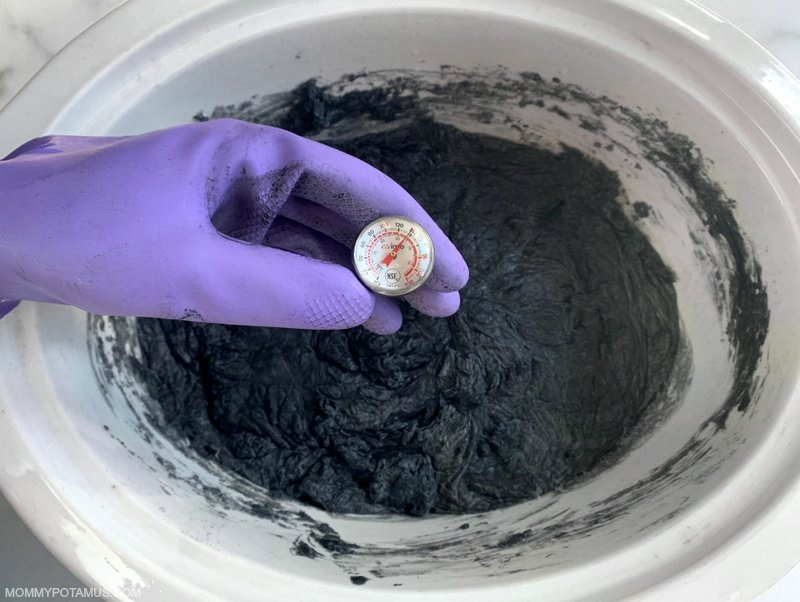
If you’re adding essential oils, wait until the mixture cools to 140°F – using your thermometer to check – then add them. Otherwise the heat will evaporate the essential oils instead of allowing them to be infused into the soap.
Step 10: Spoon Soap Into Mold
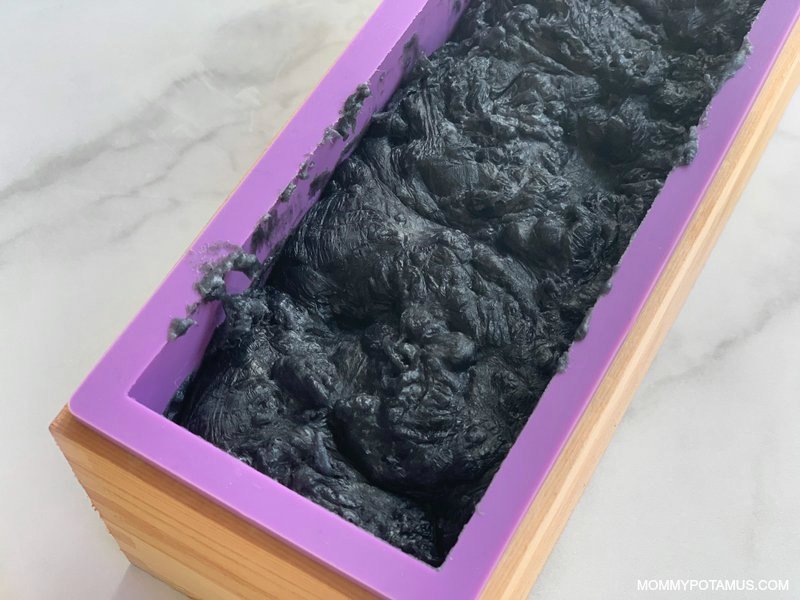
Spoon mixture into your mold and firmly tap it on your work surface – or the floor – a few times to get rid of any air bubbles. It shouldn’t splash, but just in case make sure you’re still wearing your protective gear.
Fill your sink with hot, soapy water and wash all tools well while wearing your protective equipment. Rinse very well after washing.
Step 11: Cut & Cure
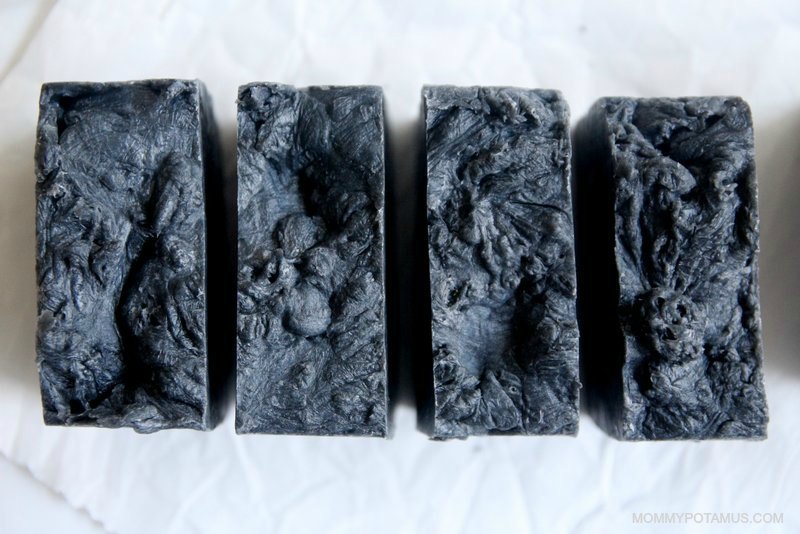
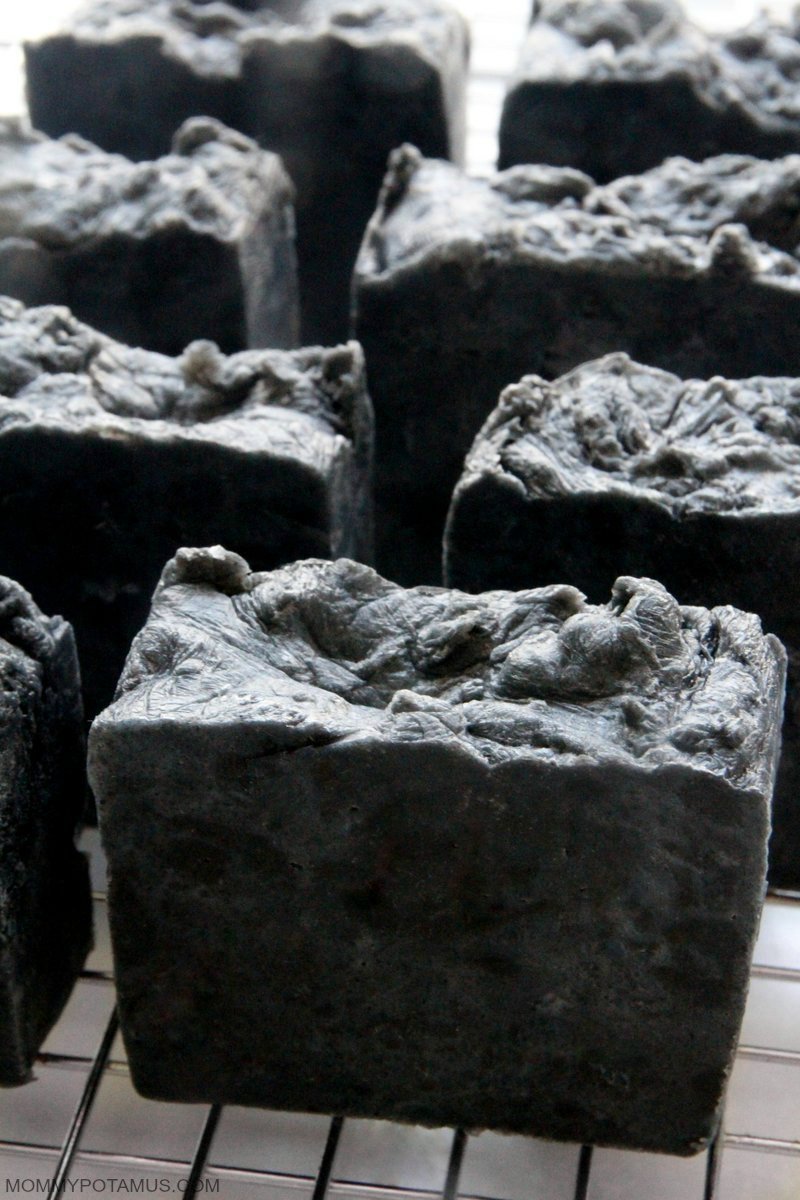
Let the soap set for 24-48 hours, then cut into bars. The mold I use will make ten 1-inch bars, but I like mine a little thicker so I cut the loaf into eight bars.
In an area with good airflow, place the soap bars on a rack/tray with about an inch of space between them.
Allow them to dry out and harden for a week or two. Charcoal makes bars a little soft at first, so although you can technically use them after a few days these just get better with time.
Frequently Asked Questions
If you don’t see your question answered here, please ask in the comments!
What are some tips for adding lye to water?
Add the lye to the water either outside or in a well-ventilated area. I personally add it outside, but some soapers use their kitchen sink as the mixing area after opening several windows and turning a fan or air purifier on. When the lye is added, it will become hot and release vapors which is why you want to be in a well ventilated area. When I mix mine I can see the vapors rising (they look like steam) so I just lean my head away and don’t breathe them in.
While the lye is cooling it should not be in an area that is accessible to children or pets.
When mixing soap lye or blending soap, protect the area with packing paper or something similar to keep the lye from getting on surfaces.
Can I make this soap with the cold process method?
Yes.
Can I replace one of the oils you suggest with one of my choosing?
Often, yes, but oils have different saponification values (the amount of lye needed to convert the oil to soap) so you’ll need to run the new recipe through a lye calculator to determine how much water/lye you’ll need.
DIY Activated Charcoal Soap Recipe ^
Equipment
- stick blender
- digital scale that measures to two decimal places
- Thermometer
- small bowls for measuring your oils
- measuring spoons
- rubber or stainless steel spoon with long handle
- silicone spatula (optional)
- protective equipment: long-sleeved shirt, plastic/rubber gloves that go up the forearm, safety glasses or protective eye gear
- medium-size heat resistant glass or ceramic bowl
- sink filled with hot soapy water and some for cleaning anything that comes in contact with lye (Wait until you're ready to clean to fill the sink. Details below)
Ingredients
- 10 oz. coconut oil
- 10.5 oz. olive oil
- 8 oz. tallow
- 1.5 oz. castor oil
- 4.36 oz. lye
- 1 tsp pure salt (No additives, even other minerals)
- 11.4 oz. distilled water
- 0.9 oz. tea tree essential oil (optional)
- 2 tbsp activated charcoal
Instructions
- Weigh all your ingredients: coconut oil, olive oil, tallow, castor oil, distilled water, lye and optional essential oils if using. Next, place salt in a small bowl and activated charcoal in a separate small bowl.
- Add coconut oil, olive oil, tallow and castor oil to the slow cooker. When they are almost fully melted move on to the next step.
- Make sure that kids and pets do not have access to the lye water you are about to make, then put on your protective gear and add your water to a medium-sized heat-resistant glass or ceramic bowl. Choose a well-ventilated area to mix in the lye. I prefer to mix outside, but some soapers like to mix in their kitchen sink with several windows and a fan or air purifier running. If you're new to working with lye, see the FAQ section for safety information.Make sure you have a long-handled spoon or spatula ready. I use a this silicone spatula/scraper.While wearing your protective gear and taking care not to breathe the vapors, slowly add the lye to the water while mixing gently. Order is important here, so make sure it is the lye you’re pouring into the water.Keep stirring until the lye seems mostly dissolved. The mixture will be cloudy at first, but will turn clear in 5-10 minutes. When it's clear, add the salt and stir again until the salt is fully dissolved, then proceed to the next step.
- Add the lye water to the slow cooker (being careful not to splash) and stir a few times with your spatula or long-handled spoon.
- Using the stick blender begin mixing toward “trace.” I've found that if I mix while holding the immersion blender straight down instead of at an angle it doesn't splatter outside of the container, which keeps my protective equipment clean and reduces cleanup. You’ll know trace is achieved when the mixture has the texture and thickness of a light pudding.
- Add the activated charcoal and mix gently with a long-handled spoon or silicone spatula. I've found that activated charcoal seems to accelerate the saponification process (conversion of fats into soap), so at this point I set a timer for 10 minutes to remind me to check on the soap.
- After the soap has been cooking for about 10 minutes, I check on it and give it a stir. During the cooking process the oils should rise up the sides like a wave and then fold back into the mixture, but sometimes if they're not stirred often enough they can overflow out of the slow cooker. After the first 10 minute check, I stir the soap every 15 minutes until a total of 55 minutes has passed.
- When the soap is ready, it should look like soft, fluid mashed potatoes. Here's how to test your soap for readiness according to Dr. Kevin Dunn, author of 'Scientific Soapmaking.""1) Take a gloved finger and wet it.2) Rub the wet finger over the surface of your soap to gather up a coating of diluted soap/lather (does not have to be frothing).3) Very carefully touch the lather on your finger to only the very tip of your tongue – i.e., behave as if your finger might be covered with something gross or dangerous, instead of covered with something delicious like chocolate. Don't go licking the bar of soap itself, and don't go rubbing your lathered finger all over your tongue. Just a quick touch or 2 of your lathered finger to the very tip of your tongue is all it takes to be able to detect excess alkali/unreacted lye in your soap, which will make itself known by a zapping or stinging sensation on the tip of your tongue.4) Repeat the above on each side of your soap.5) Rinse your mouth out with water (or lemon juice if you desire) and spit."If there's no zapping or stinging sensation, it's ready. If you don't want to do this test, the only other reliable testing method I know of is to purchase a waterproof pH tester kit and make sure the soap ph is between 8-10. .Note: It's really important to make sure the soap is finished cooking and therefore all the lye is converted – otherwise it can burn skin.
- If you’re adding essential oils, wait until the mixture cools to 140F – using your thermometer to check – then add them. Otherwise the heat will evaporate the essential oils instead of allowing them to be infused into the soap.
- Spoon mixture into your mold and firmly tap it on your work surface the floor a few times to get rid of any air bubbles. (It shouldn't splash, but just in case make sure you're still wearing your protective gear.
- Fill your sink with hot, soapy water and wash all tools well in hot soapy water while wearing your protective equipment. Rinse very well after washing.
- Let the soap set for 24-48 hours, then cut into bars. The mold I use will make ten 1-inch bars, but I like mine a little thicker so I cut the loaf into eight bars.
- In an area with good airflow, place the soap bars on a rack/tray with about an inch of space between them.Allow them to dry out and harden for a week or two. Charcoal makes bars a little soft at first, so although you can technically use them after a few days these just get better with time.
FREE Ebook: DIY Body Care Gifts Made Simple ^
Do you want to give gorgeous, handcrafted gifts for family and friends, without spending a bunch of time on them?
Then I’d love to give you a free copy of DIY Body Care Gifts Made Simple – my step-by-step guide to making gorgeous handcrafted gifts without stressing yourself out – as a gift for signing up for my newsletter. I’ll show you how to make vintage labels, luxurious lotion bars, lip balms, sugar scrubs, body sprays and more like a pro. Sign up for my newsletter and you’ll be redirected to the download page immediately!