
“So, what do you wash your hair with?”
“Mud.”
“I’m sorry?”
“Well, technically it’s clay.”
If you want to have an entertaining conversation with your stylist, try that as an opening line.
Then when they ask how you’ve managed to get your hair so smooth and shiny, tell them you put Jello on your hair. (Or rather, gelatin, the stuff that Jello is made of.)
Of course, if you haven’t tried these things, do that first!
Gelatin: The Secret To Shiny, Strong Hair
If your stylist has ever told you conditioners like Pantene might wreck your hair over time, here’s why:
Many store-bought conditioners contain silicone, which coats the hair to make it smooth and shiny. Unfortunately, this only makes the hair **look** healthy – in reality it’s doing the exact opposite. Silicone blocks moisture from reaching the hair shaft, which can cause strands to become dry and brittle over time.
A far better option is gelatin, which contains keratin proteins that actually bind with hair to strengthen it. Unlike whole proteins such as egg yolk, which have difficulty bonding with hair, the partially cooked proteins found in gelatin bond easily. Gelatin adheres especially well to damaged areas, but also nourishes the entire strand as well. It helps to smooth the hair cuticle, boost shine and reduce breakage.
Those with wavy or curly hair also report that it reduces frizz.
Something to keep in mind is that, when it comes to protein treatments for hair, you can get too much of a good thing. See the Tips & Troubleshooting section below for info on how to get the best results.
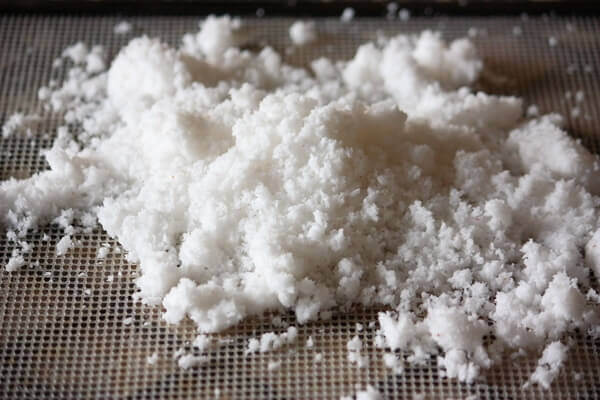
Because I’ve been using gelatin in my hair for awhile now, I couldn’t get a true “before” photo to share with you. Fortunately I had an adorable little volunteer that was willing to help me out. The photo below is of my daughter, Katie, before and after her first gelatin hair mask.
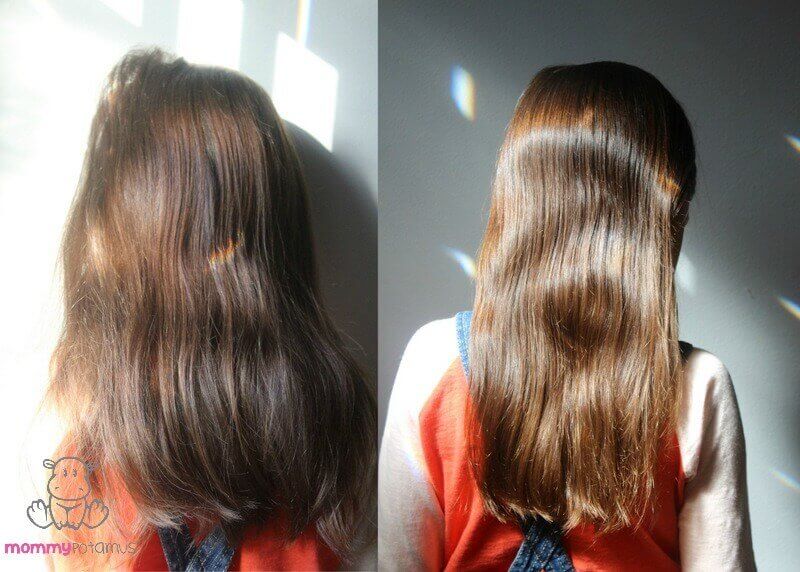
Her hair looks a little oily in the photo on the right, but it’s actually not at all. I’d just run a large-tooth comb though it, which made it separate in a funny way. Oops!
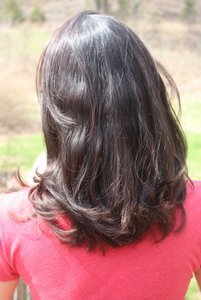
The photo on the right is my hair after the same treatment. My hair is a weird blend of straight and wavy when it air dries, but you can see that it’s not oily or greasy. It is super, super soft though – I love gelatin masks!
Back to my daughters before and after: The light is a little brighter in the second photo because the sun was higher, but the increase in shine is real. The photos were taken about two hours apart because I let her run around outside while her hair dried. Both are completely unretouched.
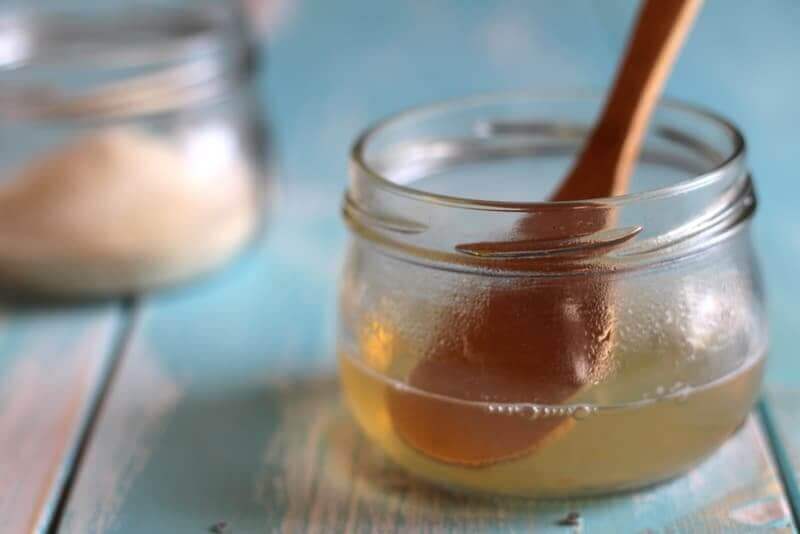
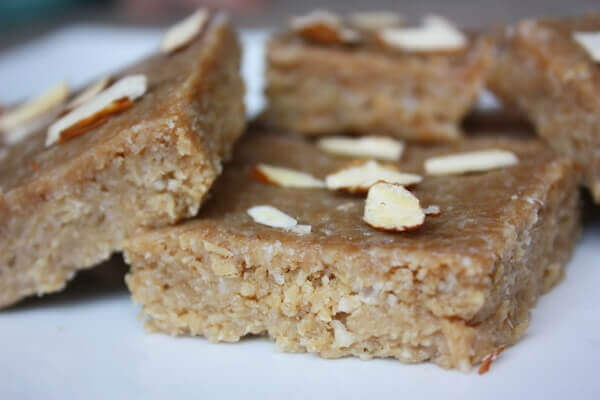
Gelatin Hair Mask Recipe
Ingredients
- 1 tablespoon powdered gelatin (where to buy grass-fed gelatin)
- 1/3 cup water (see optional add-ins for alternatives)
- 1 teaspoon apple cider vinegar (I use this brand)
- 1 teaspoon honey (I buy mine from a local beekeeper, but when he’s out of stock I order this brand)
Optional Add-Ins
Coconut Milk
Moisturizing. (Note: If you use homemade coconut milk, make sure to strain it through a coffee filter or you may end up with white flecks of coconut meat in your hair. Store-bought coconut milk will work fine – no filtering necessary.
Herbal Tea
Peppermint, rosemary and nettle tea – which add shine – are suitable for all hair types. Sage, marshmallow root and elderflower are helpful for dryhair.
Moisturizers
If your hair is very dry, you might try adding 1-2 tablespoons of avocado or banana to your mixture. Give it a whir in the blender before use to ensure even application.
Another option is to add a little bit of oil. A few drops may be enough, but some people add as much as one tablespoon. Oils to consider are olive, coconut, almond, and argan.
Essential Oils
Rosemary adds shine, chamomile is helpful for dry hair and tea tree is helpful for oily hair. For the recipe below, use 12-15 drops.

Making Your Gelatin Hair Mask
Add liquid to a small saucepan. Slowly sprinkle gelatin over your liquid while whisking to prevent lumps. Place the pan on your stove and allow the liquid to heat until steaming, stirring often with a spoon to prevent the gelatin from sticking to the bottom of the pan. When the mixture is steaming, remove it from heat.
When the mixture has cooled down somewhat – it should be warm but not so hot that it’s uncomfortable to touch – add in the honey, vinegar, and any optional ingredients.
Using Your Gelatin Hair Mask
When the mixture is warm but not so hot that it’s uncomfortable to touch, apply it to clean, wet hair. I like to dip the ends of my hair into the jar, then pour a little bit on one side of my scalp and work it down from roots to tips before moving to the other side.
Allow the mask to sit for 10-30 minutes. If you’re planning to let it sit for much longer than 10 minutes, cover your hair with a shower cap so that it doesn’t dry out. When the time is up, rinse very thoroughly, follow with conditioner (here’s my recipe) or diluted apple cider vinegar, and allow to air dry.
If you find that your hair feels crunchy or brittle, see the “Tips & Troubleshooting” section below.
Tips & Troubleshooting
When it comes to protein and hair, you can get too much of a good thing. Healthy hair is both strong and flexible, but hair that has too much protein hardens, loses flexibility, and begins to break.
On the other hand, hair that is fragile is also prone to breakage. The trick is to find a balance between the two. If you find that your hair is feeling stiff or crunchy after a treatment, gently rinse your hair again just to make sure all the excess was removed, then follow with conditioner (here’s my recipe) or diluted apple cider vinegar and rinse again. Then next time you do a treatment, use about half the amount of gelatin you used before.
Experiment with how much you need. Shorter hair may need only half of what the recipe calls for, while very long, thick hair may need more.
Do this treatment no more than once a week – once every month is best for most people.
FREE Ebook: DIY Body Care Gifts Made Simple
Do you want to give gorgeous, handcrafted gifts for family and friends, without spending a bunch of time on them?
Then I’d love to give you a free copy of DIY Body Care Gifts Made Simple – my step-by-step guide to making gorgeous handcrafted gifts without stressing yourself out – as a gift for signing up for my newsletter. I’ll show you how to make vintage labels, luxurious lotion bars, lip balms, sugar scrubs, body sprays and more like a pro. Sign up for my newsletter and you’ll be redirected to the download page immediately!

Thanks for the mask recipe. Is there a recipe for homemade conditioner that you use?
Ahh, I was wondering if this would come up ! 🙂
I actually don’t usually use conditioner – I rinse with apple cider vinegar after washing with homemade shampoo. The shampoo bar I’ve been using lately (recipe coming soon) is AWESOME because it moisturizes without leaving a greasy residue – and it’s only three ingredients. Because shampoos are alkaline I simply rinse with vinegar afterwards to close the hair cuticle so that it’s smooth and shiny. (The vinegar is scented with infused herbs or essential oils)
However, I have a leave-in conditioner that I make for my daughter posted here: https://mommypotamus.com/diy-leave-in-conditioner/
I would love to help test it! We just did the clay wash followed by an ACV rinse on my daughter last night. She has little short hairs all over, though, so I’m not sure if they are new or broken hairs (all about the same length). We have a hard time cleaning her hair that it doesn’t get greasy quickly afterwards too.
Hi Heather 🙂 Thanks for this! It looks great! Just to clarify, you say to follow with conditioner, then comment that you don’t use conditioner; do you apply the mask, then just follow with an ACV rinse and then rinse the ACV out with water? (I don’t use conditioner, but ACV normally) Thanks! 🙂
I too would like to about the conditioner you use following the gelatin mask. Did you use the ACV rinse as a conditioner after this mask? Thanks. Waiting for your reply to try this mask.
If you are already using ACV as a conditioner stick with that. You can also use this homemade leave-in option if you’d like 🙂 https://mommypotamus.com/diy-leave-in-conditioner/
How much of it do you use per application?
I use a whole batch 🙂
Hi, I have liquid gelatin at home already. I wonder how to convert the recipe. How much liquid does this recipe make and how thick, viscous is it? Thank you 🙏
I was wondering about the conditioner, too. I use hot coconut oil wrap in my hair if I think I need protein. However, I have found that I only really needed it when my hair was damaged from using commercial shampoos. Now, since I use soap, I find that my hair gets too crunchy after an application so I hardly treat my hair anymore.
Hi Becky, I have just a couple of questions to make sure I’m understanding correctly. What kind of soap do you use? Are you rinsing with an acidic medium afterwards?
Can Great lakes gelatin be used as well
Yes, any gelatin will work. 🙂
Cool. Thank you.
Regarding adding coconut milk to the mask-do i use it instead of water?does it keep it’s benefits after heating?thanks!
Thanks! I am excited to try this. My hair has been SO much healthier since switching to totally non toxic shampoo and conditioner but I would love to make it even healthier.
Can you go into more detail about shampoo being alkaline and rinsing with vinegar which is acidic? I am not sure I totally understand that. Is all shampoo alkaline?
Thanks!
Hi Kim, most homemade shampoos are made with real soap, which is alkaline. Most store-bought shampoos are really detergents with a more neutral pH. Hair does best when it is slightly acidic, so after washing with my shampoo bar I rinse with vinegar to restore my hair to the correct pH.
ok next question. I watch my hair go down the drain, in the waste basket, off my brush so I use a heavy conditioner after shampoo so that combing wet doesn’t pull out so much hair. When you rinse your hair with vinegar. Is it vinegar or apple cider vinegar and are these in place of conditioner?
avoid combing when wet, this is when your hair is at it’s weakest state
Sara…What do you suggest for detangling dry hair? I have to comb mine out while it’s still wet as the tangles wouldn’t come out otherwise – or at least not without a lot more breakage. Ironically it was virtually tangle-free for the couple of years I was using baking soda with an ACV rinse. Last year I began to notice the damage I was doing and switched to rye flour. I’m still working out the kinks, literally and figuratively as even a small amount of bran leaves my fine-textured hair tangled. Maybe it’s because I’ve just been paying more attention but it seems that I’ve had a lot more breakage over these past few months. I want to continue with the rye flour but in addition to fine-sifting it I’ve been researching homemade detanglers and leave-in conditioners that won’t weigh my hair down as this was the problem with commercial shampoos and conditioners. I still occasionally use ACV but I’ve read bad things about this as well, i.e, it’s too acidic for regular use.
So…before I saw the comment on wet-combing, my question for Heather was: Can the gelatin treatment be used before washing my hair, or would the wash strip out the gelatin and defeat the purpose?
Hi! So I used the gelatin mask, and left it on for about 30 minutes. After reading more in depth, I realize this was likely too long. Overall, my hair feels smoother and looks shinier, however the strands on top that take the brunt of wind/sun exposure are incredibly tangly and seem very dry. I don’t have split ends at all, but the hair shaft does feel rather fragile. (I have fine, blonde hair.)
I used your leave in coconut milk conditioning spray, but it’s still feeling tangled and dry. Any suggestions to restore its health?
What do you think of WEN shampoo? I have heard opinions on both sides.
Don’t use WEN shampoo I just saw a girl lose her hair from wen products. I use morrocan method shampoo line and detox clay. Hair goes through detox process from commercial shampoo to natural shampoo. (Old hair falling out, greasy hair etc.) if used constantly will go away in a couple weeks. Stay strong with keeping up with natural shampoo instead of going back to commercial shampoo
What about using pectin in place of gelatin? None of the stores around me have the gelatin I used to buy so I bought a box of Sure Jell since that’s the closest thing they had…
I don’t think pectic would have the same effect unfortunately.
you mention gelatin in the post but your link is the collagen hydrosolate. Should we be using gelatin? Or CH?
Hmmm, can you tell me where you see the link to hydrolysate? I see one link to collagen protein, which is the regular kind that gels . . .
I also wanted to know which gelatin product to use….is either the ‘green’ can or the ‘red’ can ok? Thanks!
Julie and Colleen, I ordered Great Lakes collagen hydrolysate for general purposes and found that it doesn’t have the same effect on my hair as “regular” gelatin when applied directly. I’ve started using gelatin as my in-shower detangler following a wash with rye flour, and it really helps with coating the bran particles and facilitating their rinse-out. CH doesn’t accomplish the same thing, or not nearly as well, likely because it doesn’t thicken. I have a harder time combing out the snags and my hair isn’t as soft when it dries. So my purpose in using it is slightly different from that of most people here but that’s my experience. I’ve ordered the red, undenatured collagen (also GL) and will use that from now on.
I also appreciate the comments regarding taking gelatin/collagen internally as this makes a lot of sense. However I’ve found that the CH I ordered for this purpose still smells and tastes like beef, so that I can only use 1/2t at a time in most things to keep them from tasting like beef broth. And the recommended dosage is 2 tablespoons, twice per day – 1/4 cup?? I don’t drink enough coffee, hot chocolate or smoothies on a given day to consume this much gelatin at this rate. I suppose I could add some to soups or other “liquid” meals on days when I eat them, if the flavor profile allows. Does anyone have suggestions on what else I can put this in on a daily basis?
Heather,
I love this!
About a year ago I added gelatin to my store-bought shampoo (at the time, I thought it was a good idea) and it got super clumpy and gooey.
But a MASK. It makes so much sense.
You’ve totally inspired me explore homemade haircare again. High fives!
I tried this and love it! My hair is very fine and tends to be either flyaway or greasy. Most conditioners leave it lank looking. I left this in for 10 min, and could tell as soon as it was dry that my hair is much softer and supple. I think it looks shinier too. Thanks so much for the recipe, I keep trying various natural hair treatments and am often disappointed. Would love that shampoo recipe!
Naomi, did you use any other product (conditioner or ACV rinse) after washing the mask from the hair? TIA.
oooh, this looks so awesome, I’m in desperate need of some hair therapy… I can’t wait to try this, thanks!
Is this ok to use on color treated hair?
I don’t see why not 🙂
I am in perimenopause and my skin & hair have changed dramatically in spite of diet changes in the past 3 years. I tried this today as my hair was thin without body or bounce. I have high and lowlights in my hair. I put it on my dry hair before showering, worked it in well, wrapped a warm wet towel around my head and let it sit for 10 min. Washed with regular shampoo and styled as usual – wonderful shine and body!!! Will continue to do once or twice a month for sure!!
So cool, I am definitely trying this! My go-to deep conditioner is coconut oil, but I do find that it leaves my hair feeling heavy, so I’ve been looking for a good alternative 🙂 Thanks for sharing this!
I will try this! My curly hair is severely suffering. I have been soooo tempted to go back to the toxic stuff that made my hair look beautiful 🙁
This is amazing! I once tried washing my hair with egg yolk and it was so luxurious, soft, bouncy, and wavy! But…. more than once a month isn’t good! I used it again 2 weeks later and got the brittle hair. I will try this now that it has been a few months since I have used the egg, thanks for posting pictures! =)
I am not so sure if my hair needs protein or moisture even after watching dozens of video the hair strand test.
I would like to know if it is fine to use the mask when my hair does not show any sings of protein deficiency.
Hi, I can’t wait to try this! I have some Great Lakes not congealing geletin (green tin), would this type work as it doesn’t gel?
Thanks 🙂
Unfortunately, I haven’t tried it with the collagen hydrolysate so I’m not sure.
Could agar-agar be substituted for the gelatin?
Unfortunately it does not have the same benefits for hair.
your hair is dead past the root it would be better for your hair to drink the gelatin Just saying
I do that Cheryl! I have been taking the Great Lakes Collagen Hydrolysate once a day (in my morning cup of tea) for the last 6 months. I am 54; my hair is baby fine and thin. I have worn it uber short – think quarter to half an inch all over – for the last 10 yrs, because it wouldn’t grow much and when it did it looked terrible! Now it is growing like a weed and is 3-4″ long, looks nice and healthy and feels so good! Of course now I am going to try the mask too.
Thank you for that Victoria. I am 55. Been having hair issues for the last three years. My hair has become fine and losing plenty everyday.
Will try gelatin in my coffee. Thank for the info.
Thank you for this! After one application, my dry, frizzy hair has been magically transformed into shiny, soft, bouncy awesomeness. I keep touching it when no one is looking;) And, I had all of the ingredients in my kitchen already. Thanks again!
This looks like a great recipe Heather. So you would heat up the mask and then apply it to hair after washing it? Just wondering how to keep the mask at the right temperature. Will it work if it is cold? My hair is long and it takes me a while to wash it 🙂
If I want to use coconut milk, do I substitute it for the water or just add it in? If so, how much should I add?
I’ve used WEN for the last 7 yrs (non stop) and its worked wonders for my hair. I also have tons of new growth continuously coming in…I color and bleach regularly. Making blanket statements about hair falling out or thinning is ludicrous (using WEN) just like every remedy on Pinterest will work on every head of hair.
Pro tip: the best delivery system for homemade hair products is a peri bottle! Yes, like the kind you use after having a baby. I use Morocco Method and ACV rinses, and peri bottles are the BEST for distributing cleansers that don’t foam. So much better than pouring.
Awesome idea!
I don’t have a peri-bottle handy, so I use a store bought ketchup container. It has a top spout to squirt out the water & deliver where I want it.
A year and a half ago, I had a major hair disaster that I won’t go into, but I ended up getting a keratin treatment to fix it. I HATED doing it because I know how bad it is for my hair. The only benefit (besides looking better) was that my hair dried really fast. I have insanely thick hair and it takes forever and ever to try. Anyway, I did this gelatin mask last month, and ever since, my hair dries crazy fast! Like, 10 minutes with the hair dryer instead of 30! I figure I’ll just do it again when it starts taking longer to dry my hair again. Way healthier and way cheaper than the keratin!
Why would you talk about how damaging conditioner is then tell us to use conditioner after the mask.
Wow.
Creditability gone.
Haha, good point! As I mentioned in my first comment on this thread, I actually use apple cider vinegar as my “conditioner,” but I also have a recipe for leave-in conditioner that I make for my daughter posted here: https://mommypotamus.com/diy-leave-in-conditioner/
She was referring to traditional store bought conditioner with all the chemicals and silicone not the natural homemade ones!
I’ve been bleaching my hair platinum blond for about nine months now (by bleaching twice and then applying a ash blond to neutralize the last bit of yellow.) I had wavy hair before going blond, but now my waves are gone. So about two weeks ago I got this silly idea to perm my hair to get my waves back (I miss them) what a terrible idea. My hair was in a good condition before the perm, but as soon as I rinsed the neutralizer and started to dry my hair it was all sticky and elastic, I immediately applied some coconut oil to them and left it in for a couple of hours. It feels a bit better but is still in a terrible state. Any advise?
You’ve pretty much denatured all the protein in your hair. Bleaching hair is an extremely damaging process to hair, especially when double processed. I strongly recommend you get a professional to do the double bleach and tone. If not, atleast get a friend to help do your roots. Watch videos on how to apply colour with a bowl and brush. Divide head into 4 sections by parting center front to center back, then from just behind ear over the top to other ear. Starting in the back, make a horizontal parting ABSOLUTELY NO DEEPER THEN 1/8″ . Apply to the underside of the section a GENEROUS amount of lightner from root to tip at roughly a 30 degree angle, using moderate pressure and a slight horizontal back and fourth sweeping motion. Then holding the section at 45 degrees elevation reload your brush and apply a generous amount of product from root to tip using the same application strategy from root to tip. The section should be completely saturated with lots of product flowing between the hairs. This is essential in getting your hair to adequately lighten and stay moist during the processing time. Dry product doesnt lighten hair, but will continue to damage it, so its important to apply enough lightner that its going to stay moist for the entire processing time. Now continue working up the quadrant till you get to the top, then do the otherside. Once thats done, move to the front sections. Now taking diagonal sections startin with the corner thats at the crown, start following the same application strategy. Because its a diagonal your first section will be the tiniest little triangle, but dont try and compensat by taking a deeper section, youll start overlapping, leading to breakage. Your sections will get wider as you go along. Continue on until you have just a thin section of hairline remaining. Leave this out. Now do the otherside to the hairline. Now apply to both side of the front hairline using the same application and pull the hair back and away from the face and “lay” an extra lightener on top of the root area painting back. Now set your timer for the maximum processing time. Your head should feel heavy with all the lightener in it and your roots should look puffy or swollen with product if youve applied correctly. Every 10 minutes or so take a section and scrape off the lightener and evaluate the degree of lightness. If its not light enough, reappy product and wait another 10. Check from different points each time. When it looks light enough, check a few places around your head. If all good, its time to rinse. When applying like this, using a professional strength lightener, most times a second bleaching isnt required. I can lift virgin coarse black South East Asian hair to butter yellow. Its only when going from the darkest of dark to the coolest of pastels that a second bleaching is required. If hair isnt light enough when the timer goes of, still rinse. Dont shampoo or condition just rinse extremely well till hair is no longer gritty or slippery and feels squeaky. For doing the second lightening, apply using the exact same application strategy, but use a lower volume of peroxide to mix up your bleach. Half the strength is usually perfect strength. The cuticle is already open and the cortex is exposed because we didnt lower the ph or seal the hair with shampoo or conditioner, so it will totally suck up and react with the milder product. Process till the desired level of lightness is achieved. Then rinse super thoroughly and shampoo twice. Now if youre going to tone, apply a spray in leave in conditioner which will balance the porosity and make the hair take up toner more evenly without creating a barrier preventing it from being absorbed. My advice is to find a semipermanent or acid based toner if you can. And ther is no need to put any toner higher then 12 volume on your hair. Semipermanents are preferred. Apply to the root area only. Wait a few minutes. If you feel your ends desperately needed toning, at the processing halfway point apply to ends, if its only needed a little bit, do it for the last 1/4 of processing time. If it really didnt need much at all, only appy for 2 minutes. If itwas perfect, when time is up, emulsify with water for 1 minute then rinse and condition deeply. Never ever perm hair thats more then 40% highlighted and never on fully bleached hair. Bleaching hair works by essentially chewing through the structure of your hair till it reaches the melanin in the cortex and blows it up like popping a balloon. So inherently in very strongly bleached hair, a lot of the hair structure (cortex) is broken down when trying to break down all of your melanin. This is why you lost your hair texture and it feels mushy and slimy. To many of the cystein disulfide bonds have been broken and oxidized to cysteic acid, which is water soluble, so when you wash youre hair you are litterally washing away your hair. Its been chemically dissolved. What can you do about it? Well, prrtein treatments harden the hair structure, so they will help you regain some texture and stop it from being so mushy. This gelatin one should be good to do on a monthly basis. My advice would be to go to a beauty supply that carries APhogee products and get your hands on their 2-Step protein treatment. Not the two minute reconstructor, you want the two step one. So the process is this. Wash your hair with a clarifying shampoo, towel dry till hair is just barely damp. Then apply step 1 making sure everything is coated, but not dripping with oversaturation. It smells kind of funny. Run a comb through it and chill out for 15 minutes. When time is up, now its time to cook it. Sit under a hood dryer on high heat UNCOVERED and process until hair is completely dry. It will feel very stiff and brittle at this point, and it is. If you dont have acess to a hood dryer you can just put a plastic grocery bag over your head like a bonnet and slide your hair dryer in the side opening. Works great for deep conditioners too. Once its all crispy, go and rinse with water just warm enough to soften the treatment. As you rinse it out youll notice your hair isnt quite so slimy, it has some texture back to it. Now do deal with the wireyness, apply the second part which is a deeply moisturizing treatment. I like to leave those in for a full 20 mins, sometimes back under the dryer for 10, cool for 10. Always do a cool down after doing a treatment under the dryer and rinse with cool water, this encourages the cuticle to close and seal in the treatment. Never do an APhogee 2-step any sooner then every 3 months, preferably 4 months, or your hair will become too stiff and brittle and potentially break off. You can use softer proteins on a more frequent basis. Gelatin, placenta, or hydrolyzed collagen are all good options. Keratin AMINO ACIDS are also good. Unspecified Hydrolyzed kertain, or keratin proteins molecular weight is too large to penetrate into the hair to give strucural strength, but are better for surface coating/film forming. Same with wheat and soy proteins. You might have been able to get back some of your texture before the perm, but after, the structure of your hair that was responsible for your texture was litterally turned to gelly, then when neutralized its supposed to harden back up, but because the integrety was already so compromised there wasnt enough of the structure left that could glue itself together again. Another option that would really help your situation would be using Olaplex or a similiar rebonding polymer added to your bleaching agent and toner, it synthetically crosslinks the broken protein residues in your hair making a surprisingly rejuvenating treatment. If you insist on doing these things yourself, you may be able to schmeagle yourself some online, but it will cost you. Also, dont over wash your hair. After You get your hair done and do a treatment, wait ATLEAST 2 weeks before washing it again. Natual scalp oils are one of the best moisturizers out there. But you have to let your hair get disgusting. Like weeks between washes. Everyfew days use a boar bristle brush and try and move the oil from your scalp to your ends, sliding it down and smoothing through your hair. You ideally dont want to wash your hair until when you brush your ends no longer look fluffy or fuzzy, but theyre starting to look stringy/clumped together. Then its time to wash. Anyways hope this helps!
It’s all good only that those poor big animals are slaughtered so that humans can put gelatin in their hair. It’s not the natural order of things and deep down we all know it. They are mammals they suffer just like us but nobody saves them.
Rita…I doubt that any animal is slaughtered for only its hooves. I myself would rather see all parts of an animal put to use than wasted, and I do think it’s important for the animals we domesticate to have quality lives.
Can I use anything in place of the gelatin please?
Would you recommend this for dreadlocks? I would probably just put it along the roots that aren’t knotted in yet to help strengthen them. Any thoughts?
I have used this twice now. The first time, I was amazed at how soft and strong my hair felt. My husband doesn’t ever notice if I color or cut my hair, but that night he told me he thought my hair looked great.
You have a lot of interesting recipes on your site that I’m anxious to try. Thank you for your contributions to more natural living.
Hi, Heather. Can you tell me how to do wash that mask off the hair? With just water or you are using natural shampoo or just ACV?
Can this treatment be used more often, maybe twice or thrice a week? If not, then why so? I’m just trying to understand the side effects, or the facts about it being too damaging for the hair if exposed repeatedly. Or it’s safe and more beneficial the more you use it.
I tried searching for it, but couldn’t find any information on the effects of overuse.
Thanks!
The very last line of the article states “Do this treatment no more than once a week – once every month is best for most people.” The reason is in the Tips and Trouble Shooting section of the article.
I’ve tried this mask a couple of times and I love the way it makes my hair feel and look afterwards! The only thing I don’t really like is how it runs down my head while I’m letting it sit in my hair! I don’t know if there’s anything I can do about it. I put my shower cap on and I’ve tried wrapping an old towel around that too, but it still runs. I haven’t been able to tolerate it for more than 10 minutes before I have to get in the shower and rinse it off. Is there something you do to keep this from happening? Am I using too much? I have pretty long hair now that it’s grown out for a while. I take CH and gelatin internally and I think that’s helped it grow, but it still has a fine texture to it and looks and feels dry after I wash it. I use natural hair care products, but I don’t make them. I’d love to buy a coconut oil shampoo bar, but I haven’t done it yet.
OK, so I was a little wary of trying this, as my hair does not like too much protein. I have dark, curly, medium-length, medium-thick (closer to thin) hair . I decided to try this with my sister who has the same length but THICK, straight/wavy, dark hair. For hers, I used the full Tbsp of gelatin, but for myself, I followed the suggestion and used half. Then, for the water, I first steeped several sprigs of rosemary in a pint of water and allowed it to cool. I used this water for both the gelatin mask AND the ACV rinse (1/3 cup rosemary water to 2/3 cup ACV; my sister probably could have used more of the rinse). I applied and left the mask in as directed then RINSED, rinsed, rinsed with plenty of water, followed by the ACV rinse, working both water and ACV through my hair really well, then rinsed with water again. Next day, my hair was SUPER SOFT and did not need to be washed to get rid of any brittleness/stickiness/greasiness!! That scores BIG points in my book! Thanks, Heather!! 🙂
Is there a vegetarian alternative (or semi-alternative) to this treatment?
Thanks!
Hey I was wondering if the vinegar as part of the mask is necessary or can I skip it? And also if not, will I be able to use white vinegar in it’s place?
This was amazing for my hair! I have so much damage from various things, my hair was breaking and frizzy and just looked and felt awful. My hair afterwards is smooth and soft and I can run my fingers through it again!
Thanks for all the great recipes you have!
I’m so happy to hear that, Nicki! Thanks for taking the time to let me know 🙂
I have Wavy dry frizzy hair wat shampoo suits me
Hi, I have two questions. How many gram is one tablespoon gelatin? There are tablespoons with all kind of sizes. Please help. My other question is, how often do you use it? There is a big difference between one week and one month. I have normal, healthy hair. How often should I use it? I don’t want to do any harm, just want to feed my hair.
Thanks a lot for your help in advance.
Nice article by the way, I like the photos.
Hello, I bought online a collagen protein powder called LINEAVI and when I tried to follow your instructions to make the mask I noticed that the powder doesn’t really create lumps even if I put it in water that is barely warm. So my question is, do I still need to put it in a saucepan until it steams or is that process unnecessary since my gelatin doesn’t create lumps?
Thank you in advance!
Terpsi
What you are describing sounds like collagen hydrolysate, which is a little different than the type of collagen I used in this recipe. I’m not sure if it will work as well or if it needs to be heated. My recommendation would be to use gelatin that is not in hydrolysate form.
Re: Gelatin Hair Mask. What do you mean by add liquid to a small saucepan, water and apple cider vinegar? Add honey and apple cider vinegar again once cooled?
I’m not sure I understand the question. Could you please rephrase it?