These easy dried orange slices are a beautiful way to add a pop of color to your Christmas tree, garland, wrapped presents, simmering stovetop potpourri gift jars, and more.
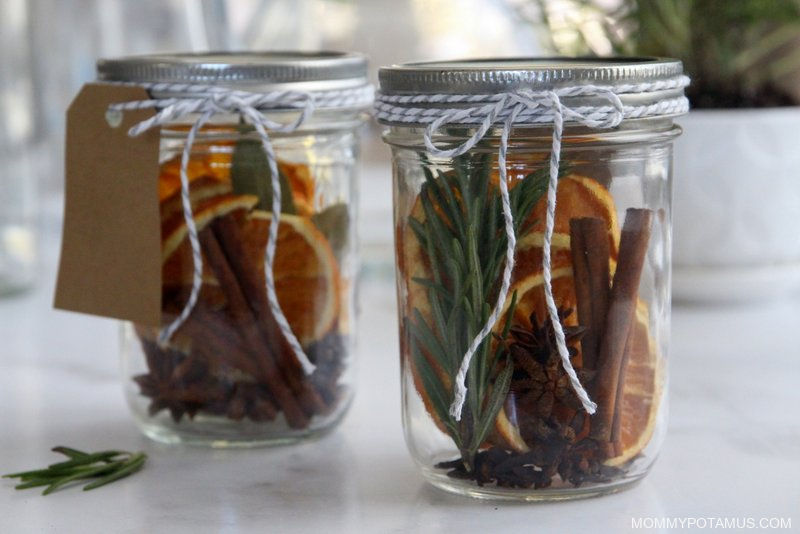
I love combining them with fresh sprigs of rosemary, dried eucalyptus, cinnamon sticks and/or pinecones to create a cozy atmosphere in my home throughout fall and winter.
They can be made using your oven or dehydrator, and though they truly are easy, there are a few tricks to getting the best results. I’ll cover those below, along with some ideas for using them in everything from decor to drinks.
Ways To Use Dried Orange Slices
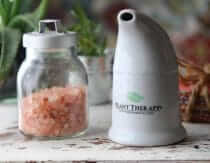
- Tuck them into mason jars with cinnamon sticks and few other ingredients to give as stovetop potpourri to friends and family (Find my recipe here)
- Tie with a string and hang as Christmas tree ornaments
- Add to garlands, mantles, table centerpieces, and wreaths
- To embellish gifts (see the photo below)
- As a garnish for drinks like mulled wine
- To snack on. I love to eat them whole!

Tips for Getting The Best Results
Choosing the best oranges:
- The deeper the color of the orange, the better the result
- Choose oranges with thick, dimply peels instead of thin, smooth peels.
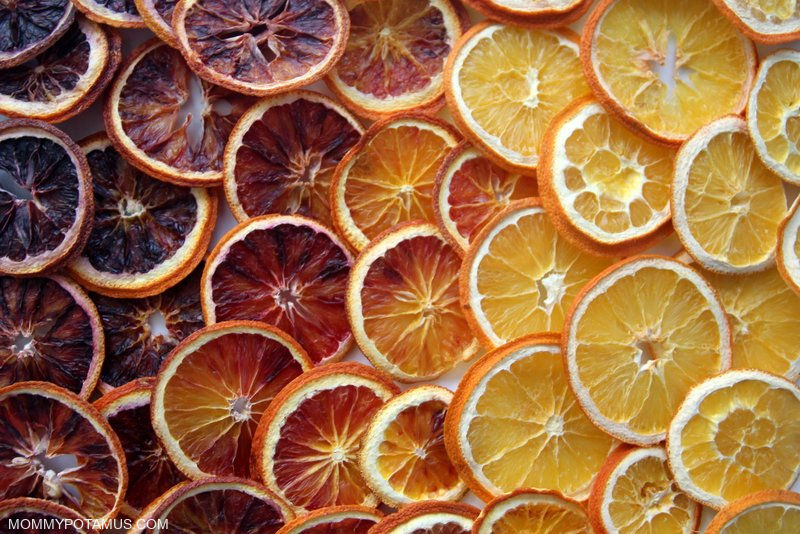
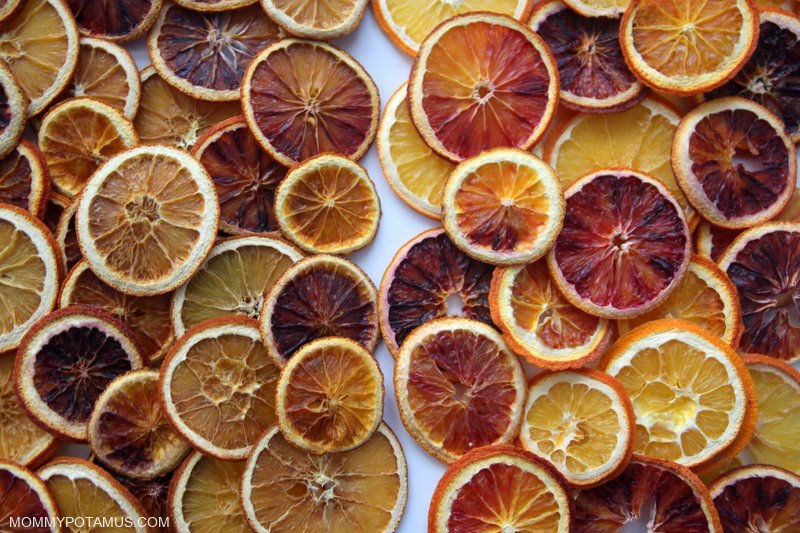
Navel oranges can vary in color from deep orange to pale yellow. A previous batch you see pictured was deep orange, but the ones I bought most recently were more pale, so I decided to add color by tossing blood oranges into the mix.
Cara cara oranges are often very vibrant if you can find them, and grapefruits can work beautifully, too.
Use A Good Knife
Thin, even slices (about 1/4 inch thick) create the best result, so make sure you have a sharp knife for making smooth, even cuts on hand.
Another option is to use a mandolin for slicing, but the blade needs to be very sharp. When I tried it with mine, it created about 50% beautiful slices and 50% mangled slices that I ended up serving to my kids as a snack.
Opt for Low, Slow Heat
It may be tempting to rush the process by increasing the heat a little. However, lower heat settings allow the oranges to retain more their vibrant color while higher settings tend to darken them.
I keep my oven at 170F, but up to 200F will work. You will probably need to remove them early to prevent burning, though. I’d start watching them around the 4.5 – 5 hour mark and remove them just as soon as they feel mostly dry. They’ll continue to dry a bit at room temperature.
Add Sugar & Spice
My first batch of dried orange slices was intended for decorating handmade gifts, but I had to make a second one because I didn’t realize just how deliciously snackable they can be.
I like mine plain – with the rind and everything – but they’re also delicious when sprinkled with a bit of sugar and/or cinnamon or dipped in melted chocolate and sprinkled with a touch of vanilla finishing salt.
Oven Vs. Dehydrator Results
If you have both an oven and a dehydrator and are wondering which one to go with, here’s a side-by-side comparison of oranges that I dried in my oven (left) at 170F for six hours versus my dehydrator (right) at 115F for twelve.
The higher heat oven-dried ones are a bit more rustic and softer in color, while the lower heat dehydrated ones are more true to their original vibrant hues. Both are beautiful in my opinion, so it really just depends on what you prefer.
How To Make Dried Orange Slices In The Oven Or Dehydrator
What You’ll Need
- Navel oranges, blood oranges, cara oranges or grapefruits (As many as you want, but keep in mind that you may be only able to fit 4-6 at a time in your oven or dehydrator depending on their size and the size of your drying unit.)
- Sharp knife for slicing
- Cutting board
- Cookie sheets
- Parchment paper
- Paper towels or dark kitchen towels
- Twine or clear fishing line
How To Dry Orange Slices in A Dehydrator
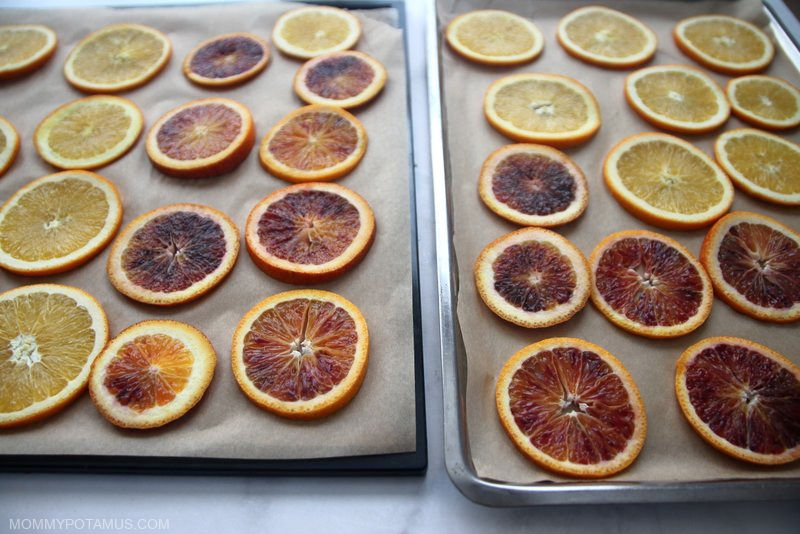
1. Using a sharp knife, slice each orange into 1/4 inch thick slices. Don’t worry about measuring them with a ruler or anything, just do your best to keep them thin and as even as possible.
2. Using a paper towel or kitchen towel (that won’t show stains), blot each side to remove excess moisture and speed the drying process OR skip the blotting step so that the natural sugars can concentrate and add a bit of shine.
3. Line your dehydrator tray with some parchment paper and lay the slices on the tray, making sure there’s a little room between each one.
4. Place the trays in the dehydrator. Some dehydrators allow you to manually select the temperature setting while others dry at one consistent temperature. Mine allows me to set mine, so I select 115F.
It usually takes about 8-12 hours for the orange slices to fully dry . . . usually closer to twelve for mine.
5. Flip them once or twice throughout the process to keep the edges from curling up. I usually flip around the 4 hour mark and then again around 8.
6. Once the oranges hit the 8 hour mark, start checking them and removing any slices that are fully dry.
7. Once your orange slices are completely dry, you can store them in a pretty jar and put them on display, make them into Christmas decorations, garlands, etc. If you want to use them as drink garnishes, store them in an airtight container in a cool dry area until you’re ready to use them.
How To Dry Orange Slices in the Oven
1. Preheat your oven to 170F.
2. Using a sharp knife, slice each orange into 1/4 inch thick slices. Don’t worry about measuring them with a ruler or anything, just do your best to keep them thin and as even as possible.
3. Blot each side with a paper towel or dark kitchen towel (that won’t show stains) to remove excess moisture and speed the drying process. I usually toss all the slices on a towel as I’m cutting, then toss another towel on top and blot them all at once.
4. Line your baking sheet with some parchment paper and lay the slices on the tray, making sure there’s room between each one. If you can fit two baking sheets in your oven and have enough oranges, keep going until you have both filled.
5. Place the baking sheet (or sheets) in the oven and dry for around six hours. Flip them every hour or so to keep the edges from curling up. Around the 4.5-5 hour mark, start checking to see if any of the oranges are done. If they are, remove them and set them aside. Continue this process until all the orange slices are dried.
6. Once your orange slices are completely dry, you can store them in a pretty jar and put them on display, make them into Christmas decorations, garlands, etc. If you want to use them as drink garnishes, store them in an airtight container in a cool dry area until you’re ready to use them.

How To Make Dried Orange Slice Ornaments
My process for making dried oranges into ornaments is super simple:
- Use something thin and sharp to poke a hole through the top of the orange, just underneath the rind. I used a shish kabob skewer, but a clean meat thermometer would also work.
- Thread a piece of twine through and tie it into a circle. That’s it!
As you can see in the photo below, when you add a bit of light it shines through the slices and allows their patterns to really shine.

More DIY Holiday Ornaments To Make

Traditional Salt Dough Ornaments – This recipe is as easy as 1-2-3! Plus, after all the fun is over you have a sweet keepsake for your tree. And possibly a gift for the grandparents, too.
Gluten-Free Salt Dough Ornaments – Here’s my tried-and-true gluten-free alternative to flour-based handmade ornaments.
Chalkboard Christmas Ornaments – One of my family’s traditions is to make a handmade ornament every year – this was one of our fave projects! All you need are some wooden rounds, chalk paint and stencils or stamps.
How To Make Dried Orange Slices
Ingredients
- Navel oranges, blood oranges, cara oranges or grapefruits (As many as you want, but keep in mind that you may be only able to fit 4-6 at a time in your oven or dehydrator depending on their size and the size of your drying unit.)
- Sharp knife for slicing
- Cutting board
- Cookie sheets
- Parchment paper
- Paper towels or dark kitchen towels
- Twine or clear fishing line
Instructions
How To Dry Orange Slices in A Dehydrator
- Using a sharp knife, slice each orange into 1/4 inch thick slices. Don't worry about measuring them with a ruler or anything, just do your best to keep them thin and as even as possible.
- Using a paper towel or kitchen towel (that won't show stains), blot each side to remove excess moisture and speed the drying process OR skip the blotting step so that the natural sugars can concentrate and add a bit of shine.
- Line your dehydrator tray with some parchment paper and lay the slices on the tray, making sure there's a little room between each one.
- Place the trays in the dehydrator. Some dehydrators allow you to manually select the temperature setting while others dry at one consistent temperature. Mine allows me to set mine, so I select 115F. It usually takes about 8-12 hours for the orange slices to fully dry . . . usually closer to twelve for mine.
- Flip them once or twice throughout the process to keep the edges from curling up. I usually flip around the 4 hour mark and then again around 8.
- Once the oranges hit the 8 hour mark, start checking them and removing any slices that are fully dry.
- Once your orange slices are completely dry, you can store them in a pretty jar and put them on display, make them into Christmas decorations, garlands, etc. If you want to use them as drink garnishes, store them in an airtight container in a cool dry area until you're ready to use them.
How To Dry Orange Slices in the Oven
- Preheat your oven to 170F.
- Using a sharp knife, slice each orange into 1/4 inch thick slices. Don't worry about measuring them with a ruler or anything, just do your best to keep them thin and as even as possible.
- Blot each side with a paper towel or dark kitchen towel (that won't show stains) to remove excess moisture and speed the drying process. I usually toss all the slices on a towel as I'm cutting, then toss another towel on top and blot them all at once.
- Line your baking sheet with some parchment paper and lay the slices on the tray, making sure there's room between each one. If you can fit two baking sheets in your oven and have enough oranges, keep going until you have both filled.
- Place the baking sheet (or sheets) in the oven and dry for around six hours. Flip them every hour or so to keep the edges from curling up. Around the 4.5-5 hour mark, start checking to see if any of the oranges are done. If they are, remove them and set them aside. Continue this process until all the orange slices are dried.
- Once your orange slices are completely dry, you can store them in a pretty jar and put them on display, make them into Christmas decorations, garlands, etc. If you want to use them as drink garnishes, store them in an airtight container in a cool dry area until you're ready to use them.
Want more research-backed natural remedies?
No problem, I’ve created a free ebook for you – Kitchen Apothecary: 25+ Natural Remedies Using Ingredients From Your Pantry – as a gift for signing up for my newsletter. You’ll also get updates when I post about safe essential oils for pregnant/breastfeeding mamas, exclusive gifts and coupons (I was able to give away a jar of free coconut oil to anyone who wanted it recently!), plus other goodies.
Sign up using the form below.