
Want to play “I never”?
Good, I’ll start. Since becoming a mom, I have never ever accidentally used the phrase “go potty” with an adult because I forgot how to talk like one. I have never ever accidentally rubbed soft scrub in my armpits instead of my homemade deodorant.
And I most certainly have never ever run out of shampoo and washed my hair with regular bar soap.
Okay, I have actually done all those things. Now obviously I don’t recommend the first two, but hear me out on that last one.
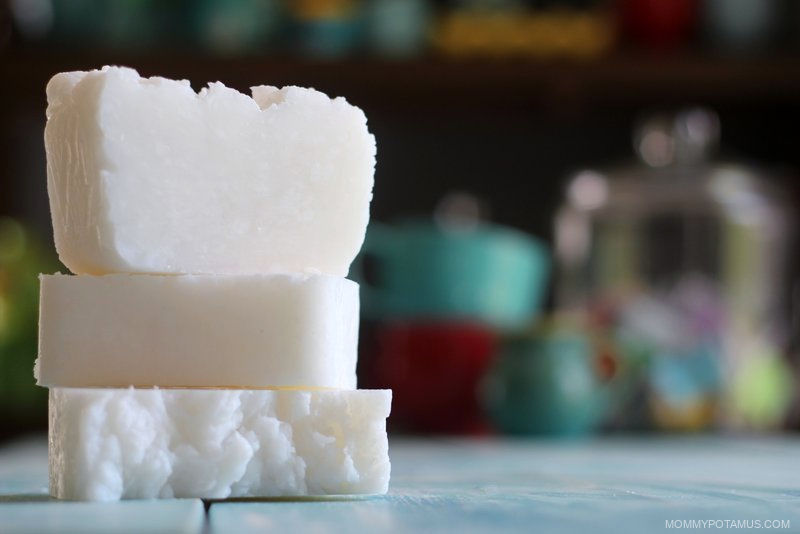
It all started on a day when I needed to shower and get dressed in 10 minutes – so basically, a typical day at that stage of motherhood – and realized I was completely out of shampoo. Rather than hop out of the shower and mix up a batch of clay hair wash, I grabbed my coconut oil soap and rubbed it on my head.
There was SO. MUCH. LATHER. We’re talking lather for days. And my hair was so soft afterwards I started to feel a little self conscious about how often I was stroking my own hair. It did leave it a smidge oily, but I loved the overall effect so much I decided to play with the recipe and see if I could change that.
Turns out, reducing the amount of oil in the finished bar by about 8% did the trick. It gently cleaned and moisturized my hair without leaving it heavy or greasy. You only need three ingredients to make it, and today I’m sharing the recipe.
New To Shampoo Bars? Here’s What You Need To Know ^
As I mentioned in this article on detoxing your hair, commercial shampoos are usually made with surfactants such as sodium lauryl sulfate – which is often contaminated with the probable human carcinogen 1,4 dioxane – instead of true soap. (1) (2)
They also often contain silicone, which coats the hair and prevents it from absorbing moisture. While silicone can make hair look smooth and shiny in the short-term, it can actually cause it to dry out and become more brittle over time.
When you make the switch to natural shampoo, you’re going from an approach that strips hair and then coats it with polymers to something that washes and nourishes the hair with a natural oil. If you’re using the right bar it shouldn’t make your hair heavy or greasy – it will provide just enough oil to help hair maintain its softness and flexibility.
During the transition you may find that your hair feels a little gummy, though – this can happen as silicone and other polymers begin to peel off. Fortunately, you can speed up the process with the hair detox tutorial I linked to above.
Another reason hair can seem dry or dull is that it soap is alkaline and your hair prefers a more acidic environment. When washing with soap, you need to keep it happy by restoring hair pH with an acidic rinse after shampooing. You’ll find an easy recipe in the “How To Use Solid Shampoo Bars” section below.
The rinse acts as a “conditioner” that restores pH, smooths the cuticle and makes your hair shiny. In most cases you won’t need an additional conditioner, because shampoo bars moisturize as they cleanse.
Video Tutorial: Making Coconut Oil Shampoo Bars ^
Before I started making soap, I asked a friend if I could stop by and watch her make a batch. She agreed, and that afternoon in her kitchen helped me become comfortable enough with the process to try on my own.
In the video below, I invite you into my kitchen to do the same. I’ll walk you through my method for making hot process soap. Unlike cold process soap, which takes 4-6 weeks to cure before it’s ready, hot process soap uses an external heat source (in my recipe, a slow cooker) to speed up the process so that the soap can be used as early as the day after it is made.
After you watch the video, scroll down this post for the exact recipe and written instructions to follow as you go. There’s also a printable version of the recipe at the bottom of the tutorial.
Also, if you’re looking for the body bar and laundry soap recipes that I mentioned in the video, you can find the body bar here and my homemade laundry detergent recipe here. Now, back to the shampoo bar . . .
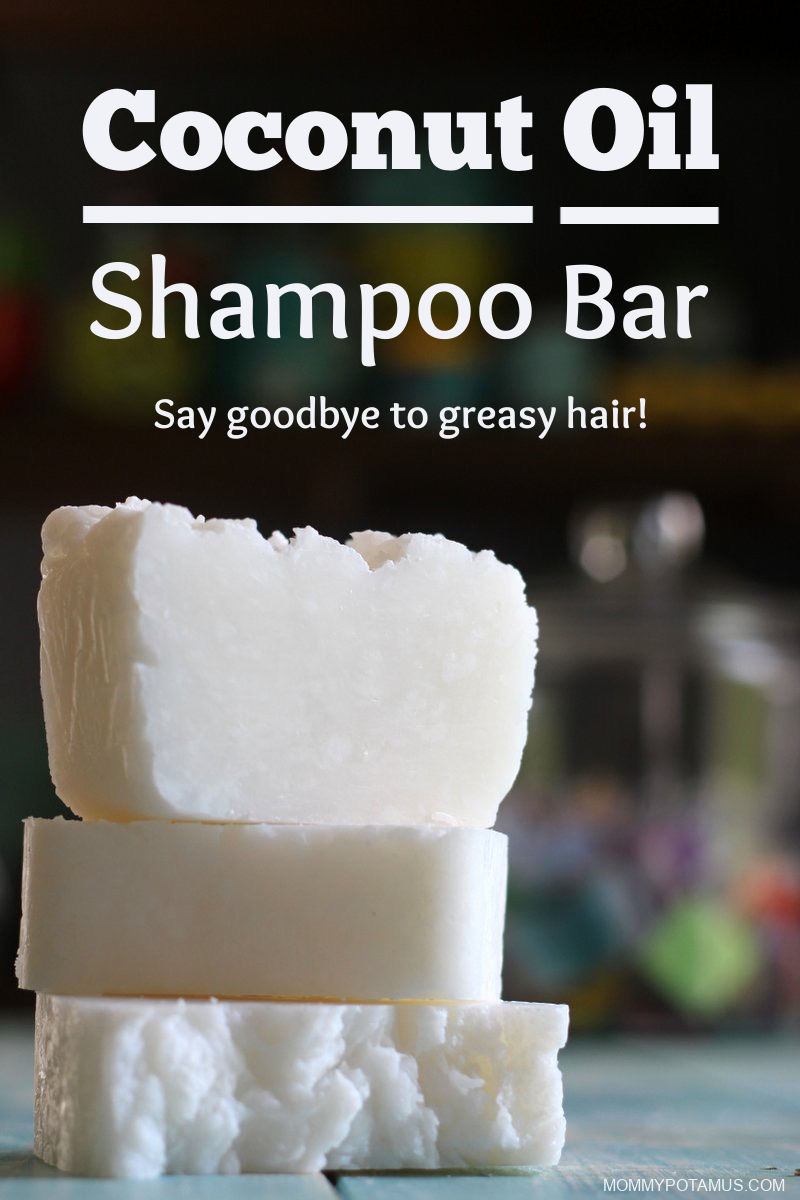
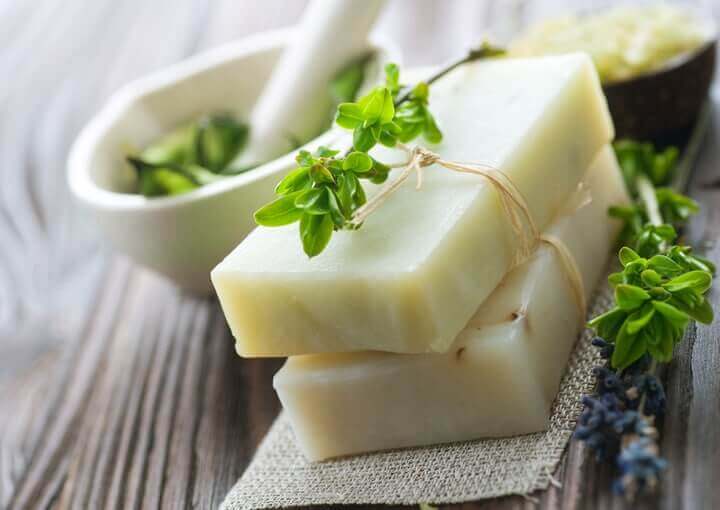
Coconut Oil Shampoo Bar Recipe ^
This coconut oil shampoo bar recipe delivers a rich lather that cleans and gently moisturizes without leaving hair heavy or greasy.
Ingredients For Normal Hair (10% superfat)
- 33 oz. coconut oil
- 12.54 oz. distilled water
- 5.44 oz. lye (sodium hydroxide)
- ½ – 1 ounce essential oils (tea tree, peppermint, and rosemary are good options)
Ingredients For Dry Hair (12% superfat)
- 33 oz. coconut oil
- 12.54 oz. distilled water
- 5.32 oz. lye (sodium hydroxide)
- 1/2 – 1 ounce essential oils (tea tree, peppermint, and rosemary are good options)
Equipment Needed:
Note: According to Anne Watson, author of Smart Soapmaking, you can use your regular kitchen utensils as long as you follow these guidelines.
- 8 quart slow cooker/crock pot
- Immersion blender
- Digital scale
- Glass measuring cups
- Bowls for measuring your oils
- Medium-size heat resistant glass bowl for mixing the lye water
- Stainless steel or plastic spoon with long handle (If you use a wooden spoon like the one pictured below, make sure not to use it for anything but soapmaking)
- Protective equipment: long-sleeved shirt, plastic/rubber gloves, safety glasses or protective eye gear
- Soap mold – A standard sized bread pan will work for this batch, or you can use a flexible silicone mold like this one.. If you use a bread pan instead of a flexible mold that easily pops out the soap, just make sure to line it with parchment paper so you can easily lift the soap out.
- Thermometer (Optional – only needed if you’re adding essential oils)
- Sink filled with hot soapy water (For cleaning anything that comes in contact with lye. Wait until you’re ready to clean to fill the sink. Details below)
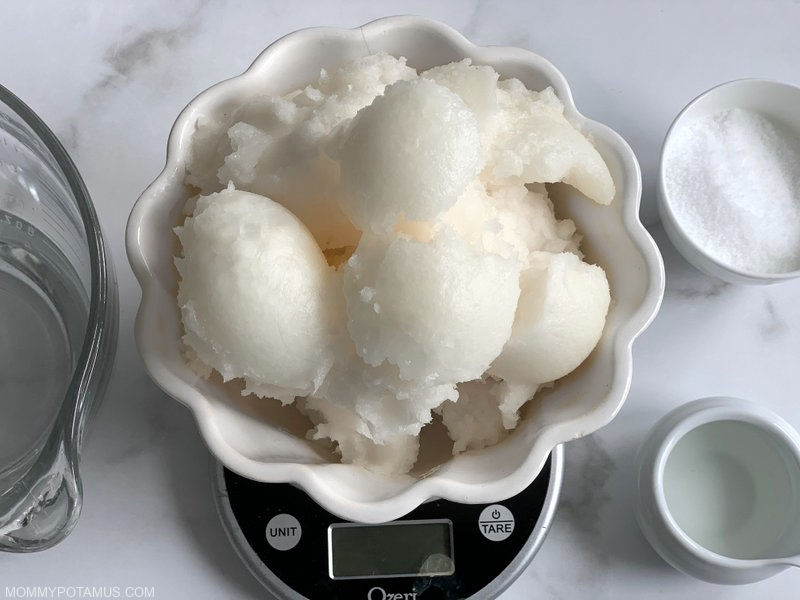
Step 1: Weigh Your Ingredients
Weigh all your ingredients – coconut oil, distilled water, lye and essential oils if you’re using them.
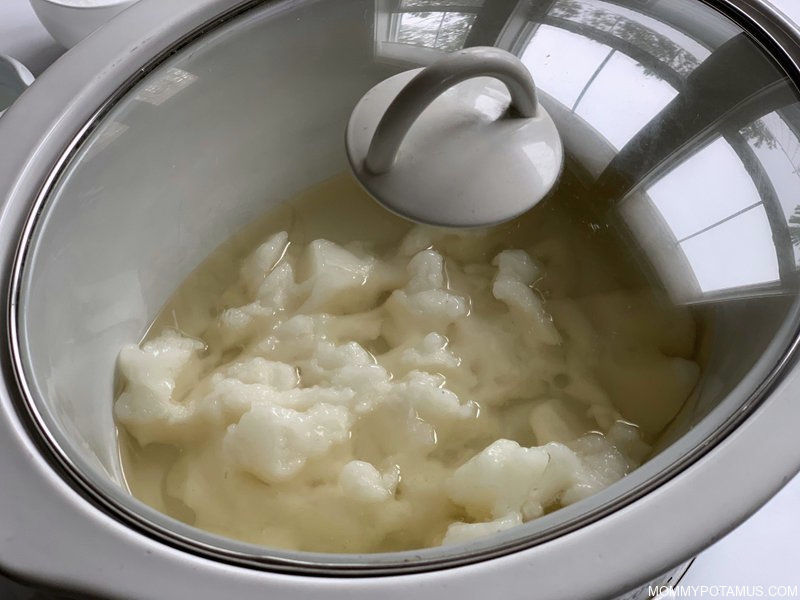
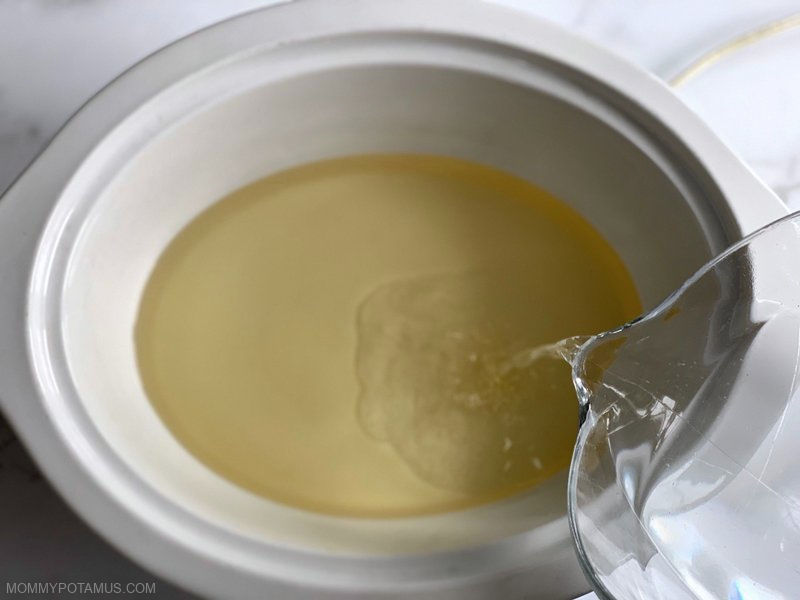
Step 2: Melt The Coconut Oil
Add the coconut oil to the crockpot and set it to low. It’s okay if it’s in solid state – it will melt fairly quickly. When the coconut oil is almost fully melted, move on to Step 3.
Step 3: Mix The Lye Water
It’s time to mix your lye water. Put on your protective gear, add your water to a medium-sized heat-resistant glass or ceramic bowl, and choose a well-ventilated area that kids and pets don’t have access to.
I prefer to mix outside, but some soapers like to mix in their kitchen sink with several open windows and a fan or air purifier running. If you’re new to working with lye, see the FAQ section for safety information.
Make sure you have a long-handled spoon or spatula ready. I use a this silicone spatula/scraper.
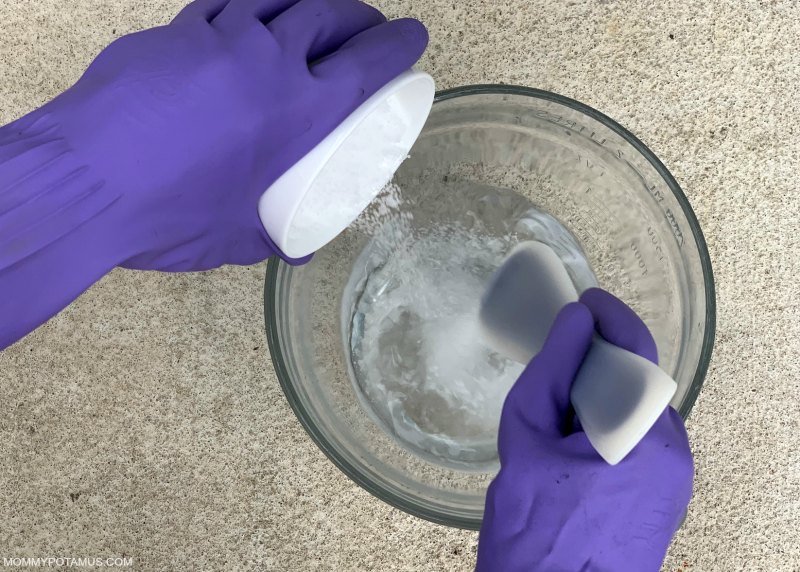
While wearing your protective gear and taking care not to breathe the vapors, slowly add the lye to the water while mixing gently. Order is important here, so make sure it is the lye you’re pouring into the water.
Keep stirring until the lye seems mostly dissolved. The mixture will be cloudy at first, but will turn clear in 5-10 minutes.
When it’s clear, proceed to step 4.
Step 4: Add The Lye Water To The Slow Cooker
Add lye water to the slow cooker (being careful not to splash) and stir a few times.
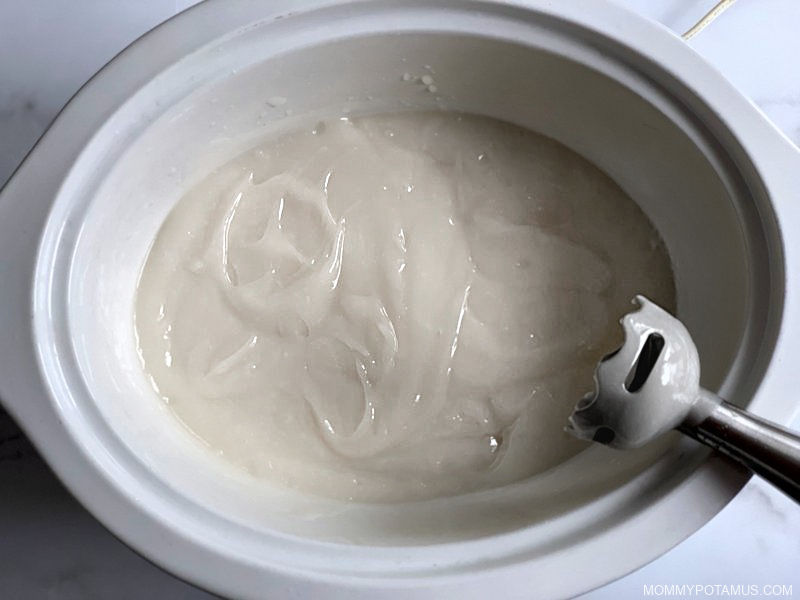
Step 5: Bring Mixture To Trace
Using the immersion blender, begin mixing toward “trace.” Hold the immersion blender straight up and down (versus at an angle) so that it is fully immersed in the mixture and doesn’t splash.
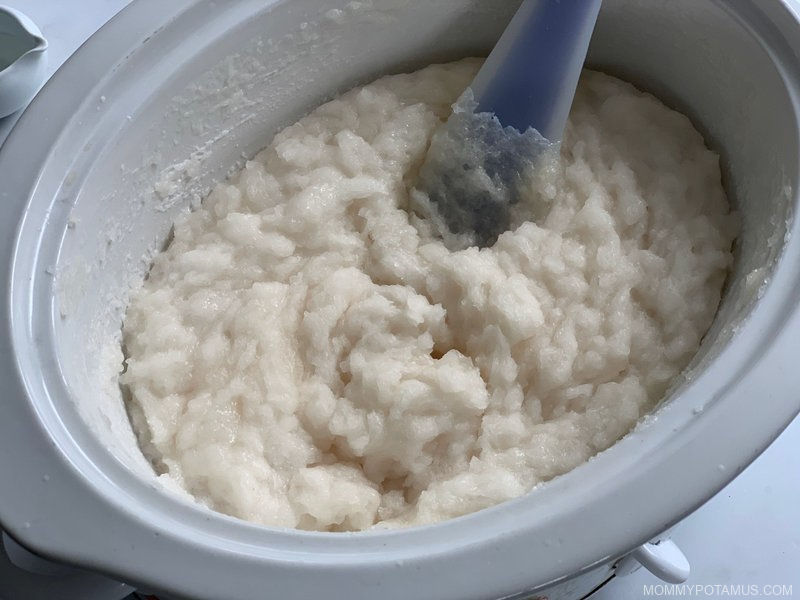
You’ll know trace is achieved when the mixture has the texture and thickness of a light pudding.
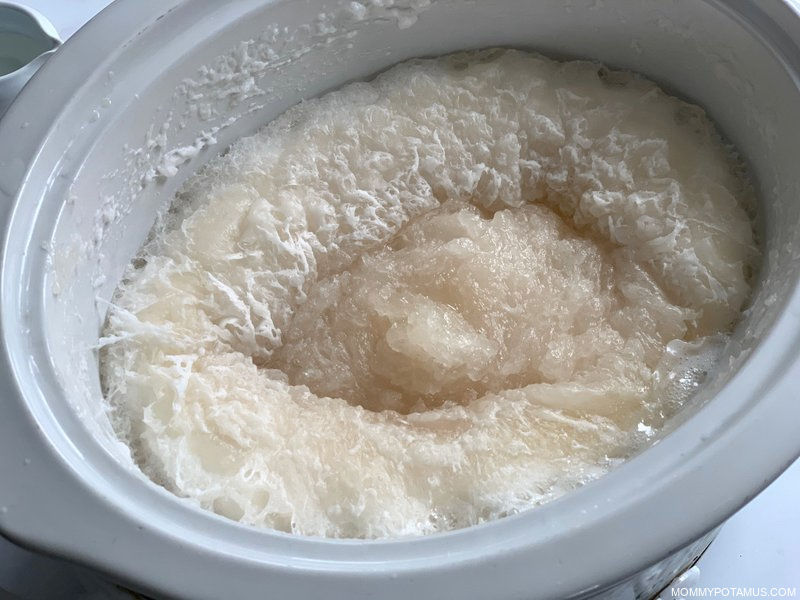
Step 6: Check On The Soap
Cover and cook on low for approximately 45 minutes to an hour. I stay nearby and check on the soap about every 15 minutes.
During the saponification process (the conversion of oil and fat to soap) the oils should rise up the sides like a wave and then fold back into the mixture. If they rise too high they can sometimes overflow out of the slow cooker, so I give it a few stirs throughout the process.
Step 7: Check for Doneness
When the soap is ready, it should look like soft, fluid mashed potatoes. Here’s how to test your soap for readiness according to Dr. Kevin Dunn, author of ‘Scientific Soapmaking.”
“1) Take a gloved finger and wet it.
2) Rub the wet finger over the surface of your soap to gather up a coating of diluted soap/lather (does not have to be frothing).
3 Very carefully touch the lather on your finger to only the very tip of your tongue – i.e., behave as if your finger might be covered with something gross or dangerous, instead of covered with something delicious like chocolate. Don’t go licking the bar of soap itself, and don’t go rubbing your lathered finger all over your tongue. Just a quick touch or 2 of your lathered finger to the very tip of your tongue is all it takes to be able to detect excess alkali/unreacted lye in your soap, which will make itself known by a zapping or stinging sensation on the tip of your tongue.
4) Repeat the above on each side of your soap.
5) Rinse your mouth out with water (or lemon juice if you desire) and spit.”
If there’s no zapping or stinging sensation, it’s ready. If you don’t want to do this test, the only other reliable testing method I know of is to purchase a waterproof pH tester kit and make sure the soap ph is between 8-10.
Note: It’s really important to make sure the soap is finished cooking and therefore all the lye is converted – otherwise it can burn skin.
Step 8: Add Essential Oils (If You’re Using Them)
If you’re adding essential oils, you’ll want to wait until the mixture cools to 140°F before you mix them in. If the mixture is too hot the essential oils will evaporate on contact instead of infusing into the soap.
You’ll know your soap mixture is cool enough when you can place a thermometer into the center of the mixture (not touching the bottom of the slow cooker) and it reads 140F.
Step 9: Spoon The Soap Into Your Mold
Spoon the soap into your mold and firmly tap the mold on your work surface a few times to get rid of any air bubbles. (It shouldn’t splash, but just in case make sure you’re still wearing your protective gear.)
Fill your sink with hot, soapy water and wash all your tools well while wearing your protective equipment. Rinse very well after washing
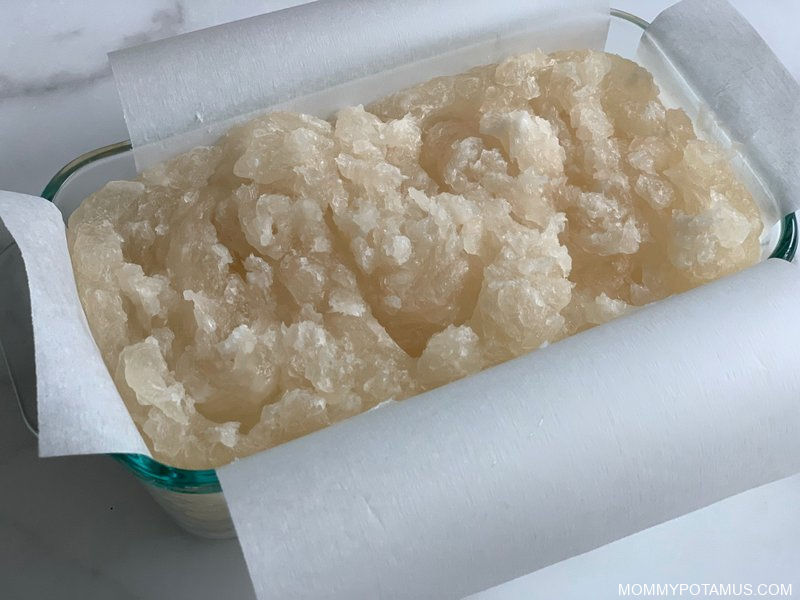
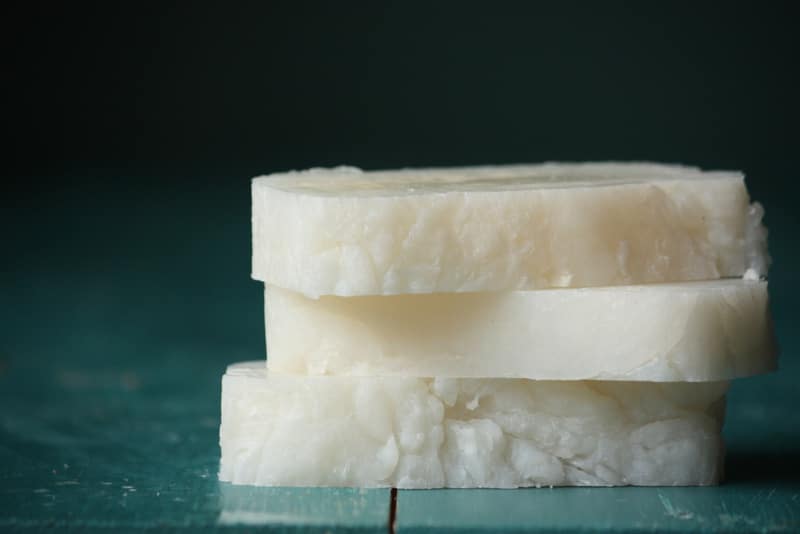
This is what your soap loaf will look like after it has hardened.
Step 10: Cut Your Bars
Unlike other bars which need to harden for 24 hours before being cut, coconut oil makes a very hard bar that will be difficult to cut if you let it dry too long.
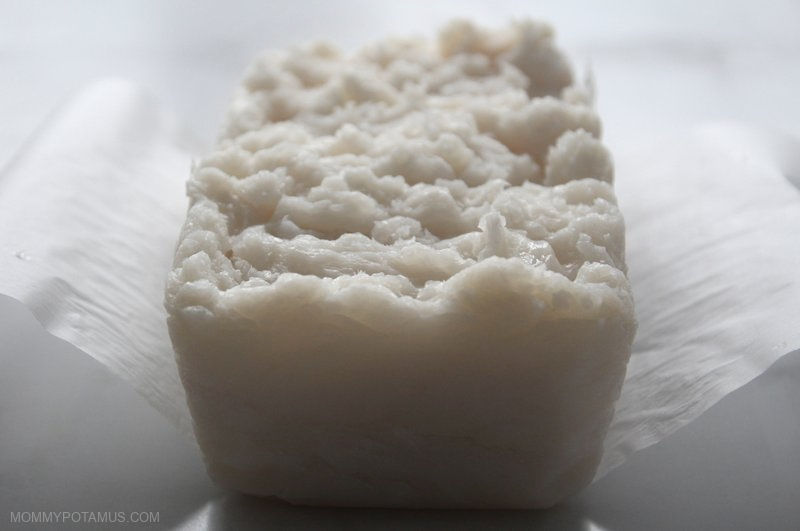
Cut as soon as it’s cool and firm.
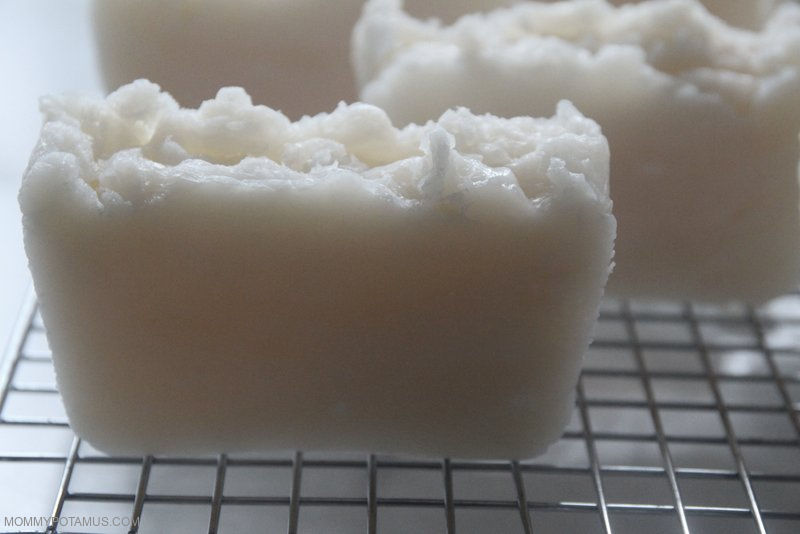
Step 11: Use Right Away Or Let Them Cure
Your shampoo bars can be used right away, but they’ll last longer if they’re allowed cure for a bit. I usually put one bar in my shower and then place the rest in an area with good airflow to continue to cure. Make sure they have about an inch of space between them and let them sit for up to a couple of weeks.
How To Use Solid Shampoo Bars ^
The easiest way to use your shampoo bar is to lather in your hands and then work from root to tip, then rinse your hair very thoroughly and follow with the shine boosting rinse below.
Shine Boosting Rinse Recipe
Ingredients
- 1/2-1 cup apple cider vinegar or distilled white vinegar
- Enough filtered water to bring the vinegar mixture to 1.5 cups
To Use:
Mix ingredients and pour into a container – I use a large squeeze top bottle. Pour enough over hair to saturate and allow to sit for 2-3 minutes, then rinse. Cool water is best because it helps smooth hair by closing the hair cuticle, but warm is okay.
Note: After my hair dries the scent of vinegar fades completely, but some people have reported that it lingers a little. If desired, you can spritz a scented hydrosol on your hair to give it a fresh scent. Sometimes called floral waters, hydrosols are scented waters that are created during the essential oil distillation process.
Some good options are:
- Organic lavender hydrosol
- Organic rosemary hydrosol
- Organic rose hydrosol
- Organic peppermint hydrosol
Frequently Asked Questions ^
Below are answers to some of the most common questions I’ve received about soapmaking through the years. If you don’t see your question answered here or in this article on soapmaking myths, please leave it in the comments below!
What is the shelf life?
These bars will pretty much last indefinitely in a cool, dry place.
Can I substitute another oil like olive oil, castor oil, avocado oil, jojoba oil or sweet almond oil?
Yes, you can, but there are two things you need to know first:
- Different oils have different saponification values (the amount of lye needed to convert the oil to soap) so you’ll need to run the new recipe through a lye calculator to determine how much water/lye you’ll need.
- Coconut oil works well in this recipe because it creates a very cleansing lather. Many other common oils create more of a nourishing, moisturizing lather that will work beautifully for skin but may leave hair feeling heavy.
I want to make lye-free soap. How do I do that?
All soap is made by combining fats with lye to initiate a process called saponification – aka making soap. All soap is made with lye, but when used correctly there is no lye left in the finished product because it has all turned into soap.
Some people think that melt-and-pour soaps are lye-free, but actually they’ve just gone through the saponification process before being packaged and sold. Melting them does not actually making soap since saponification has already occurred, but it is possible to add essential oils, herbs and clays to customize the soap.
Can I make this into a liquid shampoo?
Liquid soaps like castile soap use a type of lye called potassium hydroxide instead of sodium hydroxide. I don’t know of a way to convert this solid shampoo bar into a liquid.
What are some tips for adding lye to water?
Add the lye to the water either outside or in a well-ventilated area. I personally prefer to add it outside, but some soapers use their kitchen sink as the mixing area after opening several windows and turning a fan or air purifier on.
When the lye is mixed in, it will become hot and release vapors which is why you want to be in a well ventilated area. When I mix mine I can see the vapors rising (they look like steam) so I just lean my head away and don’t breathe them in.
While the lye is cooling it should not be in an area that is accessible to children or pets.
Also, when mixing soap lye or blending soap, protect your work area with packing paper or something similar to keep the lye from getting on surfaces.
Can this homemade shampoo bar be made using the cold process method?
Yes!
Do you recommend this bar for color-treated hair?
Unfortunately, it’s not recommended for color treated hair because it cleans by opening the hair shaft, then closing the hair shaft after washing with an acidic rinse. If hair is dyed, the dye may leak out when this happens.
More Hair Care Recipes To Try ^
Homemade Hair Detangler – If there are tears over tangles in your house, here are three homemade hair detangler recipes that are inexpensive and simple to make.
Natural Hair Gel – Many of the styling gels on store shelves contain hormone disrupting fragrances and formaldehyde releasers, but you can make natural hair gel with just 1-3 simple ingredients using the recipes from my article.
Coconut Oil Shampoo Bar Recipe ^
Ingredients
Ingredients For Normal Hair (10% superfat)
- 33 oz. coconut oil
- 12.54 oz. distilled water
- 5.44 oz. lye (sodium hydroxide)
- ½-1 oz. essential oil (tea tree, peppermint, and rosemary are good options)
Ingredients For Dry Hair (12% superfat)
- 33 oz. coconut oil
- 12.54 oz. distilled water
- 5.32 oz. lye (sodium hydroxide)
- ½-1 oz. essential oils
Equipment Needed
- 8 quart slow cooker/crock pot
- Immersion blender
- Digital scale
- Glass measuring cups
- Bowls for measuring your oils
- Medium-size heat resistant glass bowl for mixing the lye water
- Stainless steel or plastic spoon with long handle (If you use a wooden spoon like the one pictured below, make sure not to use it for anything but soapmaking)
- Protective equipment: long-sleeved shirt, plastic/rubber gloves, safety glasses or protective eye gear
- Soap mold (A standard sized bread pan will work for this batch, or you can use a flexible silicone mold like this one.. If you use a bread pan instead of a flexible mold that easily pops out the soap, just make sure to line it with parchment paper so you can easily lift the soap out.)
- Thermometer (Optional – only needed if you're adding essential oils)
- Sink filled with hot soapy water (For cleaning anything that comes in contact with lye. Wait until you're ready to clean to fill the sink. Details below)
Instructions
- Weigh all your ingredients – coconut oil, distilled water, lye and essential oils if you're using them.
- Add the coconut oil to the crockpot and set it to low. It’s okay if it’s in solid state – it will melt fairly quickly. When the coconut oil is almost fully melted, move on to Step 3.
- It's time to mix your lye water. Put on your protective gear, add your water to a medium-sized heat-resistant glass or ceramic bowl, and choose a well-ventilated area that kids and pets don't have access to. I prefer to mix outside, but some soapers like to mix in their kitchen sink with several open windows and a fan or air purifier running. If you're new to working with lye, see the FAQ section for safety information.Make sure you have a long-handled spoon or spatula ready. I use a this silicone spatula/scraper.While wearing your protective gear and taking care not to breathe the vapors, slowly add the lye to the water while mixing gently. Order is important here, so make sure it is the lye you’re pouring into the water.Keep stirring until the lye seems mostly dissolved. The mixture will be cloudy at first, but will turn clear in 5-10 minutes. When it's clear, proceed to step 4.
- Add lye water to the slow cooker (being careful not to splash) and stir a few times.
- Using the immersion blender, begin mixing toward “trace.” Hold the immersion blender straight up and down (versus at an angle) so that it is fully immersed in the mixture and doesn't splash. You’ll know trace is achieved when the mixture has the texture and thickness of a light pudding.
- Cover and cook on low for approximately 45 minutes to an hour. I stay nearby and check on the soap about every 15 minutes. During the saponification process (the conversion of oil and fat to soap) the oils should rise up the sides like a wave and then fold back into the mixture. If they rise too high they can sometimes overflow out of the slow cooker, so I give it a few stirs throughout the process.
- When the soap is ready, it should look like soft, fluid mashed potatoes. Here's how to test your soap for readiness according to Dr. Kevin Dunn, author of 'Scientific Soapmaking:1) Take a gloved finger and wet it.2) Rub the wet finger over the surface of your soap to gather up a coating of diluted soap/lather (does not have to be frothing).3) Very carefully touch the lather on your finger to only the very tip of your tongue – i.e., behave as if your finger might be covered with something gross or dangerous, instead of covered with something delicious like chocolate. Don't go licking the bar of soap itself, and don't go rubbing your lathered finger all over your tongue. Just a quick touch or 2 of your lathered finger to the very tip of your tongue is all it takes to be able to detect excess alkali/unreacted lye in your soap, which will make itself known by a zapping or stinging sensation on the tip of your tongue.4) Repeat the above on each side of your soap.5) Rinse your mouth out with water (or lemon juice if you desire) and spit.If there's no zapping or stinging sensation, it's ready. If you don't want to do this test, the only other reliable testing method I know of is to purchase a waterproof pH tester kit and make sure the soap ph is between 8-10. Note: It's really important to make sure the soap is finished cooking and therefore all the lye is converted – otherwise it can burn skin.
- If you’re adding essential oils, you'll want to wait until the mixture cools to 140°F before you mix them in. If the mixture is too hot the essential oils will evaporate on contact instead of infusing into the soap. You'll know your soap mixture is cool enough when you can place a thermometer into the center of the mixture (not touching the bottom of the slow cooker) and it reads 140F.
- Spoon the soap into your mold and firmly tap the mold on your work surface a few times to get rid of any air bubbles. (It shouldn't splash, but just in case make sure you're still wearing your protective gear.)Fill your sink with hot, soapy water and wash all your tools well while wearing your protective equipment. Rinse very well after washing.
- Unlike other bars which need to harden for 24 hours before being cut, coconut oil makes a very hard bar that will be difficult to cut if you let it dry too long. Cut as soon as it’s cool and firm.
- Your shampoo bars can be used right away, but they'll last longer if they're allowed cure for a bit. I usually put one bar in my shower and then place the rest in an area with good airflow to continue to cure. Make sure they have about an inch of space between them and let them sit for up to a couple of weeks.
FREE Ebook: DIY Body Care Gifts Made Simple ^
Do you want to give gorgeous, handcrafted gifts for family and friends, without spending a bunch of time on them?
Then I’d love to give you a free copy of DIY Body Care Gifts Made Simple – my step-by-step guide to making gorgeous handcrafted gifts without stressing yourself out – as a gift for signing up for my newsletter. I’ll show you how to make vintage labels, luxurious lotion bars, lip balms, sugar scrubs, body sprays and more like a pro. Sign up for my newsletter and you’ll be redirected to the download page immediately!
Sources
1. MadeSafe (2017) The Truth About Shampoo & Conditioner
2. Environmental Protection Agency (2010) 1,4-Dioxane

Hi,
Was wondering if this soap will melt in warm temps? I’m thinking it will. Trying to find a good shampoo recipe for my son who spends his summers in Africa.
Thanks, Deb
Hmmm, I don’t think so. It might get sticky, though. If regular bar soap doesn’t melt there this recipe will be fine.
I’m a soapmaker and I live in Riyadh Saudi Arabia and I’ve never had any problems with soap melting. The only thing I’ve experienced was some of the soaps getting sticky when they’ve been sitting in direct sunlight for hours. Hope this helps!
Thanks so much!
HI, from where do you buy Lye? I live in Kuwait, no idea from where to find it. Thanks
I don’t know if you still need an answer to this, but I usually buy lye from the hardware store. It is used to unclog drains, so look in the plumbing section. Just make sure you are buying a product that has 100% Lye and no other additives.
Amazon, or Bulk Apothecary
Hello!
I finally have the chance to make shampoo bar and been eyeing this recipe for ages. I was wondering if I were to combine Shea butter and/ castor oil in this recipe would it be unnecessary or would it make the bar super greasy?
Hi Surahbi, each oil/butter has its own saponification value, which is the amount of lye needed to convert the fat into soap. If you change the fat you use you’ll need to run the recipe through a lye calculator to see how much lye to use. I think both shea butter and castor oil could be beneficial depending on the ratios. 🙂
Hi! I love this recipe, as it gives a consistent result every time.
I’m if it could be made with rice water, or if that would mess up the finished product. Have you ever tried it?
Thanks!
Can I make and sell these shampoo bars?
Can i do it cold process? I dont have a crock pot. Tnx
Yes 🙂
Do you have a shampoo soap recipe for color treated hair?
I was really amazed by your presentation. I hope i can make my own shampoo soap too. Godbless and more power! I love to watch your vlogs again. ♥️
Is there something else that can be used as a conditioner Instead of a vinegar rinse? My husband wants to use the shampoo bar but isn’t a fan of doing a vinegar rinse .. thank you in advance
Hi, My husband loves this recipe and never rinses with anything.
Hi
I make body soap with 100% coconut oil @20% superfat (to counteract the drying effects)
Im very interested in making Shampoo bars as well. Is it 12% low? wouldn’t be to cleansing for your hair and scalp for that matter? thank you again for that amazing video.
This is not a good shampoo bar to use on your hair!!! Coconut oil is a cleansing oil and only moisturizing in small quantities. When used in large quantites, like in this bar, it becomes a laundry soap. The cleansing quality of the soap will strip the hair of its natural oils and with continuous use will dry out the hair and scalp. You must use other oils such as jojoba oil, argan oil, and avocado oil, to help balance out the soap with cleansing and moisturizing qualities.
My hair does not become dry with continuous use of this shampoo.
I love this shampoo, I don’t find it to be drying and it gives my limp hair body.
I use this shampoo bar, swapping with another natural liquid shampoo that I buy commercially. The reason I do this is that, contrary to the view in the previous post, my normal-to-dry hair actually would look and feel too moist three days after shampooing with this bar. So when my scalp became no longer dry, (the natural sebum reestablished), I went back to alternating between this soap and my other. I am 65 years old and my hair looks and feels like it belongs to a healthy 20s-something.
How do you make the shampoo liquid? I have learned how to make the bar shampoo from you. Thank you. How can I make it liquid so I can put it in a bottle?
Sorry, but I don’t know of a way to turn this shampoo bar into a liquid.
My mum used to make liquid shampoo from natural soaps by grating the bar then adding water and letting it all sit for a couple of days. It went a bit snotty. Then she would blend it somehow. This was all I ever used growing up and I had long healthy hair.
I have been using castille bar soap I made with olive oil and I notice if it gets in my eyes when I rinse it burns pretty bad. Not a big deal for me, but I want to use homemade soap for my toddler’s hair and would want it to be year free if possible. Is this recipe less harsh on the eyes, or do you know what is?
I can’t find where to post a new comment on my phone so I’ll just do it here. I love making this soap, but it ALWAYS smells like baby barf. lol Not kidding. Last night we tried a tbsp of citrus essential oils. You can still smell it. Is that the normal smell of it?
That’s really strange. Mine doesn’t really have a scent at all, and what scent there is just smells like soap. 🙂
I wonder if it could be the lye. It looks like tiny tiny beads…
I was curious why with using so much coconut oil that there is almost no smell? Is there any essential oil fragrance that you would not want to use? Even though I made the soap for dry hair I don’t find it very oily should I add anything to the mixture
Hi, do you use unscented coconut oil for the recipe? Thank you 🙂
Hi, do you use unscented coconut oil? Thank you!
I do for this recipe
I can’t figure out how to ask a question either. I have two:
1.) Can I use more water to make it work in a pump like traditional shampoo?
2.) Are there certain essential oils you definitely should not use? My favorite is grapefruit essential oil. Is that ok?
Extra water will not make liquid soap. Potassium hydroxide is used for liquid, instead of sodium hydroxide (lye). However don’t recommend doing a straight swap of the two.
1. No. That’s not how soap works. If you want liquid soap, you need potassium hydroxide instead of sodium hydroxide (and adjust accordingly). If you add more water to a sodium hydroxide soap, you’ll just end up with bars that are softer for longer and shrink more as they age.
2. Yes, there are certain ones you should not use. There are also certain ones that you should use with “anchors.” Citrus essential oils kind of fall into both. They cause photosensitivity, so you don’t want to use a lot, and as citrus, they’re “high” notes, which will fade quickly. You want to mix them with “base note” scents to make them last longer. This is why orange is often mixed with pine or mint, for example.
Just made my first batch of soap following this recipe. I didnt have 900ml of coconut so i proportioned the recipe to suit the 700ml i had. It didnt do the custard consistancy after adding the lye and water mixture and it curdled. It was blobby but also flaky when i put it into the mould. Tried a clump of flakes and it lathers nicely. Fingers crossed it does the job on my hair and saves me $25 AUD/2months on a commercial bar. Thanks
Hi I followed your recipe for the shampoo bars to the letter twice. Both times it the soap didn’t form it just crumbled any advice?
Hi Jeffrey, are you weighing the ingredients or measuring by volume? It sounds like you have too much lye in your batch, which could happen if the ingredients are not weighed.
Hi
I love this and the shampoo recipe and have made heaps. I am still confused by oz and ounces as they weigh different amounts in grams so it really affects my recipes. On the website the recipes differ between the soap and shampoo recipes ie for lye the soap says ounces and in the shampoo it says oz. because I am converting to grams this makes a big difference.
Can you confirm if the oil, and lye are measured as a weight ie oz and the water as a fluid ounce?
Thanks again for sharing this amazing recipe
Elaine
It does smell like baby puke. I thought that too. I added coconut fragrance, and I thought it was the fragrance. I guess not.
It could be the water you are using. If its tap water it might smell.
Hi! Can I cut the recipe in half?
Yes but you would probably need a 4 quart slow cooker instead of an 8.
where is step 5. its missing.
Oops! I consolidated two of the steps but apparently didn’t update the numbers. All the instructions are there, and I’ll update the numbers now. 🙂
how is the different on fat for shampoos and the bar soap if the recipes said 33 percent on all the recipes please can youhelp
I have the same questions. Coconut oil was the same amount on both shampoo recipes. I didn’t know which was the real one for dry hair.
It’s dependent on how much lye water (sodium hydroxide mixed with water) you use, not how much coconut oil. When the lye and the oil mix together, they saponify (the both change chemically). When less lye is used, there is more fatty acids in the coconut oil, so it’s a more moisturizing bar (or superfat).
I hate you for ruining my theory of what mothers look like. You’re beautiful!
What % of superfat do you use if you making this soap for greasy hair?
Hello! I was wondering if I can leave the bars that I’m not currently using in the fridge or freezer? Just to help them last longer and for easier storage.
Thank you!
You could, but they will pretty much last indefinitely at room temperature. After a long while the coconut oil that hasn’t converted to soap could theoretically spoil, but coconut oil has a long shelf life at room temp too so I’d expect these to last for years.
Hello, I am thinking of taking my first steps into soap making. Thank you for such detailed instructions. I have a few questions.
1. Can I do this on my stove top instead of a crockpot?
2. I was curious about this bar. Most people say coconut oil bars have a very ph and don’t fall into the reccomended levels between 5 and 7. Does making it a fatty bar help with that?
2. Do you have to do an acidic rinse after or is it optional?
Hi Lalitha,
1. Yes, but I’ve not used that method so I can’t provide instructions.
2. There seems to be a word missing and I’m not sure what you’re asking.
3. Some people with very short hair can get away with not using it, but for most people it is not optional.
Hi, I am sorry to reply to this comment but for some reason I don’t see where I can post an original comment… anyways I was wondering if a 6 quart crock pot would work? In the pictures it looks like the mixture would fit. Thanks!
Can’t find a place to add new comment hope you’ll see this. Would a 6 quart crock pot work or does it have to be an 8qt. Not wanting to buy a new one and have been looking for a used one since March now and still haven’t found one.
It needs to be an 8 quart because it may overflow in a 6 quart during the cooking process.
Hello! I love your blog and was wondering for this soap bar, can we just mix coconut oil and glycerin soap base? Thoughts?
Hi. I love the bars. I can’t find a place to comment on original post.
A friend tried them and wants to sell them, so I tried doing them cold process to make them look neater and a little less rustic but the mixture hardened very fast. Any advice to make them less rustic looking
just tried to do my shampoo It did not rise as on your video instead it became hard and solid almost immediately. My slow cooker inside peeled to black. I tied on the tongue and it was very acid. Is there a way to correct it at this point or find another way where I can use it. . Is it even safe to use it? Lots of organic coconut wasted unfortunately. Lol. not sure where it went wrong thought I followed all measurements and steps
I’m not sure what you mean by your slow cooker peeled to black on the inside, but when you first start the heating process the soap will turn very hard, like it’s done. Then it starts to melt. You have to wait a bit. Not sure if this was your problem but I’ve not finished soap because it was hard and I thought that something was wrong and someone told that I needed to wait a bit longer and that worked. Just an idea to try!
Hi Heather! This will be my first time to try making soap. I noted the lye you used was solid. What I have is lye water that I also use in making dessert. Can I use it instead of the solid lye? How much of it should I put?
I live in Hawai’i, it doesn’t melt or get sticky at 90 degrees, I always keep a half shell of coconut over the bar to protect it from rain or sun
Greetings,
Is it possible to make this shampoo into a paste that can be contained in a sealed plastic jar instead of a bar soap? And if so, would it be more moisturizing? Would there be any difference at all from the bar soap other than texture?
Thank you so much for this recipe. I have learned a lot from and enjoyed watching your video tutorial very much. -Angela
Well, I just made this shampoo bar on January 7. It is right up there with the best of shampoo I’ve ever used. Not sure I need a paste. It is hard as a rock and it seems like the bar will last a long long time.
This is quite literally the best thing I’ve ever used to shampoo my hair. I have fine, oily hair and it makes it shiny and full. My hair is also less dry and frizzy. Made a batch, should last me ages, and save me lots of $$$$$$ Wish I’d come across this earlier!!
Me too! I love this shampoo – I have had limp oily hair all my life and with this shampoo it has so much more body and fullness. I do worry about it being drying so I’m going to make my second batch with the 12% recipe.
Hello
I am French and I love your blog.
For this recipe is it possible to add white clay (to remove the dandelions) is it necessary to change the dose of LYE in this case ? And I have no potcock is it possible to do it in a normal pan?
Hello
I am new to soap making and have just tried this recipe and love it! I think that if you add white clay you would need to change the other ingredients too. My friend has tried the bar I made and says that her dandruff has cleared up using it and the ACV rinse. I do not think that a normal pan would work as you won’t be able to keep a low enough, constant enough temperature. You could make it using the cold process, no crockpot, no ‘cooking’ but you would need to cool your lye and heat your oil to 38 degrees C before you mix them. All other steps would be the same but you then MUST leave your shampoo bars to cure for 6 weeks before you use them as the lye will till be active and it will burn your skin. Honestly though, I think you will find that this bar, made as the recipe, and a rinse of apple cider vinegar ( I put 2 drops of lavender oil in and that gets rid of the vinegar smell) will work wonders on your hair and scalp. It has in mind. I am a total convert!
Is there a way to make this shampoo bar without lye? I’m new to soap making and I’m a bit nervous about using lye.
Thanks
Hi Sharon, here’s an excerpt from my post on soapmaking myths that you may find helpful:
Myth: You Can Make Soap Without Lye
“So here’s the skinny on fats and lye: Both are needed to cause a chemical reaction called saponification – aka making soap. As Marie of Humblebee & Me put it, making soap without lye ‘is like trying to make a baking soda and vinegar volcano without the vinegar. No vinegar and you’ve just got a pile of baking soda. No lye, and you’ve just got a bucket of fat.’
Unlike modern chemicals, lye is a naturally occurring substance that has been used for thousands of years. (source) When our great-grandmothers made soap, they got their lye by burning hardwood ashes. Unfortunately each batch was a little different, so it was hard to know exactly how much to mix into a recipe. If too much lye is used, some would be left over in the final product, which could burn skin. If too little lye is used the “soap” would be mostly oil.
These days soapmakers buy lye from the store, which is exactly the same each time. Using store bought lye ensures that recipes work out right.”
Melt-and-pour soaps have already gone through this process. When you melt them you’re not actually making soap since saponification has already occurred, but you can add essential oils, herbs and clays to customize the soap.
Thanks Sherilee. I was looking for this comment: the cold process. Mine gets too hard that I dont have much time to transfer to mold without looking like rocks.
Hi
I was wondering if I can use a normal pot, if I don’t have a crockpot? I have seen shampoo bar videos where the mixture goes in the microwave, so I’m thinking a normal pot can do the trick?
Thanks ?
Hi,
I made a mess of the recipe and it separated, over cooked it.
I am more familiar with cold process, I may I know if I could use this recipe with cold process?
Many thanks in advance
Yes, this recipe can be made with the cold process method.
Can you please provide the cold process method? Thanks
Hi, I apparently made a crumbly soap too.. it might cause from overheated.. or too often opened the lid while cooking step..
my question is, can I use this as shampoo as well?
How about u, what did you do with the crumbly soap?
So it’s been a while since I have the very crumbly (can’t molded) shampoo bar.. then I turn it into liquid,and amazingly it didn’t turn gelly as CP soap usually does..
on the other day using this shampoo + acid rinse ; my hair look oily. Is this normal?
Or I put too much acid leave on?
I use 2mg citric acid + 600ml water and didn’t rinse.
Everyone’s hair is different so it’s hard to say what’s “normal.” Some people go through a hair detox period, while others find that this works beautifully right away. For others it just doesn’t seem to work well, unfortunately. I do recommend rinsing the citric acid, though.
Hello, I’m excited to try this soap recipe and I’m womdering if you’ve tried adding to it? I have some henna powder coming, as well as alma and cassia powder. Just wondering if a few tablespoons of each would wreck the final product as far as hardness and stickiness etc. Thank you! I’m a totally newbie and working to swap all my products to natural DIY.
Soap making has to be exact from my experience. Once you learn how to measure ingredients properly you’ll probably have success, but I think a beginner would be best off sticking to a recipe. Just from my experience
What if I don’t have a crock pot ? Can I steam/double boil it after after bringing it to a trace ??
This soap can be made without a slow cooker using the cold process method described here: https://thenerdyfarmwife.com/soap-making-101-making-cold-process-soap/
Hi… I just tried to reorder the Lye for this recipe, but it is not available. Do you recommend a brand that is available for you Coconut Oil soap?
I’m really hoping so, bc I have been using this recipe for years and this is the first time I couldn’t find the Lye!!
Thank you for all that you share, it truly is a blessing!!❤️
You can buy lye at most places that sell drain cleaner. I get mine at my local farm and fleet store.
Thank u so much for sharing this recipe. I have made it. Its perfect. Im trying to get away from fake crap and I cant wait to try my bars! They look great. They smell like soap. And thats great to me. Im sick of all the extra added poison. Thank you!
Thank you so much! I have wanted to try making soap but the lye and having small children has stopped me. Now I can’t wait to try it! I do have one question…I’ve read that using coconut oil on it’s own can be drying, is there something about this process that keeps that from happening? I love your site and my little one and I enjoy watching your videos (especially the ones with your little ones involved)!
Most soap recipes superfat closer to 5%. The reasoning being if the soap contains too much extra oil that hasn’t been converted to soap by the lye, the soap may go rancid. Because coconut oil has a long shelf life and is pretty stable, a higher superfat (12% for mommypotamus’ recipe) is fine and will prevent the soap from being drying. Hope that helps.
Such a great question, Billie! You are right, coconut oil produces a very cleansing bar, which is why it’s perfect for making laundry detergent. It can be drying for skin, though, so I add extra oil – the equivalent of the “one-quarter moisturizing cream” sold commercially – to the recipe so that it conditions as it cleans.
As Sara mentioned, this technique is called “superfatting” – or adding more fat than the lye can fully convert to soap. If you’re interested in learning more I wrote in detail about it here: https://mommypotamus.com/how-to-make-pure-coconut-oil-soap-for-cleansing-and-laundry/
I have extremely fine dry hair. NOTHING helps and I’m a licensed stylist so I have access to everything. I also have hypothyroidism which doesn’t help. Do you think this shampoo bar will be too heavy OR drying for my hair? I’m seriously running out of options at this point. Thanks Hun!
I too have dry hair, and this recipe just made it worse. I’ve tried several different options that had the same effect. Right now I’m using liquid formula that is working! 1T raw organic honey, 3T filtered water, and a drop each of carrot seed and lavender essential oils. It can’t be made in multiple batches, as it will mold. I love it! Good luck.
I love this shampoo bar and have been using it for about 3 weeks. I have gray hair, which can be fuzzy and dry. I made the superfatted bar and added peppermint essential oil. I don’t use the vinegar rinse. I use organic mango butter on my face and body after I shower so while I have a light coating of that on my hands I just run it through my hair. It works great! The bars lather wonderfully no matter how dirty my hair is and my hair is bouncy and healthy. Thanks so much for this recipe!
hello, i like your idea and would like to use it for myself, but i don’t need nearly that amount. do you have a recipe for maybe half or even a quarter of the amounts?
thank u!!
thank you for your great video.
just one comment.. Soap does not have a ‘shelf life’.. a friend has made handmade soap for yrs & yrs and it never ‘goes bad’ , just becomes harder as it dries.
((just to clarify.. a chemical action takes place & so the oils will no longer go rancid ))
I love doing the Cold Process Oven Process method for most of my soaps.. NO mess , comes to gel in the oven , IN the loaf pan , is ready to use right away, but let it go a couple weeks for drying time.
can’t wait to try your shampoo bar.. thank you for offering two versions.
Most soaps will not go rancid because of how little fat remains after the chemical process has taken place. However, these recipes have an unusually high superfat level (to counteract the drying effects of an all coconut oil bar) and so these will go rancid over time (1-2 years).
I’m sorry, I haven’t been able to set up a new comment, only reply to one so I tried to find a recent one. I’m super excited to try this recipe but I am wondering if these measurements would work with other oils that are solid at room temperature such as Shea butter. Would the measurements be the same do you think?
If you change the oils you need to use a lye calculator to figure out how much to use. The amount of lye that is needed changes based on the saponification value of each oil used.
How is this calculated? I can only find definitions.
Using a soap calculator like this one: http://soapcalc.net/calc/SoapCalcWP.asp
I want to add Lemongrass essential oil to this recipe but I’m not sure how much or if I need to add something else, I read some people in the comments talking about needing to add different scents to enhance others.
Awesome! Thank you! I will be making some this weekend!
I was just wondering: can you use your crockpot for food after this or do you have to designate the crockpot for soap-making-only purposes? I know that they use lye to cure olives, but will the residue from this lye be harmful? Thanks for answering! 😀
That’s a great question, Fey. Most tools can be used for food after making soap if they are cleaned according to the instructions listed under #4 in this post on soap making myths: https://mommypotamus.com/making-soap-without-lye-and-other-myths/
There may be one reason you’d want to use a dedicated crock pot, though, and that is that soapmaking may wear the enamel over time. I haven’t noticed any wear after making soap for years, but I have heard it can happen.
My crockpot is one of the pots made of actual pottery type pots. I have been using it for soap making for years, and also for cooking. I haven’t had any problems at all. I see these type slow cookers at Goodwill and other second hand stores often, usually for about $10. Mine is over 40 years old!
Have you ever tried this recipe using the cold process method?
I haven’t, sorry!
That’s easy, just scoop it into the mold after step 6! Then you just leave it until it hardens and cut it. Leave it to cure for 3-6 weeks, though 🙂 Hope that helped 😉
Will this allow the lye to react with the whole oil? Or would still be superfat?
it would still be superfatted because that has to do with the ratio of oil and lye, the amount of curing time does not affect it
You mean after step 5? Otherwise, you’re doing the hot process method.
I make coconut oil soap all the time by cold process, and I always find the lye-water solution heats up so much that my soap is practically done in just a couple of minutes. It hardens in a couple of hours and I use it on day 3 or later. Never had any issues, works well on my hands, lathers up great, and is immensely popular with everyone who’s tried it so far!
Is this for hair or body and it is shampoo and then you use conditioner I have naturally curly hair.
This one is mostly for hair, though it can be used for body. Generally conditioner is not needed, but you will want to restore your hair’s pH after washing. Check out the “New To Shampoo Bars?” section above for a more detailed explanation and a recipe for pH restoring rinse 🙂
Hi Heather, I’ve used the coconut oil shampoo bar for a week after doing suggested hair detox and using shine boost rinse afterwards but my hair is still feeling “gummy” and a little oily. Any suggestions on if I should be doing anything different or how long the gumminess should last?
I am having the same trouble, though I couldn’t find the link for the hair detox method. Could someone please tell me how to do that? But I have been using it for over a week and rinsing with apple cider vinegar which I leave in for a couple of minutes. Still kinda gummy and greasy looking.
Do you have hard or soft water? We have hard water. I use this shampoo on my 3 children and my husband uses it and it works fine for them. It does not work for me though. I have to boil water and use baking soda for my hair to get clean. The first time I used this shampoo bar our water softener was operational and it worked beautifully! It could just be the type of water you have. Hope this helps!
In my experience, this won’t work well if you have hard water! Found out the hard way when I traveled with it! Had to break down and use the hotel’s complimentary shampoo 🙁
I also have very hard water where I live and in my experience going from commercial to an all-natural liquid shampoo, it took 2-3 weeks before my hair started feeling normal again. I only wash it every other day, and find that sticking to that schedule helps a lot in the effectiveness of the shampoo. I have also found that letting my hair mostly air dry helps the hair at my crown not feel so oily still. If I wash too infrequently and don’t let it air dry, the hair at my crown will still feel heavy and dirty, even though it’s not. I hope that helps!
Thank you so much for this recipe!!! I can’t wait to try it.
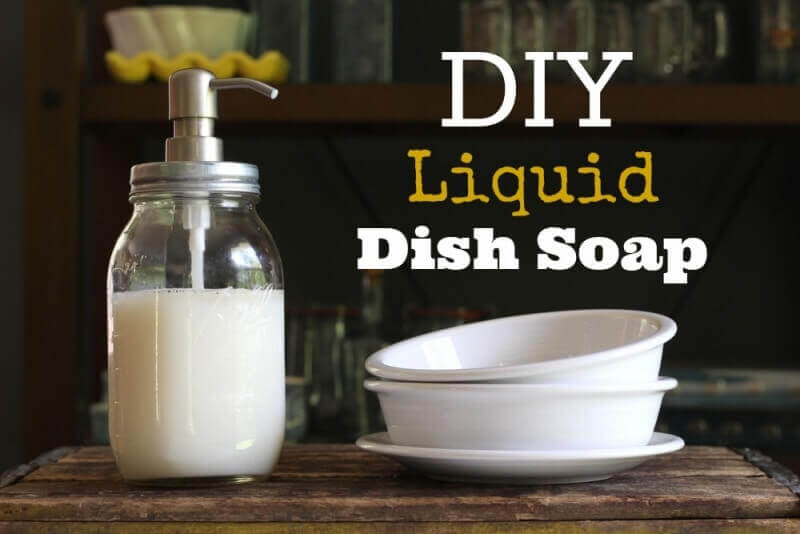
Forgot to ask earlier…what’s in the soap dispenser behind you in the video? I only ask cause it looks homemade and I’m diggin all this diy health and beauty stuff! Thanks!
It’s a mason jar with a pump I bought on Amazon. I would link to the store if I remembered which one it was, but it’s been quite awhile 🙂
Hey, I made this soap and it looked like it turned out great…but when I used it it was waxy on my hair. Not very nice. Almost like it stripped it not soft and shinny.
Is there an alternative to using lye and what kind of coconut oil?
If you want to make soap you have to use lye. There is no alternative. As Heather says in the video, “without lye all you have is a lump of fat”.
Thank you so much for all the effort you put into this tutorial! You demystified the whole process so much, and I’m definitely going to be trying your recipe. I’m especially pleased to learn that I don’t need to buy all sorts of dedicated equipment, as long as I take the proper steps and am careful. I’ve made soap only once before (cold process method), but I like your way much better. Thanks again!
Hi, I’m very keen on trying this soap recipe, but lye? If I’m not mistaken, it’s LEJÍA in Spanish (I live in Spain) which we call “bleach” and I think it´s a solution of Sodium Hypochlorite and it´s reputed to be very dangerous on the skin. Not sure we’re speaking about the same thing though… Can anyone clarify this for me? Thanks!
Kai, lye is Sodium Hydroxide (NaOH) also known as caustic soda, which is different from your bleach/Sodium Hypocholorite (NaCIO).
what would you change for it to be the laundry soap?
Hi Ali, this is the recipe I use to make laundry soap: https://mommypotamus.com/homemade-natural-laundry-detergent-made-easy/
And this is the coconut oil soap I use in that recipe: https://mommypotamus.com/how-to-make-pure-coconut-oil-soap-for-cleansing-and-laundry/
Hi,I’m doing the soap now but 2:30 hours and still very bad taste.Can you please tell me Why? Thanks
Hi,is there any way I can make this on a stove-top as I don’t own a crackpot. What is the approximate temperature of the crackpot on a low setting?
My crackpot is cracked, I don’t think stove top will work as I think the temperatures aren’t maintained evenly. Just a cracked opion.
You can make this without a crockpot. I place mine in the mold immediately after it reaches trace. You can then do one of two things, depending on your patience level 🙂
1. You can let it harden. Cut it into bars, and then let it sit for 2-9 months. If the soap turned semi-translucent when in the mold, you can use it in 2-3 months. If not, you need to wait 6-9 months for the chemical reaction to complete. Warmer temperatures speed things up, which is why the time period varies.
OR (for those impatient souls like me)
2. Place the mold on top of a heating pad for 6-8 hours. The soap should turn semi-translucent during this time period. Then, remove the mold from the low heat and let the soap harden enough to cut it into bars – 24 hours or so. Set the bars out for a week or two, and they are good to go. I usually use one right away; just know that fresh soap dissolves more quickly.
Is this another myth? I have read from the beginning of my soap making that you need to ‘cure’ the soap. eg let it sit to ‘let the process complete’.
I have always used my soap the next day with no problem. I use a stick blender to emulsify the mixture to thickness of pudding and then put into mold for next day use. even same day if I do this early in the day.
Hi Kevin!
If you do cold process soap making (usually noted as CP), the chemical process is complete within approximately 24 hours. The curing process is actually letting the soap finish hardening. If the soap doesn’t cure, or doesn’t last when being used; instead it dissolves pretty quickly in the water.
Hot Process (HP) as in the instructions above, speeds up the chemical process, which is why it’s popular with soapers who want to know their soap is superfatted (SF) with a specific oil. In CP, the lye reacts with all the oil available, but in HP, if you add oil toward the end of the process it’s the SF.
I hope that helps answer your question(s)!
Hi Heather!
I really want to try my hand at soap making and the shampoo bar looks like a great starting point. I am 13 weeks pregnant … did you make soap during your pregnancies? I guess I could have my husband do the lye/water mixture outdoors and I could complete the rest of the process. Your lotion recipes are also next up on my homemade endeavors.
Thank you so much for sharing with us!
Cara,
From what I was told when I was pregnant, it’s best to avoid lye while pregnant, but going outside with a mask as well may be ok. Maybe you could take your crock pot out there as well until the lye is cooked down. Just some ideas. Of course if you can get your man to help you, all the better!
Thank you, Lea 🙂
Take the water outside, add the lye to it, stir and then go inside for several minutes. The reaction takes several seconds to really get going, and the fumes aren’t strong during that time period.
This has the added benefit of giving the lye solution some time to cool back down to the temperature of the warm oils, so that you don’t destroy any of their good properties.
How many times a week do you recommend washing with this soap? I have blonde curly dry hair and only shampoo (store bought) once a week and condition (store bought) every day to stop the frizz. Is it the same with this soap?
I wash every other day at the most, not because it’s best (I haven’t really tried different frequencies) but because I’m a mom of three small children and that’s the best I can do. 🙂
Have read recently that washing hair every day is not best for the hair.
Two questions: Can I cut this recipe down? (There’s no way I could use this much shampoo before it goes bad…but if not I can give some away :), and secondly, do you think it would work with refined coconut oil? I’m sure it would lose some benefits, but I can’t afford to use that much unrefined oil at this time. P.S. your hair is GORGEOUS!!!
You can cut the recipe in half but you’d need to use a smaller crock pot and adjust the cooking time. These bars are shelf stable for a long time (probably at least a year) so you can probably use it all eventually.
Do you know much about Lye?
apparently it’s not safe for use on skin only clothes. So your stuff or soap bar at least is not natural. Great shame I wanted to try it.
Hi Donna, all soap is made by combining fats with lye to initiate a process called saponification – aka making soap. All soap is made with lye, but when used correctly there is no lye left in the finished product because it has all turned into soap. You can read more about lye and soap myths here: https://mommypotamus.com/making-soap-without-lye-and-other-myths/
I have used refined coconut oil to use up gifts of it that people gave me 🙂 It was fine. Also, I do much smaller batches on a heating pad. It won’t bubble inward like the crockpot recipes, but it will turn semi-translucent. When that happens, I turn off the heat (usually 6-8 hours, but could be 4-6 in the summer heat). Let it sit for a day or two and cut into bars.
Hi Heather! Would this recipe would be good for color treated hair? Thanks for the wonderful blog.
Pam
I have a tiny potpourri crock pot, that I use to try out soap recipes. For this, I would make 1/10th of a batch. Just move the decimal point to the left one place to get the new amounts: for instance 33 ounces of coconut oil becomes 3.3 ounces in a 1/10 recipe.
Can you please confirm that the water is 12.54 ounces BY WEIGHT? I make soap regularly and have never weighed the water for recipes and I am up to the trace portion and it isn’t reaching trace so I am wondering if this might be my issue (I did check the video though and I see you weighing it . . . ).
Thank you
Yes, it is by weight rather than volume.
I only have a 15 oz. jar of coconut oil. How do I make a small batch of shampoo? Can you break it down for me? My math is horrible!! 🙂
You should recalculate the recipe with a soap calculator like this one. You should never try to half a recipe or any variation of a recipe. It could be dangerous or produce unwanted results – remember you are working with lye.
Great thing is no math is needed on your end 🙂
http://soapcalc.net/calc/soapcalcWP.asp
Water has Weight=Volume ratio of 1:1 so it does not matter.
I cannot get my scale to get to 12.54!! I ordered the one above that you have…It goes from 12.52 up to 12.56 no matter how slowly I go. My daughter tried and she couldn’t get it either! What to do??? 🙂
Because of the high superfat ratio of this recipe you will be okay with 12.56 🙂
With water one ounce and one fluid ounce are the same because water has a density of one
Do you know how/if this (and the vinegar rinse) would effect color-treated hair?
Thank you!
In general most homemade shampoos and rinses are not recommended for color treated hair, unfortunately 🙁
:[
The vinegar rinse seals the cuticle of the hair shaft, so my platinum color lasts longer using the rinse than it does with traditional shampoos and conditioners.
Can you tell us why ? Thanks for your recipe
It’s because they open the hair cuticle, which can cause the color to leak out. If hair is not colored it’s a non-issue because the hair cuticle is re-sealed after washing with a vinegar rinse. Hairprint can be used with this shampoo, though. https://mommypotamus.com/hairprint-review/
Thank you so much, I have made, and am using my bar, and my silver hair (untreated) really looks great, and it seems like I’m not losing so much when I brush. Too bad for my friends who have color treated their hair, they wanted to use it, so can I get on a list (if there ever is one) to make a product for color treated hair to help with hair loss…thanks again! Susan
Hi! Made this last week. Used tea tree, myrrh, lavender, lemon, and patchouli essential oils(for dry scalp). I used a bar the next day. BEST SHAMPOO EVER!!!! I had been using JR Liggets bars or Morrocco Method Shampoos… This Is waaaaayyyyy better!! You just saved me a Ton of $$$$ too!! Thanks so much!!!
I’m so glad you like it! Even my seven year-old, who usually doesn’t like to wash her hair, adores this shampoo because it makes her hair so soft. Your EO combination sounds fantastic – I think I’ll have to try it with a future batch 🙂
Hi I was wondering if I can colour the shampoo bars to distinguish them from the soap bats? I tried tumeric but it went an ugly green.
Which soap bar recipe do you like better? Rosemary Mint Shampoo Bar with several different oils/butters or this Coconut Oil Shampoo Bar. I have thick hair which tends to be on the dryer side with natural wave/curl. I see that you added the option of 15% superfat with the coconut recipe but I was just wondering if there is more moisturizing benefit with the other bar. https://mommypotamus.com/rosemary-mint-shampoo-bar-recipe-video-tutorial/
Definitely this one 🙂
Hi, where is the 15% superfat recipe for the coconut oil bars please?
Thanks!
I reduced the 15% to 12% because most people found it too moisturizing. 🙂
This looks amazing and I am dying to try it… Anyone want to make a big batch and sell me some? I just don’t think I am up for this kind of project right now!
Hi Heather! I just have a quick safety question: I’ve read that pregnant ladies should avoid rosemary essential oil. Would it be diluted enough to be safe for a pregnant lady to use rosemary EO in a shampoo bar? What would you do? Thanks!
Hi Heather,
I ‘d like to know if there is a french translation of your e-books : DIY Organic beauty recipes & Non-toxic cleaning recipes.
Thanx
Hi Marjorie, great question. There is not a translation available right now, unfortunately.
Thank you for your answer.
Did you know if it’s possible to translate it directly with google trad or other?
Have you tried to use the stove instead of the croc pot? Croc Pots are not commom here in Brazil… I love the simple recipe, can’t wait to try! Already ordered the coconut oil and lye.
If you have a heating pad, you can pour the soap into the mold after it reaches trace. Then cover it with a towel and let it sit until it becomes semi-translucent (4-8 hours, faster in warmer environments). Remove it from heat and let it harden for 24-48 hours. Then tip out of the mold and slice it into bars.
Crock pots are a recent invention. You can make it the age-old way, in a kettle over a low fire or on low heat on a kitchen stove. Alternatively, you can pour the soap into your mold after mixing it to trace, then put the mold into your oven on low heat, if you have one. Another method is to pour the soap into the mold after reaching trace, then leave the soap to cure at room temperature, but it takes several weeks. Heat just speeds up the process.
Thank you for this recipe! I have been using your honey shampoo recipe, but it’s been over a month and I feel like my head is itchy all the time after a day. Like you, I dont wash every day 😉 I am determined to find a recipe that works with my curly hair.
Thanks for the recipe as well. I have been using this shampoo soap for a while and I too get an itchy scalp after one day of washing. I wonder if anybody is experiencing this as well due to the high PH of the soap, or if I am doing something wrong. Any suggestions appreciated (as I LOVE this soap).
This recipe sounds amazing! I would love to try it and I knew first handedly that coconut oil is amazing for the hair and leaves you with soft, shiny, slowing locks. I cannot wait try it out!
I tried the recipe a few days ago and I can’t believe how easy it was! In the end I didn’t even use my slow cooker, I used the “room temperature method”. And it was my very first time making soap!
I read that you can only use the room temperature method with solid fats like coconut oil – you just pour the hot lye solution (once it’s cleared up) on the solid fats and the heat from the lye solution melts the fats. You stir gently with a whisk until the fats are completely dissolved, then you use the immersion blender until you reach trace.
Then once you have taken the soap out of its mold and cut it up, you have to let it cure (unlike your crockpot method), but I don’t mind waiting. I can’t believe how easy it all was!!
I tried a tiny sliver of the soap and it made a very nice lather! The soap is unscented, I didn’t use any essential oils to keep things simple on my first try, but it smells… like soap (who would have thought, right?!)
Thanks for a super, failproof recipe! I would never have thought it was that easy to make soap myself. I really love soap (I prefer it to shower gels), so you can imagine how happy it makes me! Thanks again!
I have just attempted your easy to follow steps. My first time ever to try making soap. I can’t get the mixture to reach the soft pudding stage and I don’t know what to do! Help!
Hi Heather, thank you for your wonderful shampoo bar recipe, I don’t have a crock pot so my first question is can I use a stainless steel pot on the stove for cooking the soap (basically follow the hot process recipe) , and if I just do the same shampoo bar recipe the cold process way how long do I need to cure it before I can use the soap. Thanks…..
If you use a pot to cook it, it will be ready to use immediately, as long as you use a very low steady heat and cook it long enough. In cold process you don’t heat it at all and that’s why it’s COLD. That is where it takes several weeks to cure. Do some more reading and learn more before you attempt a batch. This is one area that more knowledge is critical.
Hi Heather,
I have made coconut oil soap ever since I first came across your recipe a year back and now a lot of people beg me for it! It lathers up really well and is gentler on my hands than any commercial bathing bar, dishwash bar or laundry bar.
I’m in India and it’s easy to make soap with coconut oil at room temperature because the oil is liquid. The lye solution is so hot that once I start mixing with the immersion blender it reaches trace (and beyond!) in just a few minutes, less than ten. The soap is usually ready to use by the next day, though I generally wait until the third day, and I’ve never had any issues.
I really want to try out this shampoo bar! Thanks a lot!
I’m so happy to hear that, Liji. Thanks for taking the time to let me know!
Hi would it be possible to add dr bonner’s liquid castille soap instead of the lye? thanksx
No. Soap is made when oil chemically reacts with the lye. So, you wouldn’t have a shampoo bar without lye. You would have a nourishing shampoo with the oil/castille mixture, but it would be more liquid.
Hi Cydne, If you use the castille soap instead of the lye is the rest of the process the same? Cooking times etc.
thanks so much
Wendy
Castile soap is oil that has already been converted to soap. It won’t work in this recipe, unfortunately.
Hi GREAT VIDEO, GREAT RECIPE! Prior to viewing your video, i found a lot of material saying diy shampoo products should be at s 4.5-5.5 ph balance? May i ask your thoughts on this?
the pH of soap is naturally alkaline (I think it’s around an eight) it is better for it to be pH balanced which is why you use a vinegar rinse to level out the pH again
I love this recipe and so does my husband! Thank you! 🙂
I’m so excited to try this. I just made the soap and its cooling in the bread pan now! I’m curious if this soap is safe to use on kids. Anyone know? I did add essential oils to it. But I would love to have something for the whole family to keep things simple.
As long as you used kid-safe essential oils you should be good. It is not tear-free, but I wash my kids hair with it and just keep it out of their eyes. 🙂
Thanks! Unfortunately I used Rosemary and Peppermint. Maybe next batch I’ll just forgo the EOs. Love your blog. Keep up the good work 🙂
Hi Heather, do you know if there is any different types of lye? I was told to check the purity of it and that there is a cosmetics type of lye that is recommendable for hair and body products? Is this right?
Yes, there is a lye sold in hardware stores for plumbing purposes – it’s mixed with other ingredients that you don’t want in your soap. The lye sold for soapmaking is what you want to use. I linked to the brand I use in the post 🙂
I used a 100% lye called Kleen-Out drain opener for $4 from Menard’s and it worked great.
That’s what I just bought not knowing there was another form. Did you use Any essential oils and how many drops??
Hi Heather. Is there anyway to make this not in bar form? I have been trying several different liquid shampoo recipes and they ALL leave a film on my hair and it seems extra oily. I have a lot of thin hair and I haven’t used commercial shampoo since January. I have tried the castille soap recipe and the aloe gel recipe and none of them work for me.
Any suggestions?
Mae Lynn
You probably have hard water
you could make it in bar form and then just turn it into a liquid by shredding it and dissolving it in water just look up how to make liquid soap from a bar
Hi Heather! Do you know how this would do on chemically treated hair? If it will strip color or not? I’d love to give this a try.
Thank you!
What happens if you use this shampoo on color treated hair? I would love to try the shampoo bars but don’t want gray hair.
She mentioned in a comment above that it’s probably not safe for color-treated hair 🙁 sorry!
Does anyone know if this can be done with beaters instead of a stick
blender?
Yes, you can even use a wooden spoon if you want to. It will take SIGNIFICANTLY LONGER though. You don’t need the top-of-the-line immersion blender. If you can possibly afford it, buy the least expensive one you can find. You’ll likely find so many other uses for it that you’ll wonder how you lived without it.
No. Beaters put air into it, which actually keeps it from emulsifying correctly. You can do it with a spoon, but it’s very time consuming. I highly recommend getting a stick blender. You don’t need a fancy one. The cheap $10 one works just fine and will pay for itself pretty much the first day.
Also wondering if this can be made with hand beaters. I really want to make this soap but do not have a stick blender. Thanks, love your blog btw!
I would not make this recipe with a hand mixer due to the likelihood of splashing. You can use a regular stainless steel or plastic spoon to bring it to trace, but it will take a long time 🙂
I love this bar! Although the detox is crazy! It’s pulling the dye off my hair- which is fine– but I’m wondering if it would pull a natural henna dye off?
I’ve tried the detox recipes oh how I wish the detox would finish up!
All soaps pull the dye off your hair.
Hello. I have some questions about weight when it comes to soap making. I usually use grams and kilograms when I weigh anything, but I can not find many soap recipes in my language and I have a digital scale that measure in both gram / kg and oz, but there are two kinds oz, it says nothing about that in the recipe, Is it lb oz or fl oz I should use when I weigh oil, lye and water?
I also have a question about the digital scale, I’ve been looking around everywhere but can not find one that can weigh more than one number after the comma, if I should weigh in grams there is no comma after the first number. For example 5.32 oz. lye , I get only 5.3 oz and 5 in grams, do you think it will work, or does it matter?
Sorry for my bad english, hope you understand me and can help.
The ounces are by weight, not fluid ounces. You can use an online converter, for example this one: http://www.metric-conversions.org/weight/ounces-to-grams.htm or you can use the ounce (oz) measurements on your digital scale. For the smaller fractions, just estimate. For instance, to weigh 5.32 ounces, weigh 5 ounces, then add a tiny bit more. If the scale goes to 5.4, you added too much more, so remove a tiny bit. In a recipe for this much soap, it isn’t critical. People have been making soap at home for hundreds, probably thousands, of years without digital scales. You don’t need to get too technical. There is a margin of safety. You can also use online soap calculators like http://soapcalc.net/calc/soapcalcwp.asp and http://www.brambleberry.com/pages/Lye-Calculator.aspx
Oops, I meant to say weigh 5.3 ounces, then add a tiny bit more, but not enough for the scale to change to 5.4 ounces.
Thank you so much for answering!
Whoever is interested in smaller batch: I had smaller crockpot at home (5 quarts). I used half of the batch from this recipe, and reduced cooking time to 20 mins on low. Your recipe is so easy to follow, I LOVE it ! Thank you for sharing !
I absolutely luv ur recipe and want to make this, though I dont own a crockpot nor a heating pad. can I make it on the stove?
and which coconut oil should I use
thanks .
HELP! I did everything just like the video said, but the soap is coming out of the crockpot. I am using a 8 quart. I had the temp on low, but turned it down to warm to get you help. What can i do to save this soap?
Hi Diann, just give it a stir 🙂
Hi Heather,
I made the recipe, twice. The first one made my hair very greasy and I realize It could be the purity of my lye. I am in Brazil so I couldn’t buy from the place you recommeded. So I checked the lye and it was 97% pure, which I read is the minimum for cosmetics use. The second time I increased a little the amount of lye and it worked. Now my boyfriend complains about the vinager smell in my hair, although it is ok for me… Does anyone have the same issue? Does you hair smell like vinager even after rinse off?
Dani, try using citric acid rinse. I usually put 1/4 teaspoon in 3 cups of distilled water. Use less citric acid if you have soft water. I like citric acid rinse over vinegar rinse because there is no smell.
Awesome Kaila! Many thanks! I will try it!
This is a great idea!! Thank you so much!
Hi Dani, I made this bar and used it yesterday after two dYs of letting it sit. It made my hair the opposite, very straw- like. I could not brush through my hair. I did not use the rinse afterwards. I did however try to use a leave in conditioner when I realized how droit made my hair. I slep through the night. This morning I had to wash it. It felt waxy and looked like a birds nest. What are your thoughts. I had the opposite reaction of oily.
Hi Martha, the rinse is absolutely necessary to close the hair shaft and restore proper pH. A leave-in conditioner would not be an adequate substitute, unfortunately.
Hi Martha,
I use the vinager rinse, and my hair ends still get very dry, so i am not using the shampoo bar everyday, but rotating with regular shampoo. Maybe it is because I still have hightlights half way down my hair, so it is not natural yet. But what happens is since the bar removes all residue from the hair, it gets really really soft when I wash with regular shampoo. I still want to find a solution to be able to use only the bar though.
I find that although the vinegar smell does not USUALLY remain, I tend toward being a warm person, and when I sweat, the vinegar smell does come out. It isn’t strong, but I can smell it. I imagine that in colder climates, it wouldn’t be noticeable, but Brazil, well….warm! Or if you are very warm blooded, and get hot a lot. Also, using essential oils in the vinegar really don’t work, either. I made Queen Of Hungary’s Water (fancy vinegar for facial toner and rinse) and it also, when I heat up, is noticeable as vinegar.
Heather, thank you for this recipe! I made it and loved it. Is it possible to over cook the soap? I think I might have, but it seems to have still turned out fine. Thank you also for the correct rinse ratios. I actually like to use Kombucha that has soured too much to drink. I used the same ratios you recommended for vinegar and it worked great.
Hi Katie, did you shampoo your hair yet? Just wondering. My hair was like straw. I was so excited about this recipe, but was let down. Would it have made a difference if I used the vinegar rinse, I wonder.
YES, it DEFINITELY makes a difference if you follow with the vinegar rinse! It’s necessary to restore the pH balance, close the hair shaft and make it soft.
Thank you Heather, I will give it another try and use the vinegar rinse this time.
Yes, Heather is absolutely right. I would not use the bar on my hair without the vinegar/acidic rinse. I always do this, and only ever comes out sleek and clarified feeling. I hope it works out for you, Martha!
Thank you Katie. Do you know if I can use a mixture of citric acid instead of the vinegar?
Hi there, I have just made the coconut oil shampoo and it came out really lye heavy, at first it was chalky and so solid, then I added more water and melted again and it’s still ph 12. I got pretty zapped. The actual bar looks ok and it would be such a shame to waste it. I was sure I had measured the ingredients properly but I could of made a mistake as I am used to working in grams. Is there anything I can do to bring the ph down?
Mine did the same thing Simone. I did everything just like the video and picture tutorial said. I did notice that the soap hardened up before I could even get to the 45 min. I don’t want to waste it and would like to figure out a way to bring it back down. I went ahead and spooned it in the mold..was wondering if you let it sit for a longer than a few days if the lye burn would go away?
Hi Linda, I’m sorry, I see your comment was from awhile ago but maybe you will see this? I had a similar issue with mine, got zapped pretty good, but seemed as though I was over cooking it….I spooned the soap into my mold anyway (my soap was hardening too) and wondered if perhaps I could let it sit and cure if that would deactivate the lye in the way that cold process soap would? I did tried a little soap on my hands and felt no sting, and decided to try it on my hair to experiment, it made my hair feel amazing, but definitely left my scalp a little itchy or tingly. Did you end up letting yours sit and did that cure time deactivate the lye?
Hello,
How does this shampoo bar work for color treated hair? Also, how will the detoxifying method affect colored hair?
I would not use it for treated hair, as it was written above.
This looks fantastic, and I am so excited to try it! I have a few questions about the process though..
With the lye, does it have to be reformed powder? I have never made soap, so can it be a liquid or not? I think the liquid form is the only one i can buy at my hardware store..
Also, with the zap test, isn’t that dangerous? I thought lye was harmful if ingested, so I was just wondering what the health risks were with that please?
Thanks so much!
Hello, I was so excited when I saw this recipe. I made it a few days ago. It turned out simply beautiful. It was snowy white, hard and I was looking forward to using. I used it 2 days later. The lather was amazing, the most I’ve ever seen. I did not use the vinegar rinse. It was very hard combing out my hair. I let it air dry for awhile and then use a hair dryer. My hair actually looked and felt like straw. I then sprayed a leave in conditioner in my hair, did not help. It was very hard to brush through and felt waxy. I was so disappointed. I thought I had found a shampoo bar to replace my expensive shampoo I use. What do you think the problem was? I made the recipe for normal hair. Thank you, Martha
Hi Martha, the vinegar rinse is necessary to restore pH balance. If it were me I’d begin by rinsing my hair with the vinegar, then wait a day or two and then try washing again and following with the rinse. My guess is you will have a completely different result!
Thank you Heather, I will do as you suggested. Will keep you poster. Oh ,I do have some grey strands, is it ok?
Yes, it’s totally fine!
Will the bar melt in the warm shower?? or in hot weather? or when its made into a soap does it change the melting temp of the coconut oil?
nevermind, i read an above comment! thanks!
After my soap sit…it really dried out and was crumbly. What did I do wrong?
Hi Linda, it’s really hard to say for sure since I don’t have much information, but based on your description it sounds like too much lye was used. Is it possible that the measurements were off somehow?
It was measured out precisely..but I also noticed it cooked up within 20 minutes or so and i could hardly get it out…..it was on low, could it be possible that I overcooked it, or the crockpot was too hot? I had to press really hard to get it in the form.
Heather,
Thanks for your reply….I have one more question. Since my soap turned out crumbly, is there any way that I can possible grate it and make liquid soap or even washing powdered soap?
I am excited to try this, I love coconut oil for all kinds of uses. I just need a digital scale and I would like some pretty soap molds. What has your experience with molds been, and how many molds do I need or what volume is produced from one batch so I can figure out what size/number that I would need.
Because this recipe is hot process the final texture after cooking is more like mashed potatoes than smooth, pourable liquid. For that reason I prefer a bread pan to cute shapes, because I’ve found that the cute shapes have a lumpy backside where I spooned the soap in. With the bread pans it creates a pretty texture at the top that I quite like!
Do you have any problems with your plumbing when using the soap? I know how it can harden and so I have always been cautious when using it around plumbing.
Good question. After the coconut oil is saponified (made into soap) it is no longer a concern. It’s exactly like bar soap you’d buy at the store.
Is there a place where I can purchase your soap and shampoo or a similar soap & shampoo (names please) until I make the time & have the tools to make my own?
I may open up an online shop in the future, but I don’t have anything in the works yet 🙂
Heather, DEFINITELY open up an online shop! I sadly cannot make this soap because i’m on campus at a university soon. 🙁 I am trying to stop using shampoo in bottles because of all those hormone disruptors and potentially toxic ingredients.
I want your bars!!!!!!!! 🙁
I’m looking for a shampoo bar for oily hair a client wants a coconut milk type is there any suggestions
I need a shampoo bar for oily hair too. Did you ever find one?
I was wondering why use lye when it’s supposed to be natural and why use protective gear or stuff like that? Is it really that dangerous to make that shampoo?
Hello! Well, the thing is that “chemical” is not the opposite of “natural”. Salt is a chemical (NaCl), water is a chemical (H2O)… and chili pepper is natural and you would want that rubbed in your face, right?
You use protective gear because it might be irritant if in contact with the skin or the eyes. For example, vinegar could also be irritant… so you don’t have to be scared, it’s not a dangerous process, you just need to be careful.
I like your explanation on the Lye. Once made into the soap is it still an issue? As she said, our grandmothers used Lye all the time. But I wonder about it too.
Lye is no longer an issue when the soap is done. It is converted into soap through the process of saponification.
So after the lye is converted, would lye still be listed as an ingredient if a friend asked what the ingredients where? They want to make sure it’s 100% natural. So would I just say the ingredients are just coconut oil and essential oil and water?
Hi Heather,
I just did the recipe for the soap bar. I was a little nervous since it was my first attempt to do all by myself a soap recipe with the crockpot method. I prepared myself carefully, listening to the tutorial and refering to the ebook with the picture while doing it and it turned out weirdly. In fact, the soap rise, just like you said, but never fall back in the middle. It just continued to rise and eventually fall onto my countertop. Do you have any idea what happened ???
Thank you !
I’ve had this happen before, and it turns out my crockpot wasn’t big enough. I used a bigger crockpot the next time, and it worked out perfectly!
I have this supperbig crockpot, so I dont think this is the problem. It was only a quarter full…!
just stir it more. Some soaps you stir every five minutes, some every 15-20
Happy Soaping 🙂
I have attempted this as well, but mine is not raising as much and looks like a yellow vasiline. I have done the zap test at the 1 hr, 2 hr and 3 hr mark and I am still getting a delayed tingling. I am not sure what I have done wrong!!
A delayed tingling is not the same thing as a zap – it’s probably ready 🙂
I am so happy I just read your comment. I made the soap last night and was still getting the delayed tingling. I was ready to chuck it. Ty!
Sorry, I see these comments are from awhile ago! But I made this soap yesterday and followed your video tutorial and blog tutorial very closely. I too got a delayed tingle on my tongue and when I used it on my hair (which my hair feels amazing by the way!) I got a tingly/ stingy sensation on my scalp. Is it possible that my lye is not fully deactivated? Should I let it sit and “cure” for awhile? I wanted to gift this to my mother in law and she suffers from scleroderma, I don’t want to chance harming her in any way. My soap bars look beautiful by the way! Thank you for the tutorial:)
This looks so pretty and I’d love to try it but I’m concerned about the lye. I’m wanting a heathy, organic soap and shampoo and concerned after seeing your tutorial about the lye, any comments are appreciated
Hi Nancy, you may find this info from my post on soap making myths helpful:
“Myth #2: You Can Make Soap Without Lye
So here’s the skinny on fats and lye: Both are needed to cause a chemical reaction called saponification – aka making soap. As Marie of Humblebee & Me put it, making soap without lye “is like trying to make a baking soda and vinegar volcano without the vinegar. No vinegar and you’ve just got a pile of baking soda. No lye, and you’ve just got a bucket of fat.”
Unlike modern chemicals, lye is a naturally occurring substance that has been used for thousands of years. (source) When our great-grandmothers made soap, they got their lye by burning hardwood ashes. Unfortunately each batch was a little different, so it was hard to know exactly how much to mix into a recipe. If too much lye is used, some would be left over in the final product, which could burn skin. If too little lye is used the “soap” would be mostly oil.
These days soapmakers buy lye from the store, which is exactly the same each time. Using store bought lye ensures that recipes work out right.”
I made this and it is awesome. Perfect directions and results the first try. It is just what I was looking for. Thank you.
Hello Heather! I just found your blog, and I’m really looking forward to try this recipe! I just wanted to know… how many bars did you get with this amount of ingredients? is it ok if I make a smaller batch or the measures should be exactly like this?
Thank you! 🙂
So this maybe a silly question, but is there something in the making of the soap that changes the coconut oil properties and cleansing process? Would a bit of coconut oil used as a shampoo not work just as well?
Coconut oil on its own cannot be used as a shampoo it will not clean the grease out of your hair, however it makes an excellent at home deep conditioning treatment which I do all the time, to do use raw organic coconut oil, mist of the time if it’s cool it will be solid but don’t worry just pick up a chunk of it in your fingers and your body heat will start melting it as you work it into your hair, be careful not to use to much it doesn’t hurt your hair to use too much but as it continues to melt into your hair with your body heat it will start running down your face and neck, I know this from my first try. Leave it on for at least 30 minutes I usually leave it on for longer then shampoo and condition as normal
Hi Heather, tried your recipee twice but the results are not as expected. It rises on top but below the oil still there….what did i do wrong?? And same as Taniela, it still zaps after 2 hours. Do u have any idea what’s wrong?
Hi Jenny, unfortunately I’m not sure what to make of your experience. The description of oil still present suggests too little lye (or perhaps lye that has lost some of it’s potency due to moisture), while the fact that it still zaps after two hours suggest that perhaps too much was added. Are you measuring to the tenth of an ounce? Are you certain that the lye you are using is 100% lye?
hi heather can u give me the recipie for a smaller batch of ur dry hair shampoo bar thanks
Here’s a link to a great tool I use. Use this lye calculator to resize a recipe to fit your mold.
http://summerbeemeadow.com/content/lye-calculator-and-recipe-resizer
Anyone know how to change this to a cold process method vs. hot processed soap? Thanks!
After it comes to trace, put it in your mold and you’re done. That’s cold process. It will also harden quick, so be ready to cut as soon as it’s firm (a few hours).
Hi Heather
Just found you blog and love it!
I am in the UK and can’t find a crock pot bigger than 8litres (7quarts) will this be big enough? Do I have to use a crock pot?
Thanks
Kamini
I’m not sure. Possibly, but you’d need to keep a close eye on it and stir if it starts to overflow.
You can process it in the oven instead of a crock pot. It’s referred to as CPOP (cold process oven process). After all the ingredients reach trace (pudding texture) pour it into an oven safe dish and bake it. Happy soaping!
You may already have this figured out, but for anyone else reading, a litre is so close to the volume of a quart, they are nearly equal. A quart is only about 3.6 tbsp (54 ml) more than a litre.
Hello:) I have a couple of questions I was hoping you can answer:)
Why is this not recommended for color treated hair? Is it also not recommended for chemically treated hair (like a relaxer)?
In stead of 33 oz of coconut oil, can we add some Shea Butter or any liquid oils as well?
Thank you!
It’s not recommended for color treated hair because it cleans by opening the hair shaft, then closing the hair shaft after washing with an acidic rinse. If hair is dyed, the dye may leak out when this happens.
If you substitute shea for coconut oil in this recipe you will need to recalculate the lye as they are not interchangeable. I would stick to the coconut, though, because shea may leave hair oily.
Do you have a recipe for color treated hair? TIA
Can I use Kokum butter as a substitute?
Bar soap has a tendency to make the scum in the shower worse. We use liquid soap to prevent this. Do these bar soaps build up scum on the shower/bath surround?
I use both bar and liquid soap for bathing, so I can’t speak to how one or the other affects buildup.
Your (marilyn’s) liquid “soap” probably isn’t soap, but a product of other detergent surfactants. With actual soap, there should be no difference between solid and liquid in the formation of scum. With other detergents, also no difference between solid and liquid. It’s just that soap is sold more often as a solid, and other detergents more often as a liquid.
Do you have to use the acidic rinse?
Yes, it’s necessary to restore hair pH.
I love the coconut oil smell. Does you soap still smell like coconut oil?
No, after the oil is saponofied it doesn’t really have a smell, unfortunately.
Can you add coconut fo? Then she could have her smell?
Should the coconut oil be refined or unrefined? Or does it matter in the case of this recipe?
I have used both successfully 🙂
Do you prefer this or the clay hair wash?
Thanks!
Awesome! Thank you! (:
Is 10% or 12% superfat still gentle on your skin or is it meant only for hair?
I’ve used it on skin without a problem, though it could be drying in winter. 🙂
I looked through the comments and have not really found an answer to my question: what temperature does it cook at in a crockpot. I live in Europe. I don’t own a crockpot but I do have a food processor/blender that cooks (Thermomix by Vorwerk). I make homemade detergent and other such things in it but I have not attempted soap-making. Do you think it would work in my machine? What temperature should I set? It stirs the entire time. I can adjust how fast. Is that a problem in soapmaking? Could you please, please respond to my e-mail address? Thank you!
I’m not familiar with that appliance so I can’t say for sure, sorry!
It depends on the type of crockpot as to the temperature. Typically, the low setting is 220°F/104°C and the higher setting is at least 300°F/148°C. Hope that’s helpful.
My crockpot manufacturer says that all crockpots cook at exactly the same temperature on low and high, it just takes longer to get to that temperature, but it WILL get to the highest temperature eventually. That is why they should be called SLOW cookers. And the temperature will be around 285*…I really wish I could find my reply from the manufacturer…..and give the exact temperature.
Why would you make a recipe that calls for one more Oz of oil than comes in a jar? If I choose not to buy a whole other jar to get the one extra Oz, will using 32oz mess it all up?
The 32 oz. is by weight, not volume, so a 32 oz. jar is not necessarily one ounce less than what you need. I buy my coconut oil in 5 pound tubs so I’m not sure how close it is, but it needs to be weighed for accuracy.
Ratio and proportion rule apply to this since it is a fairly simple chemical reaction.
My first batch was a half batch because of the crock pot I had available and turned out great! If you want to use a 32 oz jar reduce the other ingredients by the same proportion (32/33). Don’t be afraid to reduce the lye a little more and be sure to use the blender until you have good “pudding”.
Hi
I just tried to do this recipe cooked the recipe for 45 minutes and did the zap test and got a zap, cooked it 15 more minutes and still getting a zap now my soap has seized… I am a little mad I don’t know what I did wrong I was very carefull in the measuring.. Any ideas of what could have went wrong?
Oh, I’m sorry to hear that! I’ve never had that happen, but from what I’ve read the most likely culprit is the addition of fragrance oils. http://candleandsoap.about.com/od/soapglossary/a/SoapSeize.htm
I’m wondering, though, if it truly seized or if it just finished cooking. It should somewhat resemble mashed potatoes when it’s ready, which could possibly look similar to seized soap.
Have you tried using it?
I love all your coconut oil soaps, but where did you find a calculator to do the 12%, and 20% super fat? Also, every calc I find doesn’t calculate the amount of lye or water… I want to make a pine tar soap, using mainly coconut oil, b/c your soap is so great, but I can’t figure out how to use these calculators… Thanks for your help.
This is the one I use 🙂 http://soapcalc.net/calc/SoapCalcWP.asp
I can’t figure out how to use these calculators either. In the link, it already has the ‘soap qualities’ figures in – are these the figures you used? I just can’t seem to get the same recipe as yours (wanting to convert to grams as I’m not sure whether you are using fl oz or regular ounces and are they different to English ounces etc?) I will be using this soap on my children if it works so want to get it right. Thanks for any advice 🙂
This looks nice, definitely want to give it a try. But I can’t see on the tutorial where you use the thermometer. Also, this is a shampoo, correct? Just a little confused because you called it soap at the very end of the video.
It’s shampoo, and it’s soap. “Shampoo” is its use, “soap” is its composition.
hi Heather
love the sound of this shampoo bar, we are from South Africa and would like to make your shampoo bar, do you have this recipe in grams as i would rather use your measurements.
Hey Heather,
The links provided of where you purchase your lye are not working for me. Can you please send me the link so I may purchase the same kind as you use.
Thanks!
I get mine at the local hardware store in the drain cleaner section. Make sure it is 100% lye. As long as it is pure lye it will produce the correct reaction.
I get my lye at Lowe’s but make sure the one you get is 100% lye.
I’m curious, i have currently been “washing” my hair with an egg yoke once a week with good results for about six months but I’d like to try something else. Do you use the clay shampoo or the coconut shampoo bar? Or do you alternate?
I’m a beginner at soap-making, but was taught that the lye and fat have to be very specific temperatures for the soap to successfully saponify. Since crockpots cook at different temperatures, could you please perhaps measure yours next time you do this and let us know? Thanks!
They do not need to be the same temperature for hot process soap. 😉
Thank you for your quick response! I did some more research and learned that, too. A friend and I made your shampoo bar yesterday! Oh my goodness, it smells SO GOOD, and we didn’t even use any essential oils. I can’t wait to use it! I learned that you were serious when you said to use an 8 quart slow cooker, but part of my counter is now very clean . I need a bigger slow cooker anyway, and I’m planning to do this from now on, so shopping for an 8 quart cooker!
Do you know if I can use recipes for cold process soap with the hot process method?
Can you use fragrance oils instead of the essential oils just to give it a good smell? The essential oils are so expensive.
Barbara you can buy essential oils at amazon for a small price. If you think about the expense on the oils… think of it this way .. ONE drop is like having 100 flowers compressed into that drop … I like Plant Therapy .. Eden’s Garden and Plan Guru for the brands I buy off Amazon .. OHH and those who were looking for Lye .. you can buy it there too 🙂
For the cider rinse, does it have to be rosemary or peppermint oil, or would another essential oil work as well? Like a citrus or flower oil?
Also, will adding an essential oil to the shampoo bar cause issues or will it work as well as without?
Thank you 🙂
I like simplicity so I rarely add essential oils to either. They both work beautifully for me without them. 🙂
Love the entire blog you´ve got running and super excited to get home and try this soap recipe with my sister! One question though- you mention the need for a thermometer, but never mention using it in the steps? Is it neccessary?
Thanks so much!
It’s mentioned in step three, but honestly I don’t even use one anymore. I just melt the coconut oil and it always turns out beautifully.
I wanted to know if you could share a link on where you purchase the lye .
hello this shampoo bar recipe contains only coconut oil i have very oily hairs but very dry scalp the coconut oil won’t dry out my scalp right and also would it leave greasy feel to my hair?
That’s what Im thinking.. I suffer from dry scalp as well.. I have made shampoo bars before using only about 20% coconut oil and high amount of Olive oil and it still dried out my scalp.. Im super nervous of trying this 100% coconut recipe 🙁
Hi Heather,
I love your blog and am super excited to try this. Quick question tho, in my past attempts at making body washes with oils I’ve had problems with the oils clogging my shower drain. Have you had any issues with this? Thanks!
I haven’t had any problems with this recipe 🙂
Hi, I was wondering if an emersion blender is necessary or would a regular blender work?
Are the measurements in weight or volume?
Thanks
By weight
I have yucky (as in stinky) well water, and we use a softener (salt).
My hair has become limp and lifeless (although that’s also due in part to my stylist not cutting my hair the way I’ve described to her…repeatedly 🙄 It waves so beautifully when layered properly.)
Anyway, I was wondering if this shampoo would help with this problem or if I should try something else.
Thanks!
I made soap 1x a few years ago. I had to buy the lye off the Amish. Is there a store chain that you can buy it at?
Water? Tap water, or distilled or well water?
I just made the soap. I put lavender in the mix before placing in the mold. I was wondering how you might color the soap bars.
Hi, I really want to try this but I don’t have a crock pot. I love off grid and all my energy is solar powered I believe a crock pot would pull to much energy for me to use it. I’d there a way to make this without the crock pot?
Hi there I made this soap without crockpot as I am from Pakistan and we have no concept of crockpot here. I used double boiler. Though it’s been a lengthy process yet the soap turned out to be an excellent one. Thank to Mommypotamus ❤️
I don’t use it as shampoo because it will strip the color….but it is an awesome body bar. I love it and my skin is not so dry now.
Hi, thank you so much for this shampoo bar recipe I wanne try it, but I don’t own a crock pot. Is it possible to make au bain marie in a pan ? or do you have any other sugestions. thanks Greetings from the Netherlands Sandra
Hi Heather,
Really want to try this, but can you use a crockpot that you would normally use for food? TIA
I’ve read that adding a small amount (1oz) jojoba oil or castor oil at trace will add moisturizing properties for extra dry or processed hair. In your opinion would this be a viable additive to your current recepi?
I’m trying to make this and something seems to be wrong. It’s been in the crockpot for 3 hours and every time I check it, it zaps me. It’s getting hard but it’s still not done! Can someone give me a suggestion on what to do??
Hi Kathryn, did you measure the ingredients by weight with a scale? It sounds like the mixture may contain too much lye.
I tried your recipe and it came out great. My issue is that it left my hair stringy, tangly and dry as heck. The second time I washed and I did use the rinse you suggested both times it was so strange because my hair was crazy oily. What is happening in this process. The coating it leaves on your hair seems to make it less bouncy and feels more brittle than regular shampoos. Is there a reasoning for this?
I was wondering about coloring it as well;)
I’ve made this for my first time at attempting soap today. I made a half batch though, as I have a small crock pot. It seemed to get hard really quick, since I did a half batch should I have reduced the cook time? I was also very nervous about knowing the different between ‘shock’ and soapy taste. I think I got it right!
Hello! This may be a silly question, but do you buy the food grade lye, or the non-food grade lye? 🙂
I use soap-grade lye – there’s a link to the specific brand I use in the the post. 🙂
Thanks for sharing!
How come this recipe doesn’t require tallow or lard?
I thought coconut oil becomes liquid at a relatively low temperature?
Also you mention the vinegar rinse is necessary, but is the hair better off with this shampoo bar than store bought shampoo, if you don’t use the vinegar solution in both cases?
I’m asking because I travel a lot so I can’t always have the vinegar solution by hand. But I’m guessing the homemade soap bar is still a better option then?
It’s really necessary to use the rinse, so if you are traveling and it’s not an option the bar is probably not the best choice, unfortunately.
Heather, I love your site!! Because of serious illnesses I became more interested in natural food and natural life choices. Trying to eliminate as many chemicals and toxins as I could. I not only lowered my cholesterol by close to 300 points, but my sugar is normal, and the diagnosis of fatty liver disease is gone. My cardiologist told me to keep doing what I’m doing because its working!
My comment on the vinegar is this: I’m 58 and my hair is almost completely white. I changed to using white vinegar because my hair got a dirty dingy yellow from apple cider. So i suggest that anyone who has light colored hair use the white vinegar.
Walmart sells small travel bottles that I use for the vinegar.
I use the small spray bottles from Target (Walgreens and CVS has them also with the other travel size products) with apple cider vinegar and water in it.
It stay solid after it has undergone saponification (conversion to soap)
100% coconut bar has very little conditioning and is very drying. It’s not the best for skin, much less hair.
While that’s generally true, this recipe has been “superfatted” so that it retains moisturizing properties. I’ve been using it for a long time and my hair is soft and not dry at all. 🙂
Thanks so much for your fun videos and how to explanations. This may sound really dumb, but I have been making soap for about 5 weeks now, tried hot process once. When did you super fat? Is the essential oil your superfat? If so, please share some that you use? I was under impression your essentisl oils were for fragrance and that butters like shea, avacado, cocoa butter, etc. Were your super fats, or some xvirgin organic oils of olive or even coconut held back to end, even soft oils could be technically used to do this once the process has neared completion, i.e. when youve reached trace in cold process, and near the end of your HP proceedure. Im a grandmother, and I may have missed something along the way? Obviously. …. ? Thanks again!
I just made this so last night and used it this morning. It was fantastic and my first time making a hot process soap. I love the creamy lather and my hair feels wonderful. Thank you so much for sharing your recipe and the process I really, really appreciate it.
I am going to make this tonight. This is my first attempt at dong anything healthy for my hair, but I am very hopeful that this will be the beginning of a new hair journey for me.
Thank you for sharing your recipe!
Is it possible to CP this recipe (waiting a few extra weeks for curing)? They don’t really have crock pots where I live so HP is tough for me to do.
Yes, you can cold-process this recipe. 🙂
I am a new ” soaper” and cannot wait to try this new recipe as it sounds awesome. On a side note…I have made the transition to using a shampoo bars about 7 months ago and will never go back to the liquid store bought brands. My short hair and scalp has never been healthier. The transition took about 1 week and will tell you I wanted to go back to using the bottled stuff that was still sitting on the shelf in my shower ecause my hair felt heavy and greasy. But am happy to now say that after that transition period, my hair came alive again and even found that I started using less hair products such as gels, mousse, and hair spray because my hair was behaving. I added my “plug” for shampoo bars so that other readers might hang in there if they are making the transition. Thanks!
I totally get what you are saying! I made a “natural” shampoo to try the difference. I used coconut milk.The first time I used it my hair felt softer and happier. My scalp seemed to like “natural” much more too! This will be my first time using a shampoo bar, but I like that it barely take up space
Is this a kid friendly tear free recipe? If not, do you have one? Thanks 🙂
I’m worried. Everything seemed to go smoothly until it was time to determine if the mixture had cooked enough… I waited 30 minutes, then 40 minutes, until no puddle of liquid was left in the middle. I found the zap test difficult to determine. It didn’t really zap, but after a few seconds, my tongue seemed to tingle unpleasantly and sort of burn, so I waited another 10-15 minutes. There was no more liquid by then and the mixture seemed to be getting dry and hard. I didn’t know what overcooking would do, and it was still unpleasant on my tongue. I took the chance to put it in the mold. Now I’m waiting for it to harden and hope it doesn’t burn my scalp when I try it. Next time, I’ll buy the pH strips. 🙁
If it does feel a little harsh when you test it, just leave it for a few weeks and it will finish converting. 🙂
How much does it make? Like how many bars and how long does a bar generally last you?
You mention shelf life is about 1 year. Is there a way you can preserve it for longer. Like keep it for an emergency prep kit?
Hey Heather,
Awesome recipe. I made it and have been gifting bars to friends and family. A number of them have asked me if the shampoo bar can double as soap. What are your thoughts on this?
It definitely can. Some people find it drying, but some love it and don’t have that problem at all. As long as they don’t experience dry skin they’re fine. 🙂
I played with the recipe a bit and also used some jojoba oil (used the soal-calc.net to make sure I had the correct amount of water and lye). It really made my hair and skin feel wonderful and I have given it to friends and coworkers, who also loved it.
It IS soap. Soap is what it’s made of, shampoo is what it’s recommended to be used for.
She has a recipe for laundry detergent made (partly) of soap too. Soap is what it’s made of, detergent is what it does. “Detergent” just means cleaner (or as an adjective, cleaning), doesn’t tell you what it’s made of. “Shampoo” just means hair cleaner.
By the same token “soap” doesn’t necessarily tell you what it does. We’re mostly familiar with detergent (cleaning) soaps, but there are soaps with no detergency at all that are used as lubricants or for other purposes, or are useless byproducts.
My 12yr. old daughter found your video on youtube, she was so excited about making the shampoo bars. Thank you for the recipe it turned out great.
I was wanting to make a half batch. I’ve seen other sites mention a lye calculator, however, if I just divide everything by two won’t the proportions be correct? And do I need to adjust the cooking time for a smaller batch? Thank you!
roughly how much is 33oz of coconut oil, so i know how big of a container to buy
I Just bought a container that is 56 Fl oz, but when I weighed it in lbs and oz on my scale it was almost exactly that weight. That does include packaging. Hope that helps!
Hello,
I just made my first batch of your soap, I will be making a lot more of different types, as I am
recovering from surgery and want to do something creative
This is the best explained soap video I’ve seen! I have always wanted to make my own soaps, but I am nervous using lye. However, your explanation and demonstration of how to use it properly, and how to safely clean it up, is so helpful. I am hoping to make this shampoo bar. I was wondering what to do because I want more oil (the amount that made your hair “greasy”). Would I use less lye or more coconut oil? Thanks for the great video!
Heather said she tried using her regular soap recipe and it was too greasy for her hair (that’s why she adjusted it to come up with the shampoo bar). Maybe you want to try that original recipe instead? I believe that is listed above. If it’s too greasy you can just use it as regular body soap. 🙂
Should I only use distilled water? what kind of water did you use?
If possible always use distilled water. Because of the various minerals and things in tap water, it could react with the lye in unexpected ways.
Another option would be using something like rose water:
Make some rosewater ice cubes and add the lye to that slowly. The heat from the reaction will melt the ice cubes. Then use that as the lye water added to the coconut oil.
You will lose most of the rose scent, but keep the benefit of the rosewater for hair and skin.
Just read your article and watched your video, question do you really need to rinse your hair with vinegar or what if just water. What would be the result.
Yes, vinegar is essential to restore pH. If just water is used you will probably find that your hair has a weird texture and is difficult to brush.
Hiya Heather,
Thanks for the video on the hot-process method. I have a mini-crock pot so I was going to try your recipe cut in half, but I had only 11 oz. left in my coconut oil jar, so I went to an online lye calculator and reformulated a mini-batch. Thinking that 10% superfat might be high for me, I went with 8% superfat. I then scooped the resulting soap into mini-muffin cups to make palm-sized shampoo balls (cutting not required!). Even with the reduced recipe, I still ended up with a whole bag full of shampoo balls. Each one lasts me two weeks and my hair feels great with the 8% superfat. So I have enough shampoo to last for a year, though it only cost me about $5! I added 20 drops of tea tree EO at trace to give it a minty, therapeutic quality, but I can still hardly smell it; I could have put in much more than I did. My next batch will include a mint EO so it’s tingly and cooling. The lather is so profuse that I have to be careful not to over-do the rubbing or I can hardly even feel my (short) hair among all the suds! This inspires me to try dropping one of my mini-muffin soaps into the bottom of my shaving mug to see how well it works with a shaving brush. I will let you know!
Is the lye supposed to be food grade or non-food grade? Thank you!
Would anyone be willing to sell me a bar so I can try it before making it myself?
Hi
I have also tried this and love this shampoo bar.
First time, soap turned out snow white.
Second time it become really greyish. I used a different coconut oil.
What did I do wrong?
Thank you
Dear Heather,
I just found out about your website and I love it!
I tried to make this shampoo bar, but I can’t manage.
Here in the Netherlands we dont’t work with oz. (ounces?).
I tried to calculate to (kilo)grams and (mili)liters but that didn’t work out too well…
Could you give me the recipe in grams and mililiters?
Thanks!
Marjan
(Sorry for my poor English…)
Hi Marjan,
I’m not Heather, but I am Canadian, and use the metric system too. Just finished my second batch using this converstion:
For Normal Hair (10% superfat)
935.5 g coconut oil
355.5 g water
154.2 g lye
15 – 29 g essential oils (optional)
Thanks very much Heather for this recipe! I have just completed my second batch (10% superfatted for Normal hair), and am loving the results.
Even more excited that I will not have to buy expensive, environmentally-friendly, soap/shampoo this summer for our boating/camping. 😀 It’s a win/win!
Hello, I really just do not have the time to make soap right now due to just having a baby, but want to start doing this! Can I use dr bronners bar soap and get the same result? I believe that is coconut based
Hi Meghan, unfortunately I don’t think you’d get the same results with Dr. Bronners. However, Tropical Traditions sells a shampoo bar that might be close 🙂
I made your shampoo bars, body bars and laundry bars and I have to say, I love them! I have made soap but never made the hot processed and your recipes are so simple but oh the soap is so great! I just can’t believe it’s so wonderful. I will not be ordering any more $20 bottles of shampoo that’s for sure! I was already using a natural shampoo and at times baking soda water and apple cider vinegar so I didn’t have any problem changing to the shampoo bars.
I am allergic to citric acid (some really nasty stuff if you don’t know already) so I am excited to use the laundry powder along with all the rest. I can’t use citric acid outside or inside my body so it keeps me on the hunt for healthy clean things.
Thank you so much for sharing all you’ve learned!
My crockpot boils liquids on low but is barely lukewarm on ‘warm’. Which setting would be better? I made my first CP soap about a week ago (CAN’T WAIT for it to cure!!) and now I am wanting to make shampoo bars, as the commercial one I have been using for a few months has my hair feeling like steel wool! Thanks!
I left an earlier comment but I think it was under a different topic.
long-short: I tried a zero percent all coconut bar and thought it too harsh but should be ok grated for laundry soap.
Just did a 10% superfat for the shampoo bar.
Tried it for hands and *** amazing ***
sudsy beyond belief and smooth and creamy feeling.
thank-you MommyPotamus for your efforts with this website.
Hi,
I purchased your e-book and stated making and using some of the products. In your e-book you suggest 20% superfat for the soap bar if used on face and body, 12 % superfat for dry hair and 10% superfat for Normal Hair. How about oily hair? Can we conlude it as 8%?
Thanks
Hi Esra! I would probably start with 6-8% and adjust as needed. If you find your hair is still oily you can use some dry shampoo to soak up the excess oil.
Thank you so much for the foolproof directions 🙂 I have an autoimmune skin condition that reacts very badly to all scents and colors – this is heavenly! My skin feels amazing and I have very few flare ups when I only use this 🙂
Hi Heather!
This is my first time making my own and I just had a couple of questions:
1. After using the crockpot, should I rinse it with vinegar as well before loading it into the dishwasher?
And 2. Instead of using the break pan can I use smaller silicone mold like this one: https://www.amazon.com/gp/aw/d/B00K737UZS/ref=mp_s_a_1_1?qid=1461162854&sr=8-1&refinements=p_85%3A2470955011&pi=SY200_QL40&keywords=silicone+mold&dpPl=1&dpID=410bDsMVz5L&ref=plSrch
And would I still need to line it with parchment? (Please note that if I do get the silicone mold I will only be using it for soap making.)
Thank you so much for your help! I’m so excited to start making my own products!
Hi Heather,
I made this shampoo about a month ago and love it for my husband and kids, but my hair is still greasy after a wash and vinegar rinse. I’ve been telling myself that I’m still in the detox process, but I’m not so sure anymore. Could it be lasting this long, or did I do too much oil vs lye? I really want it to work due to simplicity and how soft it leaves my hair, but I really want to be able to wear my hair down. Help!
Thank you!
Hi Maggie, yes it sounds like you need a lower superfat ratio. Which one did you use? In the meantime, while you’re using up the bars you have you might try dusting a little of this dry shampoo on before bed. I did that when I was testing the recipe and ended up with a batch that was too moisturizing – with that extra step I was able to wear my hair down.
Thank you so much for your response. I used the 10% superfat recipe. However, my scale doesn’t go down the the hundredth decimal place, so maybe my measurements were off. I think I’ll try the dry shampoo and maybe make a new batch of bars for myself. Thanks so much for all you do! Mama bloggers like you have helped completely alter my priorities as a homemaker…for the better! Keep up the good work!
Hi Heather, I made this shampoo bar for normal hair and I love it!!!! However I do get a bit of dandruff with it even after the vinigar rinse. My hair is so soft and shiny but my scalp dry. When I use coconut milk shampoo my hair is waxy greasy but scalp normal. Even after vinigar rinse. Help! What do I do? Should I make the coconut shampoo bar for dry hair? When ever I’ve used shop bought shampoos my hair is normal.
I have just read about caster oil in wellnessmama site. I will give this a go and rub on at night to stop dandruff and hair loss that I’ve noticed in the shower.
Hello i have the same problem
After 6 months my hair still with a gummy look
I made the recipe for normal hair, I wash my hair twice a week and use the vinegar rinse…
What I can do?
Hi I have made the shampoo bar but by the 4th day I couldn’t stand the clumpy feel to my hair any longer and I have washed it with my normal shampoo. How long should my hair be feeling so yuck? My husband who has super short hair anyway has no problems.
If I want to half the recipe, should that work fine as well?
Hi, I have been wanting to try soap making but have been a little wary of the lye. But this video convinced me to take the leap. The only problem is i do not have a scale that measures to the one-hundredths of an ounce and don’t want to invest in one when I am still experimenting. Could I use tenths of an ounce? If so what would the measurements for the lye and the water be?
Thank you so much for posting this recipe. Would you be able to provide information on how I could cut this recipe in half? I only have a 5-6 qt crock pot.
What would the new measurements and the cooking time be?
I really appreciate it! Can’t wait to try this recipe!
I have made soaps for quite a while now but never shampoo bars. I’ve read that if you have hard water (which i have) shampoo bar soap will leave your hair feeling like it is covered in wax. Do you know anything about that or have a solution for it?
For almost a year I’ve been trying to figure out a way to shampoo my hair in a homemade, natural way, and I’ve suffered through many greasy hair days and more! But oh my gosh, I used this recipe and it is a miracle worker! I’m so glad I didn’t give up! Thank you! I think I’ve asked my boyfriend to feel my hair like 4 times in the last day!
However, while making my soap, it toon about 2 hours so get to a ph of 8. Still then, it still zapped a bit, maybe it was just the taste? And I thought it needed to cook longer but the pH was fine, and it didn’t burn me while I was washing my hair.
Do you think it is okay?
I think it’s probably fine if you washed and didn’t notice any harshness. So glad you liked the recipe, Kay!
Heather I want to make this shampoo. I have oily hair that needs to be washed daily, so should I try an 8% superfat? If so, does the cooking time change? I came up with 5.56 oz. lye for 8%. Is this correct? I’m new to this and found your blog a few days ago and I love it! Made your body wash and it’s great!
Just made my first batch of soap. Holy cow!!! Super easy and what an amazing lather. Thank you so much for the wonderful recipe. I’ve never made soap before but your instructions were easy to follow. I added the peppermint and rosemary essential oil and smells great. I can see this as my go to recipe.
Thanks so much!
Hi Heather,
Do you know why when i tried coconut oil my face broke out more with acne? 🙁 please help i would love to use it again as a face moisturizer. Until i can start to make my own 🙂
(coconut oils i tried: trader joes, skinny coconut oil, life of garden organic coconut oil)
Hi Mecehile, for some people coconut oil seems to have that effect. You may want to try one of the oils listed in this post instead: https://mommypotamus.com/oil-cleansing-for-clear-baby-soft-skin-video-tutorial/
Hi Heather! I’m not sure where I went wrong 🙁
I weighed my ingredients, brought coconut oil, water, & lye to trace & turned my crockpot on low. At about 45 min I went to stir my soap and the top layer of the soap had hardened. I tried to stir it & but my whole batch was extremely lumpy. Any idea what I could have done wrong? Did I overcook my soap?
Heather,
I just discovered your blog about a week ago and have been reading on my off time. Last summer I tried to start the whole no sulfite, paraben free, silicone free hair treatment (note: I am a lifeguard, swim coach and swim instructor during the summer so my hair is constantly gets sweat, sunscreen, dirt, and chlorine in it). After doing copious amounts of research, ( after I started the detox process… I know, probably not the best idea) I discovered that Hard water can make it more difficult to have clean hair when using the “natural poo” process of cleansing. My water comes from an underground well and is extremely hard. Do you have hard water or soft? Or do you have any solutions to having hard water besides doing a final rinse with baking soda and water, bottled water, or apple cider vinegar? I gave up on the “no poo” process at the end of last summer but would like to start it again.
Hi Nina! I live on a homestead and our water is spring fed and very hard. I’ve found that the vinegar rinse is essential, but I’ve had no problems using this recipe as long as I include the rinse!
I made this shampoo bar a month ago and I love it! I have long hair and I don’t even need conditioner. I use it for soap and shaving cream too; the lather is crazy.
So happy you like it, Becky!
I made this shampoo bar last week and I love it! I’ve been using another natural commercial shampoo bar for a while. Once I got past the transition phase, it really seemed to work well. But over the last few weeks/months my hair has become more waxy/stringy. I always follow the shampoo with the acv rinse. So I think the issue is just build up from whatever is in the other shampoo bar.
Do you think the hair detox recipe you have would remove previous product build up?
We made 1/2 the weight of everything and cooked for same time 45 min. Should I have set for 20 min?
The soap got set fine but insides look flaky than smooth from inside. We do want to make cute kids shapes. So don’t want lumpy crumbly look, any advice? May be replace 5-6 oz with olive oil or something? Please advice
Made this today. Really like it. Already used some. Did the apple cider rinse after and my hair wasn’t tangled or gummy feeling at all. Thanks!
Yay! So glad you liked it, Suzanne!
Hello Heather –
Thanks for sharing this recipe – this is exactly what I’ve been looking for.
I can’t find the exact measurements for the 12% superfat recipe, though. Also, after reading the questions and advice above, I’m a bit confused about whether I need a higher superfat content for oily hair or a lower one.
Could you sort me out please???
I was wondering if I could substitute coconut milk for the water/lye mixture?
Hi Stacy. I have just read this blog, which explains the late response. Yes you can use coconut milk, except the milk & lye will separate, so you will need to stick blend them before adding to the oil. Once combined it will separate again, but with patience & even more stick blending, it comes back together again. I tried this recipe with both coconut milk & cream. The cream turned the soap a slight grey colour but it was a really nice bar of soap. The milk was not as grey, but definitely not as white as when water is used.
Thank you!
Hi! I was super excited to read all the recipes I found on your blog, you are so awesome! I already make a large number of things myself and I just made my first batch of coconut oil soap using your recipe. It was SO easy! Since one of the things I currently make is beard oil for my husband, I was wondering if you have any comments or suggestions for making a beard soap using hemp seed oil and sweet almond oil? I use these in his beard oil, and I think it would be great to use the same oils in a beard shampoo for him. Thank you so much!
What if I wanted to add color? For instance, if I wanted to make laundry, hair and body, and add color to distinguish which is which. What would I use for this purpose?
Has anyone every tried an electric milk frother for this, I have the attachment for my kitchenaid hand mixer that I never use.
Can you tell me if this soap could be made with shea butter instead of coconut oil? My kids and I are sensitive to salicylates and cannot use coconut oil. Thank you.
Hey what are the differences between making soaps and shampoo bars? I know that the porpotion of the materials are a bit different. Soap cintains 4.83 oz. of lye bur shampoo cantains 5.44 oz, why is that?
My guess would be because soap has a higher fat content aka superstring.
Hello Heather. I too wish to thank you for this recipe & how simplistic the explanations are in the video. I have to say I found I do not like the taste of soap, so I purchased the litmus paper. One thing I did do, is I stirred the batter more frequently than advised, which probably prevented it from seizing in the crock pot as I find my cook time needs to be an hour or more (probably relates to my crock pot temperature). At pour time the soap sets very quickly. I have tried the recipe with both coconut cream and milk, and apart from separation issues requiring more stick blending and colour change (as in a slight grey), they both worked out fine and somewhat creamier. The defining difference makes me think I will keep to the water lye. I have not used shampoo since making your soap (recipe was found on Pinterest) and I have coloured hair. As yet I have not been able to relinquish conditioner and must have missed the part advising vinegar use, or perhaps am lucky with my hair type. Just a suggestion for some of your bloggers is the addition of a little water may release any seized or overcooked batches. I have also read it can take some a couple of weeks for the scalp and hair to adjust to the change in soap. To summarize, I love this as both a soap and shampoo and am very happy that Pinterest had your tutorial for me to find. Thank you
So excited to make these!
Maybe this is a weird question but, have you ever tried using the Laundry bar as dish soap? I was watching an I Love Lucy episode and I noticed her using a bar of soap and a kind of hand mop to wash dishes, so I thought, hey maybe… And I am just fet-up with trying to find a natural dish soap that works and is cost effective. 😉
Thanks so much for sharing your hard work and creativity here. I just started following your blog and I am loving it! Love the recipes and the photos, love how, open and heartwarming each post is. It’s like we are long-time friends you graciously invited over to partake in your homemade lifestyle. Thank you.
It’s not like bar soap ever stopped working to clean dishes. I do it all the time. It’s just not convenient if you have a lot of them to wash all at once and like soaking them in a sink of suds-water.
I was skeptical at first to try this recipe. I’ve been on the search for the perfect shampoo bar recipe, combining many different oils and additives. This is by far one of the best shampoo bars I’ve tried. The lather is amazing. The bars are hard and long lasting. My hair is silky and soft and stays clean a lot longer. I have long unruly thick hair and no conditioner is needed with this bar. Thank you much 🙂
Hello!
I have a question: My mother and I made your recipe a couple weeks back and added Rosemary oil. As soon as I used it in my hair it left an almost waxy feeling residue in my hair. The first day wasn’t so bad, i had amazing volume and it maintained its style all day long although i couldn’t run my fingers through it from the waxiness. When i washed my hair again it got even worse to the point i had to wear my hair up all day because it just looked oily and felt waxy. It would literally move is one unit it was all so waxy together, i could crease it with my hands and it would hold the crease. Did we do something wrong? I noticed on my hands and nails have a white kinda chalky waxy residue after showering as well. I haven’t been able to use it as a shampoo since the first two times i tried it so I’ve just been using it as a body wash.
Hi Brittany, there are a few reasons this might be happening. Are you using a vinegar rinse to close the cuticle after you wash? If not, that can make the hair difficult to get your fingers through. Also, did you use the bar right away? Although it’s safe to use, it usually takes about a week for the bar to fully mature and be usable as shampoo. I find that if I use my bars too early they make my hair feel heavy and a bit oily. Another possibility is that if you were using a shampoo with silicone or another compound that coats the hair shaft prior to the shampoo bar, your hair might be shedding that coating and making it feel gummy or waxy.
Heather,
Thank you so much for getting back to me. I did not use the vinegar, I will give it a shot! Also, I used the bar right away. I was too excited to wait. And as for the coating, that could be. I try to use the most natural products I can but there could still be something in it. Sounds like i just need to give it another shot! Thank you so much for your feedback! I was a bit discouraged but I will keep at it! 🙂
Is it possible to add citric acid to the recipe to balance the pH? Maybe grate the bar to make liquid and add some citric acid then? Dying to make this but really want to balance the pH. Is it possible?
Hi Janeal, while you can adjust the pH of shampoo bars and soap using an acidic medium, you can’t balance it to the point that it matches the natural pH of hair. If someone were to try, what they’d find is that the soap wouldn’t lather at all. All soaps by definition are alkaline, so even if the pH is adjusted slightly it’s always best to follow washing with a pH balancing rinse.
The Ozeri scale I bought only measures to the 0.05 ounce. How did you get 5.44 ounces measured? Will 5.45 ounces work? I am very frustrated since I had to collect all the stuff and then find I can’t get the precise measurement. I’m not sure where to go from here. Thanks.
Hello Heather,
Thank you for your wonderful post and recipe. I really want to make it, but I got rid of my crockpot and I am not planning to buy a new one. What is the best way to make your recipe using the hot process without crockpot?
Thank you!
made the soap today and am really excited about it. But like many comments I’ve read, it still zapped me after 2.5 hours. I have it in the mold, should I try to use it or throw it out?
I made this bar and I really love it. I use a citric acid rinse. I also use it as a body bar. It’s wonderful! My only question, I don’t have gummy issues but my hair does seem a little greasy. Is that normal and will it go away?
I was wondering is the coconut oil cooking oil or is it coconut oil 76 for making soap thanks
Is it ok to substitute goats milk for the water? I know I need to freeze the goats milk so the lye doesn’t scorch the milk. I made the soap and it turned out great AND MY HUSBAND LOVED IT! He is so impressed. So now I want to make a batch of goats milk soap using the same method, but not sure about the exact amounts….
Hi All, I had a quick question about the effects of this shampoo bar on hair that has a permanent wave treatment done to it.
I see repeatedly that the coconut soap and apple cider vinegar rinse is not for dyed hair, however I have seen no comments on whether it is safe for used on artificially curled hair. I have some pretty stubborn bone straight Native American Indian hair that doesn’t take a perm well at all {except for a Jerry curl right in the front that showed up after my hysterectomy} but I just love curls & want to have a perm done, but I’d rather not waste such hard earned money if this Coconut shampoo bar is going to strip the curls.
Thanks in advance for anyone that might know the answer to this and also thank you to Mommypotamus for sharing so freely her knowledge.
can you use homemade shampoo on color treated hair ? Or does your hair pretty much have to be all natural as well ?
I use a shampoo bar on my colored hair and it does fad the color faster, but I dye untraditional colors (purples,blues,greens) so it’s not a big deal for me because I constantly change my color anyway. But my hair has literally never felt nicer.
Thank you so much for this! It was super easy to follow and I made my first batch last night and it turned out perfectly! I love knowing what’s in my hair products and I feel accomplished. You and your blog rock!
Hi Heather,
I have a question: can you make this with a different type of oil if you’re allergic to coconut?
You can use a different oil, but if you do you will need a different recipe – or run it through a lye calculator.
For example, if you had a recipe* using Avocado, Olive oil, and Shea butter and wanted a 10% super fat, it would look something like this:
Lye (Sodium Hydroxide) 0.83 oz
Ounces of distilled water 2.31 oz
Total liquid 3.14 oz
Avocado Oil 2.00 oz
Shea Butter (Unrefined) 3.00 oz
Sweet Almond Oil 2.00 oz
* Note this is not a tested shampoo bar recipe. The results would be very different than the ones talked about in this post. I’ve only added it here to show it is possible, but you would need to use a lye calculator. Otherwise you risk having gummy, sticky, or poorly formed soap.
Hi, I’m excited to try this recipe, but do you have to only use the crock pot for soaping? Or can it be washed thoroughly and still be ok for food use?
Hi, I have a question. Could you use this soap on highlighted hair? Since that’s not a color? Did anyone try it? And also I get my coconut oil at Trader Joe’s can I use that for soap making? Thank you:)
I love this. I have very dry frizzy hair. Its a little more tangled when i first come out of the shower but as soon as it dries what a difference. Seriously everytime i use it he frizz level gets lower. NExt time i try making my own coconut milk too.
Hi! Can I use a hand mixer if I don’t have an immersion blender?
Anyone notice Step 5 is missing or is this just a typo?
Thanks for sharing! I currently make a CP coconut soap with a high fat content that is similar. I use coconut milk and essential oils. I’ve used it to wash my hair but was looking for a good shampoo bar recipe.
I also wanted to share an ACV rinse. Think I found this years ago in an Herb Quarterly magazine. Fill a clear lidded jar with apple cider vinegar, add a handful of organic lavender petals and steep for a week. It turns a pretty purple color and smells nice. You can also add rosemary but rosemary can darken your hair.
This sounds amazing!!
Chamomile would probably be awesome as well.. Or lavender plus chamomile.
I no longer have a crockpot and wonder if the coconut oil soaps can be made on the stove top?
We make homemade soap and the scent never stays in even if we use a whole bottle of essential oil. It always ends up just smelling like the fat after a week or so. I want to try this shampoo bar but I don’t want it smelling bad. Do you have a secret to keeping the essential oil scent in long term?
i am trying the soap recipe for 1st time and it has been 1 hour but the soap has just started climbing up side in one small spot….should i raise the crock temp to high or just wait?
I’m new to soap making. So could you please tell me what kind of coconut oil is needed. organic refined. I’m not sure what kind to get. Thank you .
Hi,
I was wondering if it could be possible to do the same exact recipe but with shea butter instead of coconut oil?
Thank you!
I have never made a shampoo bar before but make goats milk soap from our own milk. My crock pot was busy cooking dinner so I made this on the stove with mostly coconut oil but added a wee bit of shea and olive oil. It never did the “Waves” but I attributed this to the different ingredients and not using the crockpot. It smoothed up really nicely so I will see how it turns out in a few weeks!
How did it turn out? I want to try, but have no crock pot?
Hello Heather,
Is the lye you used food grade? I thought i heard you said in the video to put it on your tongue? I wanted to know before I purchase my lye if there’s any difference between food grade and ragular lye. Thank you in advance.
Hi Heather! Thank you so much for posting this tutorial and recipe. I made this today. I have done several cold process batches but today was my 1st time doing hot process. I followed this recipe exactly and it looked the same as the pictures in your instructions. I superfatted at 15% so I actually used a little less lye than you did in yours. I cooked it for over an hour and my tongue did not get a “zap” but it did make my tongue tingle. I ph tested it and it tested at a 9. After over an hour I did put it in the mold and just unmolded it and cut it from when I made it just 4 hours ago. It still makes my tongue tingle. Is this batch ruined or will it go away in another day or so? Thanks so much!
It will cure eventually. How long it will take depends on how much lye still needs to convert. 🙂
Thanks so much for the quick response Heather. I wonder where I went wrong? I measured everything 3 times after running it through soap calc so I am guessing it was not my measurements but maybe I did not cook it quite long enough. Thanks again 😉
Two quick questions…
1. What does “zap” mean? I have never tasted soaps to know… I understand soapy taste, but “zap” must be some other kind of taste affect.
2. When adding Essential Oils (specifically Argan Oil) are there or changes, or reductions to the coconut oil quantity, or the lye quantity?
I have been collecting all of the supplies and materials for a month now, and i am ready to begin 🙂
It’s not a taste, it’s an electricity-like tingle, and a bit of numbness afterward.
The quantities essential oils are usually used in can simply be figured as additions to the recipe, with no need to adjust the other ingredients. What some of them can do, however, is speed saponification, in some cases to a degree that impairs complete mixing and reaction.
hello!!
im brand new to soap making with lye and absolutely loved your coconut oil recipe because its the easiest one to come by here in Sikkim where i live. I just got my hands on some lye and now am on my way to get a stick blender and a set of kitchen scales. I did want to know though – can we do the same recipe over a gas stove? because crock pots are unheard of in these parts and ours being a rice eating family, i’ll be ostracized if i use our trusty rice cooker to make soap.
Cant wait to try this.
Cheers
Hello!
I really liked your video and would really love to try out this recipe. However, I don’t have a crockpot. Can you do it in a regular pot on the stove?
Also, I don’t know where to buy the lye. Can you make this with bicarbonate of soda?
Well…theoretically in a hot enough kiln you could convert NaHCO3 to NaOH + CO2, but practically speaking, no. In many parts of the world lye is no longer a common consumer product, and one person lamented that in Singapore soap makers need a license to acquire it. There are instructions around to use the old technology of leaching caustic from ash and standardizing it, but few would go to that trouble for practical home use. There are usually ways of getting lye, although the hazmat shipping may add costs.
I bought my lye on amazon. It works great!
Hi Heather,
Thank you so much for posting this tutorial. Because of you, I have been making soap for about 6 months. I have made your original recipe and also did one with peppermint, one with tea tree oil and today with a vanilla bourbon extract from Trader Joe’s and a couple dashes of cinnamon. I love using them on my naturally curly hair. My hair is so soft and bouncy. Before making my own soap, I was using baking soda and apple cider vinegar which I also love. But I missed the bubbles! So this is a great way for me to save money, have fun and still use ingredients that are minimal and better for my hair and skin. The best part is that my hubby loves them too!
Hi there. Could this recipe be used for oily hair? And if so do you superfat at all?
Heather,
Do you sell the shampoo soap?
Thanks
That is what I would like to know. I would love to buy a couple bars.
Can you substitute part or all of the water for something like pale ale? I have been making rebatch soap bars that include pale ale. For all my male customers, I wanted to add something “manly”.
If I use a heavy duty soap mold that has a shape, do I need to coat it with something so that the bars come out?
Which lye is recommended? Food grade lye or non-food grade? Is there a difference? I’m new to this and know absolutely nothing about lye, so I apologize if this seems like a silly question. : /
Does the coconut oil need to have a melting point of 76 degrees like the homemade bar soap?
Hi Heather,
I would love to BUY a couple bars of your shampoo soap for dry hair. I just don’t have the patience for this process.
Please let me know.
Love your site!
Carla
Hi Carla! I’m actually considering opening up a shop in the next few months. I haven’t totally decided yet, but if I do I’ll definitely send out an email about it. If you’re not already subscribed to my newsletter and you want to be notified, you can sign up in the top section of my homepage.
Thank you Heather!! I can’t wait, looking forward to it!!! I subscribed to your newsletter some time ago. Thanks for all the information you supply for us !!
I’ve spent hours on your site now as I’m looking to move away from a lot of products my family uses daily with poor ewg ratings. I’m wanting to try this for shampoo but having a hard time finding a second hand 8qt crock pot. Do you think a 6qt would work or does it need the space an 8qt provides? Thank you for all you are doing to share this information!
Could you use melt and pour soap if you don’t want to mess with lye?
Hi, thanks so much for all the helpful information that you share.
A few questions on making this shampoo bar.
a) Is there an alternative to a crock pot?
b) If not, I’m willing to go the cold process way. If so, is there any change to the quantities?
c) If I opt not to add the esential oils, do I increase the coconut oil by that much?
Thanks again!
Hello,
I am new to the shampoo bar making group and I am having a tough time getting them hard enough. I am using 15 oz coconut oil, 8oz hemp oil, 2oz jojoba oil, 6oz olive oil, 8oz Argan oil & 4oz avocado oil. I am using the hot process and following your instructions. My shampoo is never coming up the sides in the crock pot like your photo shows. I am cooking it at about 137 degrees and utilizing the warm setting on my crock pot. After about an hour it looks like very thick mashed potatoes. I then put 12oz of essential oil (Peppermint and Eucalyptus). I mix that up and start putting mixture in molds. The last batch I made was very sticky and somewhat soft. Can you help me understand what I am doing wrong? Thanks for your help.
Dan
The answer may be in your oils. Some oils produce softer bars. I used to blend EVOO and coconut oil, and those bars were a bit softer than straight coconut oil. Now all I use is coconut oil.
I would like to make this soap in my smaller crock pot. It’s not as big as the one you use, just slightly smaller. Will it work or do you think it will overflow?
the process of it becoming soap happens in the cooking process in the crk pot. the reason so many like the Hot Process way is that the soap goes through the gelling process & is READY to use right away. 🙂 still ck with the PH strips which are cheap & available through amazon.
################################
SOAP does NOT EXPIRE……………. the oils, (makes no DIFFERENCE which ones you use,) are no longer ‘oils’ .. they are chemically changed forever into a bar of soap !
some complained about the smell.. perhaps they used a coconut oil with a heavy coconut flavor ? I use a non flavored type in my soaps 🙂
Hi Heather!
I just made your Shampoo Bar Soap for the first time, and I’m so pleased with the resulting product and my ability to make something useful. Thank you for making the video and photo/caption directions easy to execute. In fact, thank you for all the great info on your blog! I’ve enjoyed much of your advice and many of your recipes over the last year.
Blessings,
Leigh-Anna Bivens
<3 I’m so glad you like the shampoo bar, Leigh-Anna!
Thank you for the video, I can’t wait to get my lye in the mail and start the process. I was wondering if this recipe would work for my dogs. I know the pH balance is tricky with animals skin but wasn’t sure if you have ever been asked this question.
Hi. I was trying to make this shampoo twice, but it is not solid. It is also not foaming. (I’m from Europe, but I’m quite sure I converted oz to kg right.) Is it possible, that it is not solid because I used refined coconut oil?
Can this recipe, with the same measurements of ingredients, be used for cold process as well?
Hi! Great video and recipe! Thanks for sharing! But I have some questions.
1. Can you use this recipe as a cold process recipe?
2. Can I use half coconut oil and half olive oil?
2. Which is the weight of this shampoo bar recipe? Because I’m trying to find a recipe that fit in my one-kilo mould.
Thanks!
I read somewhere on your site that you can test to see if the lye saponified by putting your tongue on it to see if there is a zapping sensation. I tested soap I made dong that and there was the slightest sensation of a zap. After the bars cure for 4 weeks will they be safe to use or was it just the slight taste of the soap? I’m going to use a ph strip too but wanted to know before I spent the money on the strips. Thank you!
I was looking for a ‘stick blender’ to use for soaps, and checked out a bunch on Amazon. Unfortunately, for one that is up to the task of blending soap that is coming to trace, means buying a “professional grade” blender, at $100+.
So, I got a good hand mixer (Oster) at Walmart, for $30, that came with a flat bottomed “aerating” whisk attachment that will reaches into the “corners” of my stainless pot. It worked like a charm!! It makes me wonder why everyone seems to insist that only a stick blender will do.
Do you have a whole house water filtration system? I have been using homemade shampoo of one kind or another, (baking soda, clay, egg wash, aloe vera, coconut milk, etc…) with an ACV rinse for years, and I make my own coconut oil soap (usually 10% superfat). I love my soap for my body, but anytime I’ve tried to use my soap on my hair, my hair comes out gummy. And I rinse thoroughly! And follow with ACV! And I only wash my hair about twice a week. I also have a filter attached to my shower head, but that doesn’t seem to be enough. So I’m wondering if better water filtration is needed. I’ve heard that if you still have problems that it could be your water. So that brings me full circle back to the question – How’s your water? Soft? Hard? Whole house softener (ion or salt?) with filtration? (In case it matters I have thick, straight, fine blonde hair. The kind that changes color and looks dirty after day 2). Thank you for your input!!
Can I add argan oil to this recipe? If so, how much for the 12% superfat?
Hi! I don’t have a crockpot. Can I do it on the stove at really low fire?
Thank you!
I made this soap and it went just as planned. I washed my hair with it this morning and I’m a little uncertain. My hair usually feels nice and smooth after shampoo but it felt waxy almost, and there was nothing smooth about it. I put a lot of conditioner on in the shower, then leave-on conditioner afterwards but it’s still not right. What am I missing?
Did you rinse with vinegar to smooth the cuticle?
Hi
Do you think i can cook this soap in the instapot instead of a crockpot?
https://instantpot.com/
Thanks,
K
I am wondering this too! I have the metal inner pot. Do you think the ceramic nonstick coated replacement pot would work? Please let me know! 🙂 I’m hoping to not have to buy an entire crock pot just for soap making. I don’t mind buying an extra inner pot though 🙂
Is it better to use more or less of the soap when washing your hair with this? I made it, and have tried using a little and parts of my hair were greasy, then I tried using more and still parts were greasy. Maybe it’s because I have hard water? I’ve been trying to use it for 3 weeks now. I’ve done the baking soda detox 4-5 times also. Any help would be appreciated! When were finished building our house we’ll have soft water again(I can’t wait)! Thanks!
Is this safe for kids?
Could I use soap flakes instead of making my own soap to make the coconut shampoo bar soap?
Thank you so much for this recipe! The shampoo bar left my hair so soft and clean, and the rinse was good too. I will be making this from now on!
What would make half of the coconut shampoo recipe?
Hello! Can i use this recipe for cold process too?
Yes you can 🙂
I just recently started using shampoo bars to wash my hair and I wonder what took me so long. I love it! It’s convenient and makes my hair feel so moisturized and soft. I will have to give this recipe a try because I love coconut oil.
Please help!!
I made the normal hair soap recipe (was very easy). But my hair is coming out really greasy. I’ve used it three times now and even did the clay detox, but it’s still really greasy.
Is this just the detox period or have I done something wrong?
Thanks for any suggestions
This looks great! I love making this kind of thing as gifts!
Hello,
Can you tell me how many bars of soap you get from this recipe?
Cheers
Hi there!
I live in the UK and am trying to find good lye, is it the same as caustic soda ? Thanks !
I bought the LYE that you bought. And it has been outside for over 10 minutes and it still has not turned clear what should I do.
How many washes can you get out of this bar? Or the same question the other way, how long does one bar last? Trying to figure out the cost effectiveness of this recipe. Thank you.
Hi Heather! My daughter, who is 13, and I love your website. We made the body soap and it turned out great, thank you! When I was mixing in the crock pot with the immersion blender, the soap was splashing everywhere. I took it outside and finished it there. I have two speeds on my blender, and it splashed with both. Any thoughts on this? Thanks again!
Were you using an 8 quart slow cooker? It sounds like the liquid wasn’t deep enough so perhaps your slow cooker was larger than normal?
If lye is so toxic that you must use it outside, with gloves, eye wear and a face mask, how is it safe to use on your hair and body?
Due to the process called saponification. The chemical structure of lye is changed and leaves you with fats and glycerin = soap.
Hi! I want to make my own shampoo, and this looks super easy! Buuuuut, I’m allergic to coconut and tree nuts. Is there a good alternative to coconut oil? Also, we have hard water, so are there any recommendations for that?
I’m not sure what to recommend in place of coconut oil, sorry!
Try using babassu oil instead!
Is there any way to make these bars colored?
There are some natural colorant powders available but I don’t have any experience working with them.
Hi Heather,
Planning on doing this recipe this week, my crockpot doesn’t say how big it is, but have a feeling it’s no more than 6. Can I halve the recipe? Or am I going to have to find a larger one?
Thanks so much.
So this may be an odd question, I’m very new to soap making, I’m just starting to buy supplies. My daughter has eczema which started this journey, I want to make some oatmeal honey regular body bar soap, is there a huge difference in those soaps and a shampoo bar? I see lots of people use shampoo bars for their body as well, can homemade body bars be used for shampoo as well?
Hi
I am so excited to make this. I don’t have a crockpot. Is it possible to do in a double boiler (Bain Marie)? Or other alternative?
Thanks
Victoria
Hi! I am wondering if since there is water added to this recipe do you also need a preservant?
Thank you,
Brandy
A preservative is not needed because the water evaporates out during the saponification process.
Have you ever used liquid coconut oil? There was a natural botanic store in my area that sells coconut oil in large quantities for soap, however it is pure liquid. Thoughts?
Lye? Seriously? Sooo harsh and a serious caustic chemical capable of harm. I would NEVER use such an ingredient in my hair!
Once the lye reacts with the fat it all becomes saponified – aka turned into soap. There is no lye in the finished product.
..if there’s no lye, there’s no “soap”. You’ve never used a cleaning product on your body that doesn’t contain that ingredient, by any other name! It comes from potash…very interesting when googled….it “saponifies” the oils/fats so that you aren’t just washing with oil/fat to get clean, and is no longer caustic…a good chemistry lesson when making body-bar soaps for the first time..I have for close to 10 years and would never turn back!
Having said that, straight oil to wash my face is a favorite (jojoba, argon, rosehip) and olive oil alone has been used to wash hair. Whatever works for you.
Hi! This soap receipe is wonderful! I am definitely gonna give it a try! However as I am a student, unfortunately I don’t have a crockpot. Is there any substitute for that like pressure cooker or stainless steel pot or something? I would really love to try this shampoo bar as I am hugely concerned about my scalp getting very oil in every 2 days. I would really appreciate the solution for this. Thank u:)
You can make it using the cold process method in a pot.
Is it necessary – or even a really good idea – to have a different crockpot for soap or shampoo making than the one used for actual food? Because I don’t really have a lot of storage in my small apartment, or, to be blunt, the money to buy a bigger one than my dinner-for-one (with leftovers) slow-cooker!
I think it is a good idea because over time soapmaking may wear down the enamel.
I am so excited to try this recipe. I have been wanting to try a shampoo bar recently, even better now I know how to make them! Couple questions…
1- what do I need the thermometer for?
2- I plan on using the crockpot method. In your tutorial you cleaned the materials you used with vinegar and water. If the spoons, crockpot, hand mixer and bowel I use are cleaned by this method, can they be used for other things, or should I designate these things for soap making only. I’m kind of nervous to use them for other things other than soap making but then again it would be nice to use it for other things.
Oops, the thermometer shouldn’t be mentioned. I used to say to melt it to a certain temperature, but I’ve found that melting it in the slow cooker without worrying about the exact temp works just as well. Removing the mention now.
Heather, I love your site and really appreciate your video as I’ve only made cold process soap (for almost 10 yrs) and love it…we would never use anything else.
Because I’m still soo unsatisfied with the “healthy/natural, chemical free-as-possible” shampoo choices out there, I’ve been wanting to make a shampoo bar, not knowing I could hot-process it! And I don’t like “conditioners” that ‘don’t’ either! One question: are there other ‘butters/oils” to combine with the coconut (which is the cleaner & sudzer) to add further moisture? Cacao or shea? Castor for shine? Curious as I find coconut oil alone to be drying on my skin so never use more than about 1/4 in my body butters/face cremes and in my barsoap …thanks!
Just realizing that may be another experiment for you as you’ve already found a recipe that works!
Hi Judy, I prefer to use argan oil (applied with the oil mister shown in this post) after washing so that I can adjust the amount of moisture applied as needed.
Hello! I made these shampoo bars, and tried one today for the first time. My hair, will not comb out. it’s like, ratty! I went back into the shower and put a conditioner on, and rinsed that out, It was a bit easier brushing, but still knotty. I started to dry my hair, and it feels, weird, i want to use the word gummy like you said. What can I do? Does this vinegar rinse help that? Thanks! Ellie
Hi Ellie, yes the vinegar rinse is what smoothes the cuticle so it’s essential to the process for most people. Also, another consideration when transitioning to natural shampoo is the use of silicone in many commercial brands. Silicone coats the hair much like plastic to give it slip and shine. Unfortunately this can make the transition from commercial to homemade formulas can be a bit difficult. Here’s a post on making the transition that you may find helpful:
Hi there,
I would love to make this but need a crock pot. Would a 6.5 litre be big enough for this recipe?
Thank you
A 6.5 liter would be too small and most likely the soap would overflow while it’s saponifying. I recommend using a 7.5 liter. 🙂
Thank you. I have just ordered an 8 litre. I’m looking forward to trying this soon. X
I don’t have a crock pot. Is it really necessary? Can I use a 7.5 liter stainless steel pot on low heat using a heat diffuser?
I’ve never tried that method so I’m not sure. If you don’t have access to a slow cooker it might be easier to use a cold process method like this one: https://wellnessmama.com/77388/cold-process-soap/
Hello Heather,
Thanks for the turorial, it is very practical. I am doinf it right now but at the moment of adding the lye and water to the coconut oil it turns dark purple. Do you know why? Or this has happened to you?
Thank you!
I make goat milk products and just made my first goat milk shampoo bar a couple days ago. I haven’t gotten to try it yet. Still in the waiting phase. I have two questions:
1) Your recipe with water is quite a bit simpler. I was wondering if I could substitute the milk for the water.
2) What can you tell me about using your recipe with color-treated hair? My hair is not color-treated, but I don’t want to ruin anyone else’s color job! Thank you!
Hi Heather
I’ hoping to give this recipe a go, t have very little experience making soap so far. Am I able to switch out maybe half of the coconut oil for olive or avocado oil, or will this throw the ratios?
Thanks!!
I was really excited about making my own shampoo bars and tried this recipe, but I was really disappointed with the results. When I used it, the shampoo lathers nicely, but when I wash it out with water, it feels like it just sticks to my hair and feel like it washes out. My hair then doesn’t dry out properly. Wonder where I went wrong? Would really appreciate any tips. Thanks.
Hi Nina, you may find the article section “New To Shampoo Bars? Here’s What You Need To Know” helpful. Another factor is the pH of your water. This bar works beautifully in many areas, but not all of them unfortunately.
I made a batch of this, but doing some research on e.o.’s and a few botanicals that I added, it has become a favorite among friends and family. I had lost Most of my hair on top due to what I thought was nature. Slowly but surely my hair is starting to come back. I can see a difference in the texture of my hair and don’t see the fine shower of dry skin falling from my scalp. I have made 3 loafs so far. Being a hard bar, it last forever. Thanks for sharing the recipe. Being a man with short hair, on occasion I use the Apple cider rinse. My sister never uses it. Her hair is very healthy looking. Thanks again.
This is really interesting! I saw someone selling shampoo bars at a craft show and decided to look into what they are. I had no idea that you could do this!
How often do you have to wash your hair when using the shampoo bar? Does it still require washing everyday?
I wash mine every 2-3 days usually.
Hi, I am trying to make a Henna Shampoo Bar, because i love the conditioning effects of Henna. I was hoping to add 1 oz of henna to this coconut shampoo bar, and also replace 4-5oz of coconut oil with castor oil. do you have any suggestions? you think it would suit a normal hair? thanks for checking.
Thank you for the recipe. Is there any concern with the coconut oil hardening in the drain and clogging up our pipes?
Most of the coconut oil is saponified (converted to soap) so it’s not an issue 🙂
Do I have to use an immersion blender, or can I stir with a metal or plastic spoon or a whisk?
Hi Heather
I tried this recipe, but need some help please as my mixture turned hard and crusty within 5-10 mins of adding the lye. I managed to save mixture by breaking it up and adding more water and then cooked in for 1 hour and then it when through the process pictured of folding over on its self. What did I do wrong? Was there too much lye in the mixture (or not pure enough lye)or wrong type of coconut oil used. Temperature to low or too high?? Thank you
Hi Lorna, it’s difficult to say without being there, but it sounds like either there was too much lye in the mixture or the soap seized. Did you add any kind of fragrance?
Hi Heather
I used lavender essential oil, which I added after the liquid stage. Thank you
Technically you can use a whisk but it will take a really, really long time to reach trace.
If lye is something we have to be so careful about, why is it used in products we put all over our bodies?!
Great question, Jeannine. I answer it in detail in this post on soapmaking myths. The bottom line is that all soap is made with lye – it’s what converts fat into soap via a process called saponification. When our great-grandmothers made soap, they got their lye by burning hardwood ashes. Lye is a naturally occurring substance that can irritate or damage skin if not handled properly, but when the final product (soap) is properly made there is no lye remaining. The ratios in the recipe above are designed to ensure that all the lye is used up during saponification so that there is no lye at all when the process is complete. Hope that helps.
hi there mommypotamus, im lil bit confused w the water measurements. the water used w the lye and during the boiling of coconut oil. thank youuu
Hi Naz, do you have a specific question I can help you with?
Hi Heather! May I know how long it takes to blend it until you reach the desired consistency? Most likely how many minutes
It can vary based on the temperature of the mixture and the speed of the immersion blender, but about 5ish minutes.
I made this recipe for the second time today, with only one change…I added some tussah silk fibers to the lye mixture. It is taking longer to cook this time around and it never really reached “trace” after blending for at least 10-15 minutes. I have the ph strips to test if it’s done, but just wondering what might have happened to cause the longer saponification time. Any ideas?
It’s hard to say. The silk fibers may have affected the pH of the mixture.
I am currently making this soap and chose to do the zap test. I feel like it tasted soapy but also left my tongue tingly. How intense is the zap? I chose to keep it in for an extra 10 min and try again.
Just saying, is there a recipe for oily or combination hair? Thanks.
Hello I’m super new to soap making and i tried this recipe with virgin coconut oil that I made from coconuts but the batch burnt. Can you give me some pointers?
When you say your batch burnt do you mean that it had a scorched fragrance or appearance? I’ve never experienced that issue so I can only guess, but my thought would be to use a lower heat setting or shorter cook time.
Heather,
I want to thank you so much, for your coconut oil soap recipe. I have watched the shampoo video like, a 100 times, and I have been making soap based on your bathing bar recipe for the last two years now. My siblings and nieces, my son and I only use this soap now. I have over the various trials added more ingredients, like a dried orange peel powder for a scrub, coconut milk to make it even more moisturising… and recently, a pure form of turmeric to give the skin a further boost. But the base recipe is always yours. I also find that it has completely disappeared the skin tags I used to get on my neck. I have never made the shampoo bar because we use the body bar for the hair as well. My son actually washes his hair with it every morning. Neither of us have used a shop-bought soap since May 2017! I even use this on my dogs and find they have no fleas/ ticks at all!
I have been meaning to write and thank you for so long. Thank you very very much! Keep doing the great work you do!
Best wishes and regards,
Malati from the hills of South India:-)
Oh, this makes me so happy. Thank you Malati. You made my night!
If we need a separate wooden spoon for soaking, are the other tool still food safe, like the stick blender and crockpot? Or, do metals, glass, ceramics wash completely? One concern is the gasket at the bottom of my stick blender is soft plastic/rubber? Will the lye affect that?
Is there a colored hair safe shampoo bar?
Thanks
Wood can absorb lye but ceramic and metal materials don’t and can be washed off. There is a gasket in my immersion blender as well and I haven’t experienced any issues. With regard to a color-safe recipe, some people say that this bar works well for their colored hair and others say it doesn’t. It may depend on hair type. As far as I know there isn’t a bar that is specifically guaranteed to be color safe.
What if he emmersion blender is all plastic? Am I still able to use it for other cooking needs? I had no idea there was going to be a problem or I wouldn’t have used it ?lol!
I know some people make hot process soap on the stove top using a normal pot. The method would be slightly different and I don’t have any experience with it personally.
Question–would you change the percentage of superfat for someone with oily hair? Thanks!
Quick question: Do you need to worry about the coconut oil clogging your drains the way you would if using it for toothpaste or oil pulling? Thank you!
Hi. can I use your coconut oil recipes for cold process?
Yes.
Hi Heather and thank you for your recipes and tips. Can I use an instant pot? It has a stainless steel insert. Is that ok?
I made my first batch a couple of days ago. I added lavender oil to the mixture. It smells great 🙂 It lathers up really well. The soap is rock hard. I reckon it’ll last for ages. Thanks. I don’t have a crock pot, so I used a glass bowl on top of a pan of simmering water. I made sure there were spaces for the steam to escape so it wouldn’t be too hot. It worked really well.
Hi heather
Thank you so much for your generosity in sharing these great recipes and all the work you put into working them out. I am on my 4th batch of soap and it is fantastic and so easy.
Can I ask two questions? My soap takes 2-3 hours rather than 45 min. I’m guessing I need to have it hotter but I take it to the 50 degrees you mention at the start and leave it on that setting. Any tips?
A silly question I made a double batch of shampoo soap, at least I doubled the oil and forgot to double everything else. Hence it’s for oily hair – as in you end up with oily hair! I hate to waste it is it possible to melt it down and add more lye and water?
Thanks again. I have subscribed. You are much appreciated.
Regards Elaine
Hi Elaine, it’s been awhile since I watched the video (and lunch needs to happen so can’t rewatch right now), but I think the 50 degrees is mentioned at the beginning when mixing all the ingredients. After that you can turn up the heat a bit in your slow cooker if it is taking a really long time.
And yes, although I have not done it personally I think you can save that soap. Google “rebatching soap” and I think you’ll find the instructions you need.
Hi, is it necessary to use a crock pot, or can I also use a stainless steel pan?
I have made the conversion to milligrams and millilitres, this is what I found:
For normal hair
940 gr coconut oil
370 ml water
155 gr lye
1-2 spoons of essential oil
For dry hair
940 gr coconut oil
370 ml water
150 gr lye
1-2 spoons of essential oil
Do you think it’s ok? Did anyone try with these measurements?
Thank you!!
I did this recipe with your second measurements, just cut it in half. I’m not familiar with ounces, so converted all to grams. Turned out beautifully! We use this shampoo all the time and will make another batch this weekend. I’ll just use some Monoi de thaiti coconut for luxury, about 1/3th of all the coconut oil.
can I do this as a cold process instead of hot process??
Thanks…
Yes
Hi Heather,
You’ve already had so many people say how wonderful your shampoo bar formulations are, particularly giving different recipes for normal and dry hair, but I have to add: thanks for showing how simple it can be to make products for home use that aren’t full of unnecessary chemicals, artificial colours, fillers and unnatural fragrances, and which aren’t exorbitantly expensive to make, for those of us on a budget. Kudos.
Hi there,
I buy coconut oil in 700ml jars, which is just over 26 ounces. Do you know the amounts of water and lye I need to use to make coconut soap? Is there an easy way to work this out?
Many thanks
Hi,
just wondering if you can use the crockpot for cooking after you’ve used it for the soapmaking?
thank you so much<3
I have to say a big THANK YOU! for this recipe and all the efforts to show the process clearly. Your recipe was the first I wanted to try for DIY soap/shampoo. And it worked beautifully!! My husband was a bit scared to trust such crumbly and homemade thing at first, so he waited for me to test it first. 2 weeks later he finally tested it himself and – guess what! – now is a devoted user 🙂 I have to say his hair is very long, and mine is short:) The shampoo is so beautifully simple yet luxurious! It made me start making soap. And I learned so much since then! Made some nice CP soap recipes and more to come. But I’ll always remember it everything started with THIS shampoo, your recipe. At first I made it in a simple casserole on low heat, using your measuring. I checked it recently in Soapcalc, and it was just perfect! ( because I use grams and wanted to be sure on volumes.) Kudos!!!
I would like to know how do I make the shampoo bar into a liquid I can put into a squeeze bottle. Anyone have an answer?
Hi
I have made these bars, I think successfully! I have checked the pH it is about 8.
My two daughters and I are have used the bar twice now, with a vinegar rinse afterwards, but our hair is AWFUL! It’s all matted and feels so waxy! This can’t all be the shedding of old products surely?!
Thanks
Victoria
How much soap does this yield, in ounces?
Thanks!
By soap I meant shampoo.
Oops 😏
Could you mix the oils used? i.e. instead of all coconut oil also using olive, castor, jojoba, cocoa butter, & shea butter?
Can I replace some coconut oil with argan oil in the shampoo bar recipe?as the rinse wasnt enough for my coloured hair.I loved the shampoo bar and am about to try some soap and my second batch of shampoo bars, but just checking about the argan oil first.
Hi Margaret, you can definitely replace the type of oil used, but you’ll need to run the formula through a lye calculator before you make up a batch.
Hi there,
I was wondering if you sell the bars of soap? I’m interested in making this potentially, but I’d like to try the product beforehand (I have VERY fussy hair!!!)
I look forward to hearing back from you
Hi Eve, I considered opening a shop awhile back but decided to focus on other projects. 🙂
Hello Heather,
Thanks for the turorial, it is very practical. I am doinf it right now but at the moment of adding the lye and water to the coconut oil it turns dark purple. Do you know why? Or this has happened to you?
Thank you!
Hi Heather,
I belong to a soap making forum and when the topic of soap “shampoos” come up there is a big noise about how bad soap is for washing hair and all the damage it does (alkaline, opening the hair cuticles and causing breakage). It seems the vocal ones are more interested in pretty soap than health.
I know so many people, including myself who use handmade soap for shampoo successfully (and better than commercial shampoos – no more dandruff, no more itching head or back, no more having to wash my hair every day) that I know it works well. I am wondering if they have used other products that damage their hair (perming and chemical dyes etc) or not having a strong enough acid rinse (leaving their hair tangly when they brush it).
One of my daughters has dyed her hair for some years and is growing it out. Recently she started using soap and thought her hair felt so soft, but comparatively the ends were dry compared those with undyed hair.
I have read that stress can cause hair to be course or not so nice.
If people don’t want to use soap for shampoo that’s their choice but some of them are so panicky
about being hairless that they push no “soap shampoo” really hard even though I and a few others have tried to say how many people (with long hair) successfully use it and it has a long history of use (and those old photos show women with a lot of long hair).
Have you any information on this as I would like to be able to answer those who say their hair was damaged and broke off and give a solution?
Thanks.
I have yet to venture into the world of soapmaking, but very much would like to. I use shampoo bars and love them. A question about the two recipes, 10% and 12%: the only difference seems to be the amount of lye, and only a tiny difference at that. How does that equate to more fat? Just wondering.
When you use more lye it converts more of the oil to soap. When you use less lye, some of the oil remains and makes the bar more moisturizing. 🙂
Thank you for this recipe. I have been using it to make soaps for years and it’s my favorite technique. I just wanted to give a shoutout because I really appreciate it!
Hi there! This is my first time making soap so I followed your recipe for the coconut oil shampoo bar. I still had a pretty big puddle of oil after cooking on low for 45 minutes. I looked online and it said that it can take between 30 minutes to 4 hours to make in a crockpot. How long should I cook it? Can I over cook it?
Hi Autymn. Coconut oil soap come to trace quite quickly as you blend it, hardening up till it gets hot enough from cooking to become thick and gloopy with a certain transparency. 45 minutes should have been plenty. Overcooking will just dry it out till you can’t mould it properly.
Did you blend it? It needs to be blended or the lye water will sit on the bottom and the oil will float.
Otherwise my guess is that you made a mistake with your lye weight and didn’t use enough or measured out too much oil.
If this is so and you wanted to rescue your ingredients you can. If you have written out the recipe and everything was accurate it will be a weighing mistake. I would make up more lye solution – 5% of the original weight and stir it in to the soap batter, blend it and see if it comes to trace. The pH should change quite quickly so you can check that with pH strips to make sure its not too high. It should end up about 8-9. If it still doesn’t cook up nicely but is a puddle, make another 5% lye solution and repeat. By doing it slowly, blending to trace, cooking and checking pH you wont overdo it.
Coconut oil soap will come to trace way before it is too caustic.
Always check your soap is not caustic by pH strips. Zap test works if you are careful.
Hope this helps
Hi, I made this at the weekend and used on my hair for the first time today. When I rinsed it out my hair felt really spongy and waxy and still did after my vinegar rinse. It is now a really weird texture and is difficult to get my brush through easily, just wondering if anyone has had the same experience or knows why this might be happening? I have not used commercial shampoo and conditioner on my hair for over a year and have not had this experience before with any of the products I have used.
Hi Janie. I have had that before. It could be the vinegar rinse. Talking to others it seems that this is individual. I have to have mine full strength and then rinse it mostly off with water. Others find this makes their hair difficult to deal with and need to water down their vinegar.
Another thing is that using soap with high superfat as shampoo is a problem for me. This may be fine for those with dry hair.
I have forgotten to rinse with vinegar and it was like straw so just sprayed it lightly with vinegar and it was fine.
Can this be made in an instant pot with the stainless steel pot?
Thanks!
Hello 🙂 Thanks for the recipe!
I divided it into a 3rd because my crock pot is a lot smaller and maybe 15-20 mins after combining everything in the pot the mixture seized. I’m going to try rebatching it now to save it. I had added not added any essential oils and followed the steps very precisely, so I’m not sure what went wrong. I’d love to try it again but I’m not feeling super confident…
I had the crock pot on its high setting, perhaps the temperature was too hot and saponification happened too quickly?
Any idea what could have happened?
Hi Heather, I absolutely love the shampoo bars. As someone with grey and red hair it has been a challenge to find good shampoo, I am so happy I found you! Have you tried making this recipe with goat milk, or any soap recipe with goat milk? I would love to try but not sure if I can just replace the water with goat milk.
Do you need to use a crockpot and blender separate from one you use for food? How do you properly wash after to make them safe again?
I love the recipe and it lathers well! When I use it though, and I’m rinsing it out, my hair feels sticky and not very smooth. Is that normal? Do I need to use the Shine Boosting Rinse Recipe? (I did the dry hair recipe because my hair is really dry) Thank you!!!
I made the recipe and it lathers well!! But, when I’m in the shower and the next day, my hair feels sticky and not smooth. Is this normal because of the switch? Should I make the Shine Boosting Rinse Recipe?
Thanks, Dustin
Thanks for sharing the tips. I am using this to make others understand
Hi Heather,
Oh my! This coconut oil shampoo bar recipe is soooo fun and easy to make!!! I am going to try making it next weekend. I am very excited 🙂 Thank you so much for sharing this recipe! Quick question: May I know besides using coconut oil, would you recommend using any other oils if someone has oily hair like me? I recently read that Marula or Rosehip Oil seem to be quite good for hair growth but not sure..
Would you have any recommendation for someone with oily hair like me? I really appreciate your help in advance.
Rosie
Can I use this shampoo bar as a body soap? I made your recipe and it didn’t agree with my natural gray hair and don’t want to wast all the bars I made.
I do!
Oh, I love this, and need to read it again! you have the basics laid out so clearly! Great job,
I just started using the Coconut Oil Shampoo Bar and I love it! The amount of hair it used to fall before every time was exaggerated, It’s been a week and I haven’t lost even half of the hair that used to fall before!! Love it!
I can not find a way to email you or your buisness. I am desperately trying to make these shampoo bars. Ive tried about 10 times and they never harden. I would live some helpful suggestions from mommylotamus. Via email if possible.
Hi Jessie, are you using the exact ingredients listed in the recipe? If so, the only thing I can think of is that the proportions are off. Too little lye or too much water will yield soft soap. Are you weighing your ingredients as described?
I am weighing. I was using a different lye. I will order the exact lye you listed and see if that improves it. Thabkyou!
Hi,
first of all: thanks for this recipe!.. I just tried it (for the first time) and had to tweak some things..
I converted the ounces to grams, and scaled everything down because my crockpot is for 3,5 liter (3,7 quart, more or less)…. But.. it didn’t work out like I hoped… I think I didn’t let the lye convert long enough because my skin gets very dry when using the bar… I also added the essential oil too soon (i think) because it doesn’t smell like happy peppermint 😛
My question now is: can a finished batch be melted again so that the lye conversion can “continue” – or do I have to throw away everything?…. The lather is magnificent, like you said: lather for days! 😀
thanks again!!
If you let the bars cure for a few weeks it should convert any remaining lye. It’s hard to say exactly how many weeks since we don’t know how much of the lye is already converted. The cold process method – which converts the lye without the help of heat – takes six weeks in total, so the time you’d need should be less than that.
Hi Heather,
thanks for the feedback! Will do as you say & let you know in 5 or 6 weeks 😉
thanks again!
Hi Heather,
I just made a batch of shampoo bars with 10% superfat. After 45 min. In the slow cooker it seemed to taste soapy but it’s got crunchy bits throughout, like it’s dry. Did I cook too much? The temperature was over 200 when I stopped cooking it. I’m waiting for it to cool before I add essential oils.
Any thoughts? Thank you.
Molly
It’s pretty normal for some of the soap that’s at the top of the mixture to harden into little pieces during the cooking process. It won’t affect the quality or performance of the soap, but if you’re adding essential oils it does mean that the oils will not be as evenly distributed throughout the soap as is possible. Stirring more often can help keep the whole mixture more fluid.
Hey Heather,
I have never heard about this kind of shampoo bar and I am very much impressed with the recipe shared by you. I am definitely going to give it a try. Cold Pressed Coconut Oil is considered very good for consumption as well as for hair care.
Thanks for sharing the information.
Hello! I made this but ran out of coconut oil in the process and finished it up with about 8oz of avocado oil- could that be what is making my hair so oily after going through detox? Or is it still detoxing?
Has anyone doubled the recipe and been able to do it all in one Crock-Pot without spillage?
Can you use the same crock pot for cooking afterward? Or do you have a separate crock pot just for soap making?
Hello,
can you tell us the results of shampoo after several years? Does the shampoo-soap still work? Is it effective? do you have any additional advice?
Should so-called “oily” hair use 10% superfat coconut oil shampoo like normal hair?
thank you, I am French 🙂
Wow! Thank you for a great video! My daughter and I made body bar soaps and we had so much fun making them this year as Christmas gifts! I am SO excited to try this Coconut Bar Shampoo! By the way, your hair is gorgeous! I enjoyed reading how store-bought shampoos can coat your hair with silicone!!! That is crazy! My youngest daughter made a coconut oil hair conditioner that she found online. I must say, her hair was so silky and pretty looking so I think it is high time this family switched from chemical-laden store-bought shampoos to healthy, pure Coconut Bar Shampoo!
Thank you for the video! It really does help to watch someone do something to give a sense of confidence!
Thank you again and keep up the awesome articles!
Hello Heather. Do you sell your Coconut oil shampoo? I don’t want to take the time to make it and I’m not as skilled as you are. Or is there a similar shampoo I can purchase online? Thanks.
I don’t have a product shop, sorry!
Flawless Recipe! Thank you for sharing!
Once I add water to the vinegar, will it have a short shelf life?
I have been looking for something like this. Can’t wait to try.
Thank you so much!
Gail
I love using the shampoo bar, it was very easy to make. I have been noticing some build up on my hair brush, could I be using too much to wash my hair with? I am using the acv rinse and typically wash my hair every other day. Any help would be greatly appreciated.
Very informative, have to try it somehow, thank you for sharing, God Bless!
I made your coconut soap in the crock pot yesterday, and measured everything. I am still waiting for my soap to harden. I don’t know what I did wrong.
Hello I’m wondering if there is a substitute for the coconut oil. Since it can be ultimately drying for some constitutions, such as mine, I have not had good experiences with it for that very reason. Thank you
Other oils can be used to make shampoo bars, but you’ll need to select ones that don’t leave hair greasy and then run your new formula through a lye calculator to determine how much lye and water to use. This recipe is specifically calculated to work exclusively with coconut oil.
Hope I can learn to do this,,where to get lye I will need to know and I will watch again when I get ready to make some,,,I want to k ow what I am using is not harmful for me and my family,, thank you for sharing your knowledge
Great tutorial video! Two questions: does it make any difference whether I use refined or unrefined coconut oil? Second, I don’t have a slow cooker. Would this work just as well made on the stove over low heat?
I use unrefined. As for the stovetop, I know some people do use it to make hot process soap but I don’t have any personal experience or advice I can share.
Hi, do you sell the soap?
HI, Have my first batch of shampoo cooking. Just wanted to know if my bowls, dishes used, immersion blender, and crockpot will be okay to use with food once I clean everything with vinegar/water and soap or are these to only be used for soapmaking now?
I would love to know if you sell your coconut oil soap and if yes how do I get it and the cost???? Thank you so much!!!!!
I don’t sell it right now but I’m considering opening a shop 🙂
Been using this shampoo for a few years now. It’s the absolute best for my hair (very fine and leans oily). Gives me more body and I can go a day between shampoos which I never used to be able to do. And the best part is not buying all those plastic bottles!!!
Hi, do you know if it is safe to cook the soap in a crock pot? I’m worried that the lye will react with and leach the coating on the crock pot.
I use a slow cooker that is dedicated solely to soapmaking just in case 🙂
Thank you for this! I was buying shampoo bars from a woman at our local farmer’s market and she moved! All the other recipes have too many ingredients for me since I have never made soap! This is exciting, I can’t wait to try making it. One question – could you make a soap recipe that includes some castor oil which is good for hair? Her ingredients include both coconut oil and castor oil. If so, please post it – I will try your original recipe though! Thank you again!
Hi,
I love your recipes. Thank you very much.
Do you have a recipe for oily hair? I have super oily hair and would love it if you have any tips. Thank you.
Can the same recipe be used to make by cold processed method ?
Yes, it can.
FANTASTIC RECIPE & INSTRUCTIONS! I was getting shampoo bars from a local seller at the farmer’s market. Unfortunately she moved away and I was left with dirty hair! You motivated me to try my first ever soapmaking experience! Wow! The shampoo turned out amazing! So easy! Thank you for making this recipe available! I love the shampoo bar and everyone I shared it with has also loved it! It lathers up beautifully and rinses cleanly. Even if we don’t rinse with vinegar, our hair is great! Thank you!
Hi Heather – I’ve been sharing your recipe on X (Twitter) – it’s fantastic. People are trying to avoid commercial shampoos, etc. I think your recipe is the easiest & is fantastic on my hair! Dr. Naomi Wolf just reposted your site 🙂 She has a lot more followers than I do.
Thanks again for great work!
Liz
Are you aware this site is using your photos? If so, no problem. I immediately recognized your style when I saw the pics. Thanks again for a great recipe – my hair is LOVING IT!
– ok, well your comments won’t let me put a link in. I’ll put it in the website link next to my name.
Hi Liz, thanks for looking out for me! Technically they should have asked before using my photo since it’s copyrighted, but since they are linking back to my site for the full article + recipe I’m okay with them leaving it up. It is a problem when sites republish entire articles, though. 🙁
Hi,I got a problem with this recepy.When the mixture reached 60C it became very grainy.I pressed them into small molds,maybe they will cure after some time?Is there any possibility to melt it again and pour it into molds?Because I dont think these shampo granulae can be used.😂I really hope that you can help me.Katarina
It sounds like your soap may have seized. This article may help: https://lovinsoap.com/2015/08/my-soap-seized-what-can-i-do-hot-process-it-rebatch-it-or-chunk-it/
I made the shampoo bars and used twice. So far so good!! I did have a slightly sun burnt scalp prior to use but wanted to ask if the lye was not cooked all of the way if it would be obvious when it burns the skin or not? I’m thinking it worked out fine.
Thanks!
Yes, if the lye is not fully converted most people notice a burning sensation or irritation of some kind.
Are any of your ebooks still available? Thanks!
They’re not right now, but I may update and re-publish them in the future. 🙂
Hello! Pretty new to soap making, but I see several places you say this can also be made as cold process – so instead of putting it in the crock pot, one would add the lye water to the oil, mix to trace, and then put into a mold, correct? With no use of the crock pot? And then leave them to cure as usual?
Correct, but the curing time is significantly longer. You can search my site for cold process recipes to get a clearer idea of the step-by-step process.
Wow, this coconut oil shampoo bar recipe looks amazing! I can’t wait to try making it myself. The photo and video tutorial make it so easy to follow. Thanks for sharing such a fantastic and natural alternative to liquid shampoo!
Made these bars last night. (April 2025). They were incredibly easy for a novice soaper and after 2.5 hours I cut them as they were already hardening so much. I used a ‘soap butt’ in the shower. This thing lathered like crazy! After the vinegar rinse, my hair is so soft and manageable. I would like to experiment with additives in the future but overall, a great basic bar. Thank you!
I’m so glad it worked well for you!
This coconut oil shampoo bar recipe is amazing! I love how easy the video tutorial makes it to follow along. I can’t wait to try it out and see the benefits for my hair. Thanks for sharing!
I can’t wait to try this coconut oil shampoo bar recipe! The photo and video tutorial make it so easy to follow. Do you have any tips for packaging them as gifts?
Hi Heather,
How can I make this recipe as I do not posess a slow cooker/crock pot? Is it essential for making soap?
Please let me know as I would love to start making your soap recipe.
Thanks, Ingrid
The same ingredient ratios can be used to make soap using the cold process method of soapmaking. A good starting point would be to google “cold process soap method” and find a step-by-step tutorial. 🙂