

I adore a good slow-roasted chicken, but sometimes a mama just needs to get dinner on the table quickly. Unfortunately, I’ve found that rushing the oven-roasting process with higher temperatures usually means drying out the chicken breast in order to get the dark meat fully cooked on time.
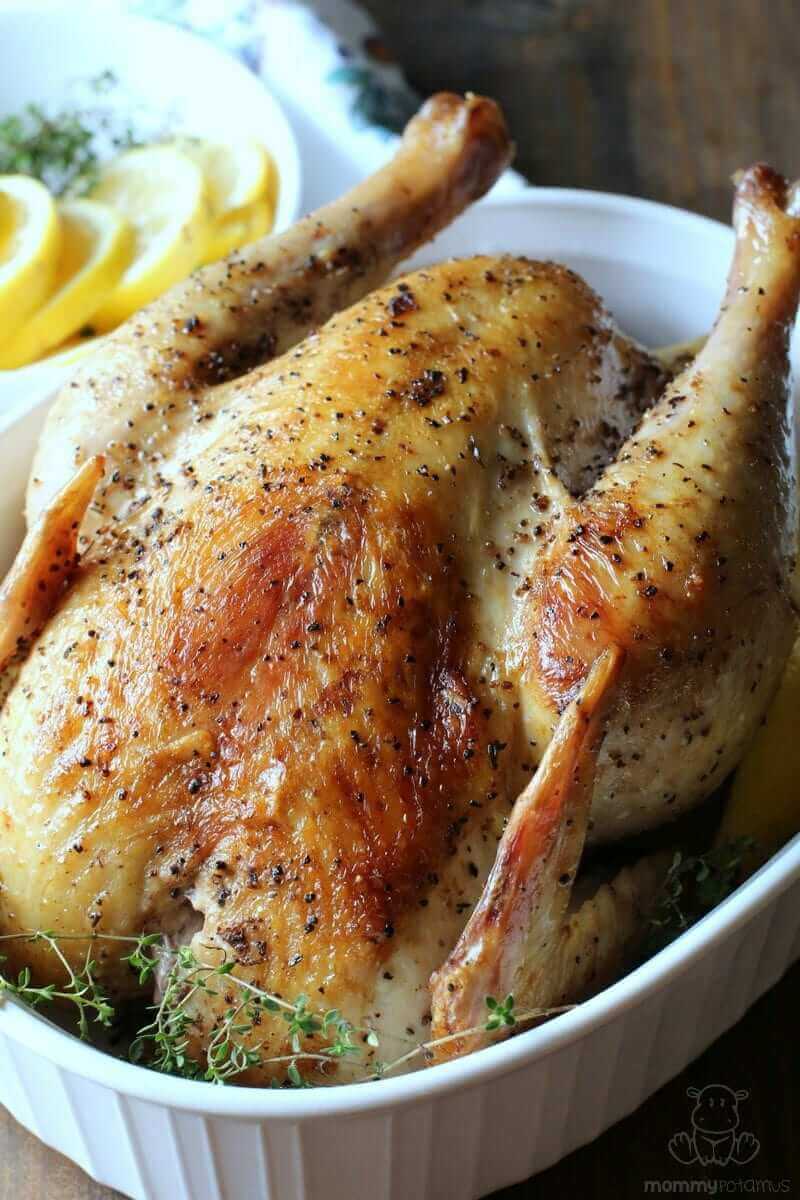
That’s why I love this easy pressure cooker whole chicken recipe. It yields juicy, flavorful white meat, fully-cooked dark meat, and with just five minutes under the broiler you can still get the crispy, golden brown outside, too.
Plus, it takes less time than actually roasting a chicken, and after your fall-off-the-bone tender meal is over, you can just toss the frame back in the pot to make Instant Pot chicken broth. That’s two tasty dishes with less cleanup. (The BEST, right?)
Ways To Use Pressure Cooker Whole Chicken
I usually rub this “roast” chicken with rotisserie spices (recipe below) or lemon pepper seasoning for a burst of flavor. However, sometimes I season it more simply – with just salt and pepper – so that it has a more neutral flavor that can be used in:
- Chicken Salad With Apples
- Buffalo Chicken Stuffed Sweet Potatoes
- Chicken Tortilla Soup
- Coconut Lime Chicken Curry Soup
- BBQ Chicken Stuffed Sweet Potatoes
- Easy Apple Sandwiches With Bacon (And chicken!)
- Tacos or burritos
Also, if you have leftovers, you can shred and freeze them for easy weeknight meals later on.
My Favorite Easy Rotisserie Chicken Seasoning
When my plan is simply to slice and serve, I love to make this chicken with rotisserie-style seasoning. In addition to salt and pepper, just add the following. (This blend is listed in the recipe as an optional addition so that everything is in one place..)
- 1 tsp garlic powder
- 1/2 tsp sweet paprika
- 1/2 tsp smoked paprika
- 1/2 tsp thyme
- 1/8 tsp cayenne
Cooking Times
The standard size in my recipe is a 4 pound chicken because I’ve found that it holds together the best. With larger chickens it can sometimes be challenging to get them out of the Instant Pot the drumsticks separating a little.
Even with smaller chickens, the “wing” area sometimes separates, but I just tuck into the serving dish and don’t worry about it.
The flavor will be just as delicious either way, so if needed you can adjust your cooking time based on the size of your chicken by multiplying the number of pounds by 6 minutes. That means:
- 3 pound chicken = High pressure for 18 minutes with a 15 minute natural pressure release
- 3.5 pound chicken = High pressure for 21 minutes with a 15 minute natural pressure release
- A 4 pound chicken = High pressure for 24 minutes with a 15 minute natural pressure release
- 4.5 pound chicken = High pressure for 27 minutes with a 15 minute natural pressure release
- 5 pound chicken = High pressure for 30 minute with a 15 minute natural pressure release
- 5.5 pound chicken = High pressure for 33 minute with a 15 minute natural pressure release
Quick Tips
- In case you skipped the section above, smaller chickens tend to hold together better and look “prettier.”
- If you want to use the drippings to make gravy or include them in your next batch of bone broth, I recommend refined coconut oil instead of virgin coconut oil because it has a more neutral flavor.
Instant Pot Pressure Cooker Whole Roast Chicken
Equipment
- Trivet with handles
Ingredients
- 1 four pound whole chicken (giblets removed)
- 2 tbsp room temperature refined coconut oil or ghee
- 1 tsp sea salt
- ¾ tsp black pepper
- 1-2 cups chicken bone broth (Use 1 cup for a 6 quart pressure cooker and 2 cups for an 8 quart pressure cooker)
- 1 lemon (cut in half)
- rotisserie seasoning or other additional seasoning if desired (Rotisserie seasoning is 1 tsp garlic powder, 1/2 tsp sweet paprika, 1/2 tsp smoked paprika, 1/2 tsp thyme, 1/8 tsp cayenne)
- Fresh herbs for garnish (optional)
Instructions
- Pat dry the chicken with a paper towel.
- Mix together your salt, pepper, and any additional spices you're using. (See the rotisserie blend above for suggestions.)
- Turn on the sauté setting and add 1 tablespoon coconut oil or ghee so that the Instant Pot can start to warm up.
- Rub one tablespoon of coconut oil or ghee ove the chicken breast and thighs – then sprinkle seasoning over the entire top of the chicken.
- Stuff the cavity of the chicken with two lemon halves.
- When the Instant Pot says "HOT," gently tilt it (just a tiny bit) until the oil/ghee covers the bottom of the stainless steel pot.
- Place the chicken inside with the breast side down, then move it around immediately (rolling side to side) to keep it from sticking. Brown the chicken for 3 minutes, rolling it occasionally from side-to-side for more even browning.
- When the chicken is nice and brown, remove it from the pressure cooker and place it on a plate.
- Add the bone broth to the pressure cooker and use a silicone spatula to scrape up any caramelized brown bits from the bottom of the pan.
- Set your trivet inside the pot with the handles lifted on each side. Place the chicken inside breast-side-up.
- Lock the lid into place and set the valve to “sealing.”
- Using the Manual setting, select high pressure and adjust the cooking time to the number of minutes needed. For a 4 pound chicken, which is what I usually use, the time is 24 minutes. See the "Cooking TImes" section above for additional times based on weight.
- When the time is up, allow the Instant Pot to depressurize naturally for 15 minutes. If you allow it to fully depressurize naturally the meat will be fall-off-the bone tender, but it will probably fall apart as you lift it out of the pressure cooker. Toward the end of the depressurizing period, set your oven to broil.
- When the 15 minute natural release period is up, turn the valve to quick release and allow any remaining pressure to escape fully.
- One the pressure is released, remove the lid and use the handles on the trivet to lift the chicken out of the pressure cooker. Transfer it to an oven-safe dish.
- To crisp up the skin, place the chicken in the oven broiler on high for about five minutes before serving. I like to season with a little extra pepper before putting it in the oven. Garnish with a few sprigs of fresh herbs if desired.
Notes
Nutrition
Frequently Asked Questions
If you don’t see your question here, please leave it in the comment section below!
Can I cook a frozen chicken in my Instant Pot?
Theoretically, yes, you can safely cook a frozen chicken in your Instant Pot. However, I’ve tried it and sometimes it worked and sometimes I ended up with a chicken that was cooked on the outside and raw on the inside. If I ever find a method that consistently delivers good results I’ll update this article.
How do I make this recipe in a slow cooker?
You can find my instructions for making a whole chicken in a slow cooker here.
More Recipes To Try
Instant Pot Coconut Yogurt – This creamy, thick dairy-free yogurt is an easy way to get extra probiotics into your family’s diet, and you probably have everything you need to make it right now. Unlike some methods, you don’t need a thermometer or a lot of hands-on time.
Instant Pot Chicken Soup – This recipe from Dr. Karen Lee’s Instant Pot cookbook is so flavorful and easy!


It’s 15 minutes from when you set the timer. It includes the time needed to reach pressure. 🙂
My cooker takes 10-15 minutes just to reach pressure. So I should only let it cook 5-10 after that?
I know, right? Cuz when you set timer it does not start counting down until AFTER it has gained pressure. So the answer of “15 min from when u set timer” does not make sense to me either. All these recipes irk me like that… They say 25 min to cook a roast, but NONE of the recipes add on realistic time, allowing for the additional 10 min here and there for the pressure to build, – and release, for that matter!
Yes, cook for 20 then depressurize then cook for 15. I have started with breast side down and breast side up – doesn’t seem to make a difference either way. I do let it rest sometimes while I finish up side dishes, but not always. 🙂
I had to add a splash of water as the float valve wouldn’t pop up. Only a tiny amount is needed though, and I suspect the reason it didn’t work was because I had a very small chicken which didn’t produce enough juices…
Did you flip the chicken over any for your cooking? I’m making this today! Thanks
No need to turn chicken over. I cooked it whole time w/breast side up & it was great & fully cooked!
Hi Cathy, as noted in the post the recipe has been update to an easier method that doesn’t require flipping. 😉
Where is the updated recipe…any other changes or just that you don’t flip the bird over?
Hi Theodora, the recipe in the post is the updated version 🙂
I put in 3/4 cup of water. Will add the to chicken cacciatorre rice.
Going to make 2 meals jambalya and chicken marsella. Have italian seasoning on half and cajon seasoning, hot paprika, himalyan salt and cayenne pepper on the other half.
Did you preheat the pot and then the oil? I had this problem the first couple times I tried frying bacon and sauteing chicken in the IP. You need to preheat the pot then add the oil and wait until the pot reads HOT, before you put the meat in. Then it’s important to not move the meat until it has released.
I used 1/2 cup chicken broth and 3/4 cup water. Then when chicken was done and out of pot I turned pot onto sauté added some flour whisked brought to boil and made great gravy.
Must the chicken be thawed first?
I have my chicken on Sauté is the lid supposed to be on ? And it’s seems it’s isn’t sauté any more??
Juanita-
When sautéing you do not put the lid on.
It doesn’t say anywhere in original recipe that you have to cook it twice. I’m confused.
The recipe was changed and does not require turning any longer
Recipe clearly states add 1/5 cup water
So you don’t add any water?
Right. In most cases you will, but chicken has a higher water content than most meats and, in this case, that is sufficient.
Would this work with 4 lbs. of whole chicken legs (drumsticks with thighs attached)? Your chicken looks so good! Thank you for posting this recipe.
I didn’t add water and my InstantPot overheated. I had to turn the thing off and add more than a splash of water…
Mine too. It was a fresh, 6 pound chicken. My IP did the Burn notice on the screen. I added about 3/4 cup more of water.
I had put in a half a cup of water in the beginning. But my chicken must be pretty fatty and the fat got down in there in a boiled off the water
So I added a cup of water and we started the process but instead of 18 minutes I am doing 10 minutes
Be careful with pasta sauce. I tried to make homemade sauce and it flashed burn. I had to go back to sauté.
Could you just cook it 35 to 40 minutes without flipping it over or depressurizing have you tried this? What happened if you did?
I modified this recipe from one I found on the official Instant Pot site (http://instantpot.com/salt-baked-chicken-no-water-added/), which recommended flipping. I haven’t tried not flipping it, but I think I will just to see what happens. Will report back with the results. 🙂
I modified this recipe from one I found on the official Instant Pot site (http://instantpot.com/salt-baked-chicken-no-water-added/), which recommended flipping. I haven’t tried not flipping it, but I think I will just to see what happens. Will report back with the results. 🙂
The skin is not soggy like it is when cooked in a slow cooker, but not quite as crisp as it would be if baked in the oven. I consider it a good compromise when time is an important factor 🙂
You can make your skin crispy by putting it in the oven under broil for about 5 minutes..
I have the 7 in 1 and mine takes a good 10-15 to come to pressure before the timer actually starts counting down. So if I set for 20, it takes closer to 35. Am I doing something wrong?
Mine also takes 10-15 min to come to pressure. The first time I was surprised by this amount of time
If you are sauteing first, it’s already hot and doesn’t seem to take as long to come to pressure.
how easy is it to clean. i have troubles with weight and such.for cleaning things.
I just got mine for Christmas and it seems easy to clean. The inner stainless steel pot is the only piece along with the lid you really have to wash and that is light weight and easy to remove, the inner pot can also be placed in the dishwasher but I haven’t done that. The outer cooker body is heavier but is easy to wipe clean with a damp cloth.
Someone on the AIP IP Facebook group posted a video how to take it apart and clean it. Lots of small parts to clean. She called IP and asked. The video may be on YouTube. We clean our inner pot with baking soda and vinegar and it looks brand new.
I have the same question as Ashley. 🙂
Willa, it is not a very heavy pot. I usually wash it by hand because it is big, but it can go in the dishwasher.
I would love to see more Instant Pot recipes! I just got mine when it was on sale before Christmas, and I’m excited about a big steel pot for rice (instead of aluminum), and yogurt (trying that out tonight). But a lot of the special settings I’m not sure how to use – I think Rice is only for white rice, and I’m not sure whether to use the Beans setting. It seems like most of the recipes in their booklet use the Manual mode. I LOVE the capability to saute and then slow cook in the same pot – fewer dirty dishes! But often I need a larger slow cooker capacity because I make extra to freeze.
Did anyone else notice that the instructions advise against cooking oatmeal because of foaming, but then there is a recipe for oatmeal?
I tried yogurt in mine for the first time yesterday and was so pleased with the simplicity and results! Hope yours comes out to your liking!
Yes, the book does advise against cooking things like noodles, oatmeal, etc. but it CAN be done – the trick is to use the natural pressure release (or at least a 10 minute NPR) and not just open the pressure release immediately. The advice against cooking those types of things are more of a “cover-your-bases” disclaimer for the company. If you do a quick pressure release, those types of foods are more likely to spew out and gunk up the parts making the tool compromised for future cooking if not well cleaned.
There is a great wealth of recipes and community on Facebook if you search for Instant Pot Pressure Cooker Meals, Instant Pot Community, Instant Pot Vegan Recipes, Instant Pot AIP, etc. The word is spreading! 🙂
About cooking oatmeal: There may be a difference between cooking steel oats versus regular oatmeal. I noticed the discrepancy too and had to wonder.
I have had no problems using steel cut oats. Used a recipe I saw online – 1 cup oats, 3 cups water. I also added frozen cranberries, 1/2 apple cut up, and a little coconut sugar, pinch of salt. It was very good.
What material is the lid made of? I hope it’s not aluminum…
I have the 7-in-1 Instant Pot. The lid is stainless inside with a silicone seal. Outside shows some stainless surrounded with sturdy black plastic.
Mine takes a long time to come up to temp after closing the lid, at least 10-15 minutes. So I’m curious how much time this takes from start to finish?
Also what are you using to turn the chicken over? I have a pair of tongs, but it still feels awkward.
On super busy days, toss in some cut carrots, potatoes, and onions (seasoned, of course) in the bottom when you flip the chicken. Ends up a delicious stew!
I just got an InstaPot over the holidays and can’t wait to try on this! Thanks for post!
I’m attempting this right now. But when I try to brown things in the instant pot the skin just sticks to the bottom. Is there a way to make this not happen in the future? I must be doing something wrong.
Make sure your pot is hot first before you add food. It will say hot on the display.
Pot must be hot. Chicken should be padded dry with paper towel. When placing chicken on hot oiled surface, move it around immediately to avoid sticking on contact, then move it around in circles some more by jiggling the IP a bit. At this point, the bird should slide around freely as the oil spreads all over the base again. Once you’re done with browning the skin, place your chicken on the trivet, and always add at least 1C of water or broth under the trivet. This will keep the center of the pot base from drying up and burning at the center. (The bottom of the pot is NOT flat. It has a protuding center, so anything less than 3/4C liquid will leave the protuding center exposed and susceptible to receive drippings that will burn that dry area.) Remember that a regular chicken yields more water than the bio kind as it is usually injected with water to increase weight and rip you off as much as they can.
TIP: Aside from the oil used for sautéing, I suggest you pour 1tsp of oil in one of your hands and rub it all over the chicken, including around the wings and legs. When placing the chicken in the hot oil for sautéing, hold it by the legs and start it on its neck, then drop it slowly on its back (breast upwards). Should any sticking still occur, the breasts which will be served upwards will be intact. I hope this makes sense. 🙂
Great tip Andre Id- thanks!
Excellent tips!
Thank you!!!
Just tried this and lost all the skin on the breast and legs to sticking on the bottom of the pan. Maneuvering the chicken after putting it in has been a bit difficult as well. Maybe my chicken in slightly big for the turning. It looks nothing like the beauty in this picture, but hopefully will taste great!
I think that happens when the surface is not full temperature since the same thing happens when to my on the frying pan. I make sure the oil is full hot temperature and lower slowly and it works most of the time thought I would like to hear some other tips on preventing sticking.
I have tried all the suggestions and still lost the skin through sticking. I think someone is trying to tell me that we should not be eating the skin anyway.
Would you mind sharing your ratios and instructions for broth in the instant pot, following the whole chicken recipe above? Would love to get it all done in one shot! Thank you!
I stuffed the skin with garlic whole cloves, twigs rosemary and thyme, I put in center half lemon n few cherry tomatoes so was all kept sealed wile browning, I flipped it while sauting, put a whole onion two halves two carrots n saute with chicken, added in 4 sweet potatoes few more cherry tomatoes, 3 coushette halfed, cooked 35 mins high pressure, removed chicken. Sweet potatoes coushette, then I added tiny bit balsamic vinegar left skins off sweet potato n any cloves garlic left keep warm and blended in pot to thick gravy, I added pepper corns while saute n squeeze other half lemon as tuninmg, it turned out even more tasty than doing this way in self basting tin, I leave salt till I’ve took baby 10 months out n serve sweet potato coushette roast chicken n a tasty nutritional sauce gravy, u choice if want saute gravy with red wine or redcurrant jelly, but with pot I didn’t even need bisto, was poured into jug, I added bag of new potatoes oilve oil sautéed till nice brown seasoned to u taste rosemary garlic, n put on 15 manual high pressure just to fill rest kids and also four carrots in large cut lumps, I had a full roast dinner for baby n gravy sweet potato, couchete ready with gravy in 40 mins after 5_10 sauting, the baby was fed n other 3 and myself had carrots, sweet potato, zucchini, roast chicken, salted gravy n pored, THRY loved it, I thank you. I never depressure n flipped I just done extra sauting, turning whole chicken carrots onions while everything stuffed n in skin stayed there but flavour was beautiful present though out THANKYOU for head start, I bought a rib eye roast on bone 2 kg, can tell me how I’d cook to have it lovely browned out side n medium rare inside x thought same idea, carrot onion tomatoe saute with meat till browned n sealed but what time fir beef rib eye on bone roast beef, I would cut garlic n rosemary into fat n bury in meat, do I need liquid for beef? Easter time treat
Monica Burleigh: Huuuuuh? That’s some word salad. I can almost can make sense out of it. Sounds like you are a good and creative cook, though.
Toes, that’s exactly what I was thinking. I stopped reading about 1/4 way through. I totally get that younger people don’t use punctuation but it really is necessary and, unfortunately, a lost ‘art’.
I think there may be a language barrier here.
She probably texted the whole thing on her phone with her thumbs!
Yes, Puncuation people, pleeease! And Thank you!
Yes!
Agreed.
Erm, this was definitely not written by a young person! It’s not in American English – I’m not sure if it’s British, Aus/NZ, or somewhere else. In my experience, the legibility of text-based communication goes down as the age of the writer goes up. I’m not sure why! Preteens or young teenagers also tend to be a bit hard to decipher, but that’s been the case since humans started talking. 😉
? Dying! ?
What’s a coushette?
I think it might be courgette, aka zucchini.
Ah, that’s disappointing. I am bought it was a sweet potato croquettes magically made in an instant pot. I still believe that’s what she made! All the while with a babe and 3 young ones. I see her in a village in France.
Hi,
Your added veg and spices seems really good. May I know howlong did you cook?
I’m exhausted reading your comment 🤪
I have an 8 lb chicken….is there a recommended time addition for more weight? ThankS!
I find that a whole chicken does well in the IP when it is cooked for 6 minutes per pound. For example, a 5 pound bird should be cooked for 30 minutes.
Yes, I saw a recommendation for 6 min. per pound, plus 2 min. elsewhere, so after sauteing in the Instant Pot, I cooked my 5.3 lb. chicken for 32 + 2 = 34 min. (poultry setting, high pressure) without flipping (did add 1 c. water and used the rack). Breast was 190 degrees and chicken was hard to remove due to falling apart, so I will nix the extra two minutes for sure and maybe reduce the water to 1/2 c. next time. I had a little more than 4 c. of broth in the bottom when done. This was an organic whole chicken from Costco. From reading other comments, it sounds like some birds (factory processed?) might have more water, vs. one bought say, from your local farmer. Just guessing.
I got an instant pot from my mother in law for Christmas, and didn’t really know what to do with it at first. Which is hilarious right? Because you can do EVERYTHING with it! My favorites are cooking beans, and steaming vegetables that usually take a long time to cook like yams and beets. We just started raising chickens this spring but it is way too hot to use the oven. I will be trying this out tonight!
Hello! Can you do this recipe with a frozen chicken?? Thank you!
I would like to know this too.
Is your chicken thawed or from frozen?
Does the chicken tear when removing from the IP?
Hi Heather,
Love your site! 😀
We’re definitely serious Potheads here, addicted to our Instant Pots!
Ha! We named ours the Jack-Pot, after my hubs.
Cooking the whole chicken in the pot is one of our go-to meals. Just love how easy it is.
Have a wonderful weekend! 🙂
Amy
I made this, but stuffed the centre of the chicken with chopped Apple, onion & garlic
Browned off as you said, but once it had finished cooking and was resting cooked the veg in the instant pot.
I then got out my cooker blow torch and crisped up the skin.
The best and most moist chicken I have cooked in a long time.
Thank you!!!
I’ve had the exact same issue cooking a whole chicken in my IP. It’s either rubber or dry. I’m wondering if cooking it with more broth would help and then following the 6 min/lb rule.
Hello! Delicious. When we’ve done this, it yields a lot of what I think is gelatin at the bottom of the pot. Is this safe to save and use as bone broth or should we discard?
I would use it! 🙂
NO it does not end up with crispy skin remember is pressure cooker .. but it comes good i did it last nigh and w VERY DELICIOUS I used other seasonings
Can I cook a 6 lb. chicken in marinara sauce? I want to cook it today in my pressure cooker.
I take mine out and put under broiler till really brown one top!
do you have to use coconut oil
I am just now trying this for the first time. But my chicken stuck so badly on the first (saute) step that I couldn’t turn it over – and it looked like I will lose all that lovely breast skin when I go to the next step (after the 20 minutes) to turn it over. I did it exactly as you directed. And my pot is new but has been used for 3 batches of bone broth so far. Any idea why mine would have stuck so badly?
When you set to saute did you wait until the IP said “HOT” before putting the chicken in? That’s my first thought in terms of troubleshooting . . .
I’m new to instant pot cooking also, having only just been bought one as a Christmas present from my son. Mine does the same, setting itself to 30 minutes on the Poultry setting, but you can adjust down to 20 by pressing the minus button as soon as the 30 minutes appear. Hope this helps.
OK I am new the instant pot and AIP diet. So say I just cooked the whole chicken and I want to take the meat off to eat/use and make broth out of the bones right away. Do I just throw the bones back in with the liquid from the cooked chicken or do I dump that out and start all over with the bone broth recipe??
Hi, I have been using Instapot for bone broths for about a year. When I sautéed a whole chicken, I had the same results as Amy, losing all the breast skin. Any suggestions? Thanks!
Hi, first time trying this recipe in my Instant Pot. After depressurizing and setting for the last 15 minutes, do you leave the valve on venting, or turn it back to sealing? I’m leaving on venting since I wasn’t sure… lol We’ll see what happens, but already it looked amazing when I opened and turned it over. Thanks!
Hi! Thank you for all the recipes and suggestions for preparing healthy meals. I love your website! I just purchased an Instant Pot IP-LUX60 and I saw you have a few recipes for it. Will you be adding more in the near future? Also, do you plan on perhaps setting up a video cam when preparing one of the recipes with the Instant Pot? I’m a beginner and I just want to be able to visualize the steps, especially when pressing the option buttons. Thank you!
I am making this tonight. I will be using my kitchen torch to crisp up the skin. I bought the kitchen torch to make creme brulee but comes in handy for crisping.
Good idea!!
I Don’t have the Instant Pot, it’s a Faberware electronic pressure cooker. Can anyone tell me what high pressure equates to? I prefer to avoid any possibility of food poisoning, but want to try this recipe. Thanks!
Maybe look up a user manual, I would think the pressures are listed in there.
I don’t see anywhere in this recipe about cooking under pressure, depressurizing, turning over and again cooking under pressure for an additional time. So the questions and comments regarding that are confusing to me. I’d that is part of the instructions, then why is it not in the recipe instructions?
Its an up[date top the original recipe, as stated.
Help..where does it say to presserize twice?? I see brown…then add water and cook for 24 min
Hey John, I updated the recipe with a more simple method that only calls for pressurizing once. That’s all you need to do. 🙂
Does an Instant pot/pressure cooker zap the nutrients out of the food? Just confused… Lol! 🙂
Thanks!
Not really, but that is a loaded question. All cooking zaps nutrients out of the food.
Oops! I meant to update that section when I updated the recipe. A few readers reported that their chicken turned out dry, which is probably because the water content can vary. I updated the recipe to include a little water so that it would turn out juicy every time.
Hi all, maybe you can help this IP newbie. I tried this recipe (end result was good I guess), but it was definitely not 50 minutes – beginning to end was close to 90. I could bake a chicken in the oven in less time! I could definitely cook it in my stovetop pressure cooker faster. It seems to take forever for the IP to heat up to sauté (10-15 minutes) then a looooong time to brown anything (10-20 minutes) and usually meat just turns gray, then at least 15 or 20 minutes for the pot to get up to pressure. Natural release takes 10 minutes or more. What am I doing wrong here? This takes more time than conventional cooking and more babysitting!
Yep, the nicely browned chicken in the picture is not the result I got. Same as you. Once pressured the chicken was very done.
Nice
Can I use this recipe for turkey as well?
What if I hit poultry, adjusted the time to 33 min. for my 5.5 lb. chicken, but forgot to adjust the pressure to high?
About how long does it take to do the natural release?
I’d like to have this ready to eat when I get home, but don’t have an hour right before dinner and didn’t want to start after work. Has anyone left the chicken sitting in the instant pot for an hour or so after it has finished cooking? Does it become very dry?
Slower. It brings it to temp sloooooower when it is more fool of food and it it cooking that whole time. Poorly edited on my part.
I do not recommend using coconut oil as the recipe calls for. It gives the broth an awful coconut taste; not what people usually want their chicken to taste like… I’m not sure why it was used. I recommend extra virgin olive oil instead.
That’s really too bad, Katie. I did a 4-pound chicken last night. I just dropped it on the trivet inside the cooker, covered the top side with granulated garlic and black pepper, and a bit of salt. Add a cup of water (or broth would be good) to the bottom, made sure the lid was on properly and the steam release was in the right place, turned it on high pressure for 35 minutes and let it go. We had a moist, delicious, chicken. No, it wasn’t crispy, but otherwise excellent. The broth at the bottom was dark brown and good for gravy, or a broth to make soup today. I’m happy. This is how I do chickens, beef roasts, pork roasts, turkey parts, etc. I encourage you to try again. Next time, it should be excellent, and once you get the hang of it, you’ll “never go back”. Google “5-pound chicken in instant pot” and choose something that works for you. This recipe is a bit confusing because of the edit, also, like many recipes, is overloaded with detailed instructions. Just drop it in, season, add a bit of moisture and go is all you need, really. You should have a moist, flavourful meat. Then next time you can make adjustments. AND congratulations for using properly spelled words, decent punctuation and proper sentences (see the thread!! )
hi – my instant pot does NOT have the “poultry” setting. What do i do?
Thanks
Can I cook veggies with the chicken?
Why is there a word MORE just above the word HIGH in my instant pot Duo Plus? I keep pressing the pressure level trying to make it disappear but it doesn’t seem to want to go to the High pressure. I just put a whole chicken in and want it on High. Also, can I reduce the number of minutes of cooking time even though the timer has started?
Could this be cooked in a Ninja Foodie (6 qt) on the pressure cooker setting? I think I could even do the broiling part after the pressure cooking in the Ninja Foodie also.
I will be following your InstaPot directions with the pressure cooker function of my Ninja Foodi but I want to know; how long does it take to thaw a frozen organic whole chicken weighing 3.5 to 4 lbs?
Really looking forward to trying your recipe here!
Hi
I would like to rub olive oil on the chicken before pressure cooking. Your “My Favorite Easy Rotisserie Chicken Seasoning” looks good should I add this to the olive oil before I rub olive oil on the chicken or on the chicken after I rub olive oil on the chicken?
Thanks